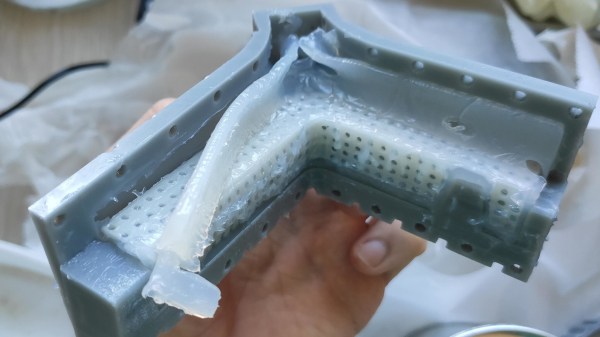
Casting parts in silicone is great, and 3D printing in resin is fantastic for making clean shapes, so it’s natural for an enterprising hacker to want to put the two together: 3D print the mold, pour in the silicone, receive parts! But silicone’s curing process can be inhibited by impurities. What’s cure inhibition? It’s a gross mess as shown in the image above, that’s what it is. Sadly, SLA-printed resin molds are notorious for causing exactly that. What’s a hacker to do?
The Garmin HUD+ was a small Bluetooth device intended for the dashboard of a car, meant to be used as a GPS heads-up display for data from Garmin smartphone apps. It used a bright VFD (vacuum fluorescent display) which was viewed through a clear reflector, and displayed GPS information and directions. It was discontinued in 2015, but [Doz] was fond of his and used it happily until a phone upgrade meant it no longer worked. Was it destined for a landfill? Not if he had anything to say about it!
The first thing [Doz] tried was using an alternate Android app, but since it also didn’t work, it was time to sit back and reflect on the scope of the issue. In [Doz]’s case, he really only wanted some basic meaningful data displayed, and decided he could do away with the phone altogether if he had the right hardware. Continue reading “Garmin HUD Got Discontinued, But Not Trashed”→
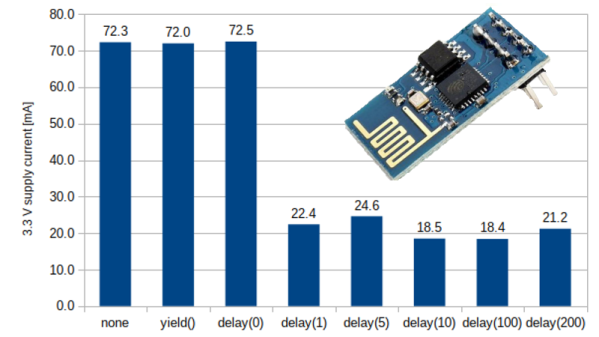
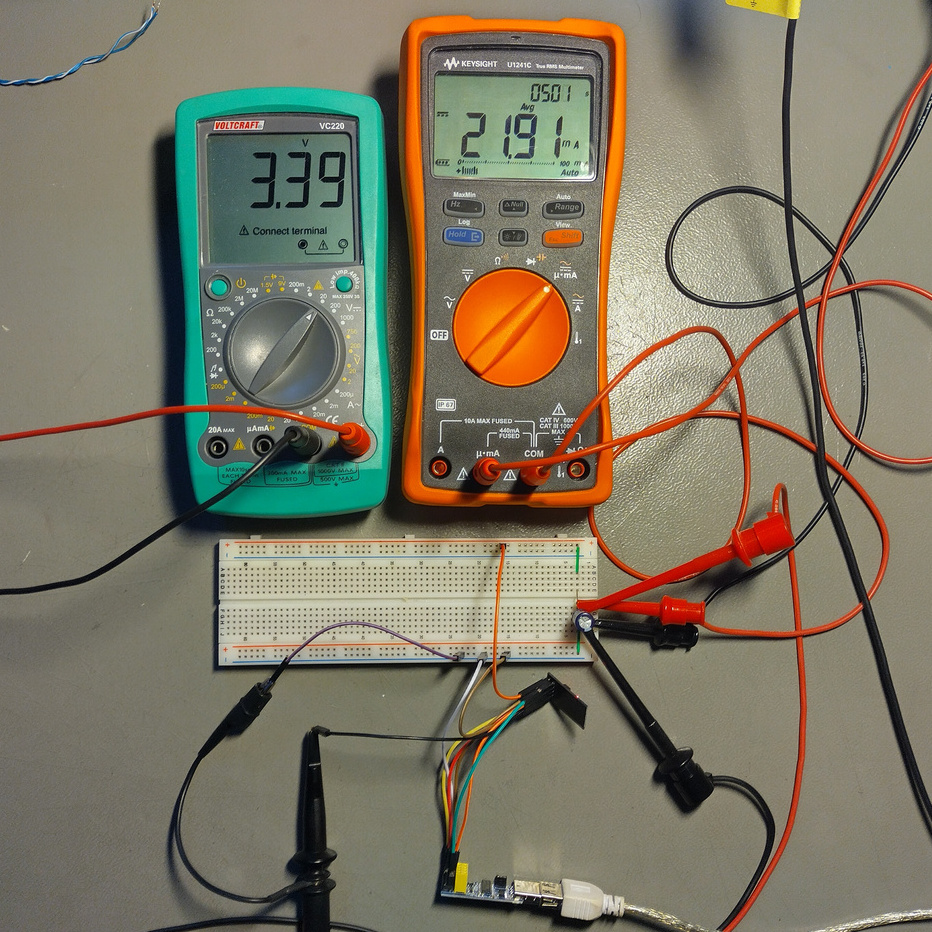
[Tomaž] uses the “hello world” example from ESP8266WebServer to explain. In it, the main loop essentially consists of calling server.handleClient() forever. That process checks for incoming HTTP connections, handles them, sends responses, exits — and then does it all over again. A simple web server like this one spends most of its time waiting.
A far more efficient way to handle things would be to launch server.handleClient() only when an incoming network connection calls for it, and put the hardware to sleep whenever that is not happening. However, that level of control just isn’t possible in the context of the Arduino’s ESP8266WebServer library.
So what’s to be done? The next best thing turns out to be a simple delay(1) statement right after each server.handleClient() call in the main loop.
Why does this work? Adding delay(1) actually causes the CPU to spend the vast majority of its time in that one millisecond loop. And counting microseconds turns out to be a far less demanding task, power-wise, than checking for incoming network requests about a hundred thousand times per second. In [Tomaž]’s tests, that one millisecond delay reduced idle power consumption at 3.3 V from roughly 230 mW to around 70 mW — about 60% — while only delaying the web server’s response times by 6-8 milliseconds.
[Jay Alammar] has put up an illustrated guide to how Stable Diffusion works, and the principles in it are perfectly applicable to understanding how similar systems like OpenAI’s Dall-E or Google’s Imagen work under the hood as well. These systems are probably best known for their amazing ability to turn text prompts (e.g. “paradise cosmic beach”) into a matching image. Sometimes. Well, usually, anyway.
‘System’ is an apt term, because Stable Diffusion (and similar systems) are actually made up of many separate components working together to make the magic happen. [Jay]’s illustrated guide really shines here, because it starts at a very high level with only three components (each with their own neural network) and drills down as needed to explain what’s going on at a deeper level, and how it fits into the whole.
Spot any similar shapes and contours between the image and the noise that preceded it? That’s because the image is a result of removing noise from a random visual mess, not building it up from scratch like a human artist would do.
It may surprise some to discover that the image creation part doesn’t work the way a human does. That is to say, it doesn’t begin with a blank canvas and build an image bit by bit from the ground up. It begins with a seed: a bunch of random noise. Noise gets subtracted in a series of steps that leave the result looking less like noise and more like an aesthetically pleasing and (ideally) coherent image. Combine that with the ability to guide noise removal in a way that favors conforming to a text prompt, and one has the bones of a text-to-image generator. There’s a lot more to it of course, and [Jay] goes into considerable detail for those who are interested.
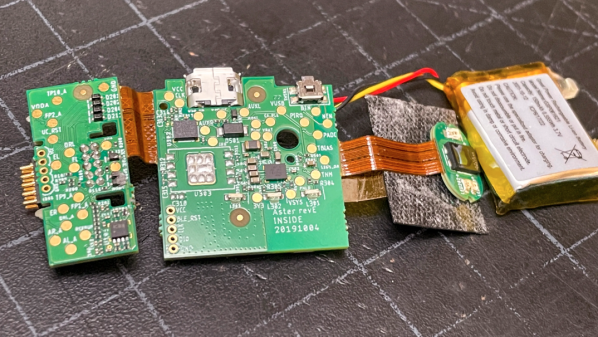
Muse makes a variety of wearable devices aimed at measuring brain and body activity, and [Becky Stern] did a detailed teardown of the Muse S model, revealing what goes on inside the device.
The Muse S is a soft, sleep-friendly biofeedback wearable mounted on silver-plated fabric. Not only does [Becky] tear it down, but she provides loads of magnified images and even has it CT scanned. The headband has conductive fabric embedded into it, and the core of the device is stuffed with three separate PCBs that get pretty thoroughly scrutinized.
While the Muse S is sold mainly as a meditation aid and works with a companion app, there is, fortunately, no need to go digging around with a screwdriver and soldering iron to integrate it into other projects. The Muse S is supported by the Brainflow project which opens it up to different applications. Brainflow is a library intended to obtain, parse, and analyze EEG, EMG, ECG, and other kinds of data from biosensors.
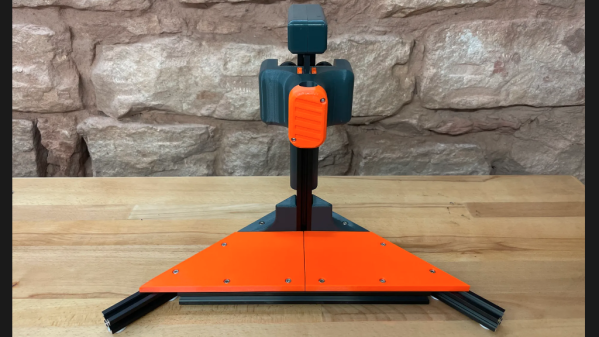
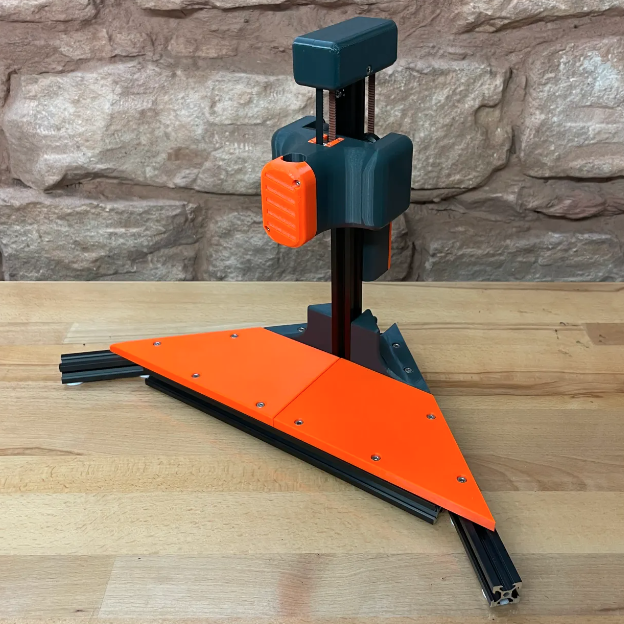
Heat-set inserts are a great way to embed mechanically-strong, threaded parts into a 3D print. For installation, all that is required is an economical soldering iron; something most of us already have.
The carriage and counterweight use a v-wheel gantry, GT2 belt, and other common hardware.
That’s fine for a handful of occasional inserts, but when a large number need to be inserted reliably and cleanly, something a little more refined is called for. That’s where [virchow]’s threaded insert press design comes in. It adds 3D-printed parts to an aluminum extrusion frame to create a press that smoothly lowers a soldering iron directly up and down, with minimal effort by the user.
The holder for the soldering iron is mounted to a small v-wheel gantry that rides along the vertical extrusion. The gantry features a counterweight to take care of resetting the position of the iron. [Virchow] admits that the design could be considered unnecessarily complicated (hence the “UC” in the name) but on the other hand, there’s nothing like doing a hundred or so inserts to make one appreciate every bit of comfort and stability.
Heat-set inserts aren’t difficult to use, but a little technique goes a long way. Spend a few minutes reading Joshua Vasquez’s guide on the optimal way to use them in 3D-printed parts to make sure yours not only go in straight but end up looking great as well.
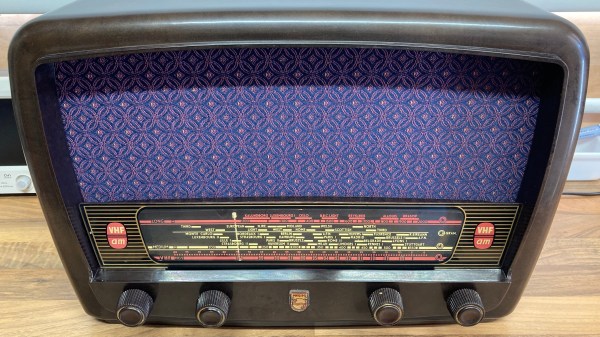
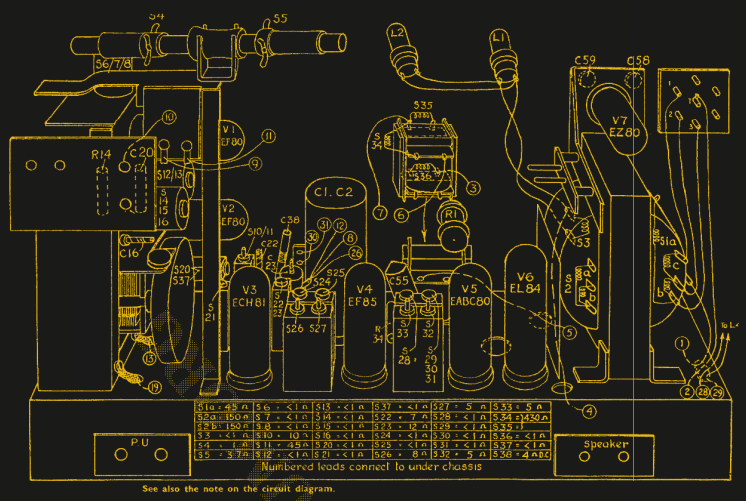
Ever wanted a good, good look at the insides of a 1950s radio, along with fantastic commentary on the internals and the purpose of various components? Then don’t miss [Adam Wilson]’s repair and restoration of a 1956 Philips 353A, a task made easier by a digitized copy of the service manual. [Adam] provides loads of great pictures, as well as tips on what it takes to bring vintage electronics back to life. What’s not to like?
Vintage electronics like this are often chock-full of components that deteriorate with age, so one doesn’t simply apply power to see if it still works as a first step. These devices need to be inspected and serviced before power is ever applied. Even then, powerup should be done with a current-controlled source that can be shut down if anything seems amiss.
Thank goodness for high quality, digitized service manuals.
Devices like these largely predate printed circuit boards, so one can expect to see plenty of point-to-point soldering. Vacuum tubes did much of the hard work, so they are present instead of integrated circuits and transistors. Capacitors in the microfarads were much larger compared to their modern equivalents, and paper/wax capacitors (literally made from rolled-up paper covered in wax) handled capacitances in the nanofarad range instead of the little ceramic disk caps of today.
One thing that helped immensely is the previously-mentioned Philips 353A service manual, which includes not only a chassis and component layout, but even has servicing procedures such as cord replacement for the tuning dial. Back then, a tuning dial was an electromechanical assembly that used a winding of cord to rotate the tuning capacitor, and replacing it was a fiddly process. If only all hardware was documented so well!