Reverse Engineering An Oil Burner Comms Board, With A Few Lucky Breaks

Here’s a question for you: How do you reverse engineer a circuit when you don’t even have it in hand? It’s an interesting problem, and it adds a level of difficulty to the already iffy proposition that reverse engineering generally presents. And yet, not only did [themole] find a way to replicate a comms board for his oil burner, he extended and enhanced the circuit for integration into his home automation network.

By way of backstory, [themole] has a wonky Buderus oil burner, which occasionally goes into safety mode and shuts down. With one too many cold showers as a result, he looked for ways to communicate with the burner controller. Luckily, Buderus sells just the thing — a serial port module that plugs into a spare slot in the controller. Unluckily, the board costs a bundle, and that’s even if you can find it. So armed with nothing but photos of the front and back of the board, the finding of which was a true stroke of luck, he set about figuring out the circuit.

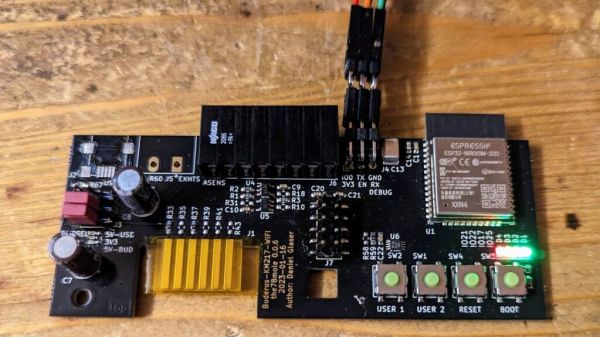
With only a dozen components or so and a couple of connectors, the OEM board gave up its secrets pretty easily; it’s really just a level shifter to make the boiler talk RS-232. But that’s a little passé these days, and [the78mole] was more interested in a WiFi connection. So his version of the card includes an ESP32 module, which handles wireless duties as well as the logic needed to talk to the burner using the Buderus proprietary protocol. The module plugs right into the burner controller and connects it to ESPHome, so no more cold showers for [themole].

We thought this one was pretty cool, especially the way [themole] used the online photos of the board to not only trace the circuit but to get accurate — mostly — measurements of the board using an online measuring tool. That’s a tip we’ll keep in our back pocket.

Thanks to [Jieffe] for the tip.

Low-Frequency DC Block Lets You Measure Ripple Better

We all know how to block the DC offset of an AC signal — that just requires putting a capacitor in series, right? But what if the AC signal doesn’t alternate very often? In that case, things get a little more complicated.

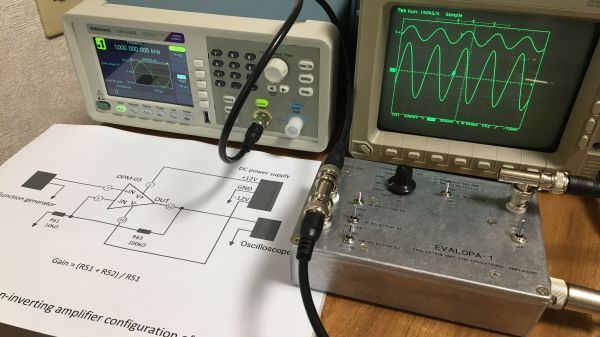
Or at least that’s what [Limpkin] discovered, which led him to design this low-frequency DC block. Having found that commercially available DC blocks typically have a cutoff frequency of 100 kHz, which is far too high to measure power rail ripple in his low-noise amplifier, he hit the books in search of an appropriate design. What he came up with is a  non-polarized capacitor in series followed by a pair of PIN diodes shunted to ground. The diodes are in opposite polarities and serve to limit how much voltage passes out of the filter. The filter was designed for a cutoff frequency of 6.37 Hz, and [Limpkin]’s testing showed a 3-dB cutoff of 6.31 Hz — not bad. After some torture testing to make sure it wouldn’t blow up, he used it to measure the ripple on a bench power supply.

It’s a neat little circuit that ended up being a good learning experience, both for [Limpkin] and for us.

A Look Inside A Vintage Aircraft Altimeter

There’s a strange synchronicity in the projects we see here at Hackaday, where different people come up with strikingly similar stuff at nearly the same time. We’re not sure why this is, but it’s easily observable, with this vintage altimeter teardown and repair by our good friend [CuriousMarc] as the latest example.

The altimeter that [Marc] dissects in the video below was made by Kollsman, which is what prompted us to recall this recent project that turned a jet engine tachometer into a CPU utilization gauge. That instrument was also manufactured by Kollsman, but was electrically driven. [Marc]’s project required an all-mechanical altimeter, so he ordered a couple from eBay.

Unfortunately, thanks to rough handling in transit they arrived in less than working condition, necessitating the look inside. For which we’re thankful, of course, because the guts of these aneroid altimeters are quite impressive. The mechanism is all mechanical, with parts that look like something [Click Spring] would make for a fine timepiece. [Marc]’s inspection revealed the problem: a broken pivot screw keeping the expansion and contraction of the aneroid diaphragms from transmitting force to the gear train that moves the needles. The repair was a little improvisational, with 0.5-mm steel balls used to stand in for the borked piece. It may not be flight ready, but it worked well enough to get the instrument back in action.

We suspect that [Marc] won’t be able to leave well enough alone on this one, so we’ll be on the lookout for a proper repair. In the meantime, he’ll be able to use this altimeter in the test setup he’s building to test a Bendix air data computer from a 1950s-era jet fighter. Continue reading “A Look Inside A Vintage Aircraft Altimeter”

Tiny Orrery Keeps The Planets In Their Places

[Frans] claims to have made the world’s smallest wooden orrery. We won’t take a position on that — such things are best left up to the good folks at Guinness. But given that the whole thing is seriously in danger of being dwarfed by a USB-C connector, we’d say he’s got a pretty good shot at that record.

The key to keeping this planetarium so petite while making it largely out of wood is to eschew the complex gear trains that usually bring the Music of the Spheres to life in such devices. The layered base of the orrery, with pieces cut from a sheet of basswood using a laser cutter, contains a single tiny stepper motor and just two gears. A zodiac disc sits atop the base and is the only driven element in the orrery; every other celestial body moves thanks to a pin set into the zodiac disc. An ESP32 C3 contacts a NASA feed once a day to get the relative positions of the planets and uses the zodiac disk to arrange everything nicely for the day. The video below shows the “Planet Spinner” in action.

We love the look of this project; the burnt edges and lightly smoked surface of the laser-cut wooden parts look fantastic, and the contrast with the brass wires is striking. We’ve seen an orrery or two around here, executed in everything from solid brass to Lego, but this one really tickled our fancy. Continue reading “Tiny Orrery Keeps The Planets In Their Places”

Minimal USB Device Connects With Just A Couple Of Resistors

If you’re like most of us, your basic approach to building something boils down to: “What’s the minimum amount I need to do to get this to work?” It’s not a bad strategy in general, but the minimal build is rarely enough to meet all the requirements, as this extremely minimal but functional USB device illustrates.

Functional, yes, but as [TM] explains, only if you define functional as being recognized by your operating system. The BOM for that job turns out to be really small — a 3.3-volt regulator, its capacitor, and a pair of resistors connected to a DIP switch. The resistors, 1.5k each, are connected to the D+ and D- lines of the USB connector and pull their respective lines up to 3V3 when their switch is closed. If the D- switch is thrown, it indicates a low-speed connection is requested, while D+ requests a speedier connection. Either way, its enough to get the familiar “USB connect” sound in Windows, and to see it listed in Device Manager or dmesg on Linux.

With no microcontroller to return a device descriptor, not much else happens, of course, but it’s still interesting that so little is needed to at least get the host machine to know that something was plugged in. And that alone has some diagnostic value; as [TM] points out, you could use this circuit to test that the physical port on the host at least minimally works.

He runs through a few other potentially useful scenarios, but really, the best use of something like this is to educate yourself on the lowest levels of USB connection negotiation. If you want to dive deeper into USB-C specifically, we suggest you check out [Arya Voronova]’s “All About USB-C” series.

Continue reading “Minimal USB Device Connects With Just A Couple Of Resistors”

Hackaday Links Column Banner

Hackaday Links: May 7, 2023

More fallout for SpaceX this week after their Starship launch attempt, but of the legal kind rather than concrete and rebar. A handful of environmental groups filed the suit, alleging that the launch generated “intense heat, noise, and light that adversely affects surrounding habitat areas and communities, which included designated critical habitat for federally protected species as well as National Wildlife Refuge and State Park lands,” in addition to “scatter[ing] debris and ash over a large area.”

Specifics of this energetic launch aside, we always wondered about the choice of Boca Chica for a launch facility. Yes, it has all the obvious advantages, like a large body of water directly to the east and being at a relatively low latitude. But the whole area is a wildlife sanctuary, and from what we understand there are still people living pretty close to the launch facility. Then again, you could pretty much say the same thing about the Cape Canaveral and Cape Kennedy complex, which probably couldn’t be built today. Amazing how a Space Race will grease the wheels of progress.

Continue reading “Hackaday Links: May 7, 2023”

Laser Triangulation Makes 3D Printer Pressure Advance Tuning Easier

On its face, 3D printing is pretty simple — it’s basically just something to melt plastic while being accurately positioned in three dimensions. But the devil is in the details, and there seems to be an endless number of parameters and considerations that stand between the simplicity of the concept and the reality of getting good-quality prints.

One such parameter that had escaped our attention is “pressure advance,” at least until we ran into [Mike Abbott]’s work on automating pressure advance calibration on the fly. His explanation boils down to this: the pressure in a 3D printer extruder takes time to both build up and release, which results in printing artifacts when the print head slows down and speeds up, such as when the print head needs to make a sharp corner. Pressure advance aims to reduce these artifacts by adjusting filament feed speed before the print head changes speed.

The correct degree of pressure advance is typically determined empirically, but [Mike]’s system, which he calls Rubedo, can do it automatically. Rubedo uses a laser line generator and an extruder-mounted camera (a little like this one) to perform laser triangulation. Rubedo scans across a test print with a bunch of lines printed using different pressure advance values, using OpenCV to look for bulges and thinning caused when the printer changed speed during printing.

The video below gives a lot of detail on Rubedo’s design, some shots of it in action, and a lot of data on how it performs. Kudos to [Mike] for the careful analysis and the great explanation of the problem, and what looks to be a quite workable solution.

Continue reading “Laser Triangulation Makes 3D Printer Pressure Advance Tuning Easier”