Bicycle generator technology has advanced far beyond the bottle dynamos of years past, which as often as not would introduce enough drag when engaged to stall the bike. Granted, it’s not as much of a current draw as a big old incandescent headlight, but this wheel-powered cyclocomputer is a great example of harvesting both power and data from the rotation of a bike’s wheel.
While there are plenty of cyclocomputers available commercially, [Lukas] was looking for some specific features. His main goal was something usable at night, which means a backlit display, ruling out the usually coin-cell power sources. His bike’s hub dynamo offered interesting possibilities — not only does it provide AC power, but its output frequency is proportional to the bike’s speed. This allows him to derive speed, distance, RPM, time-in-motion, and other parameters to display on the 1×8 character LCD display. There’s some clever circuitry needed to condition the output of the hub dynamo, and a 1.5 farad supercapacitor keeps the unit powered for about four days when the bike isn’t in motion.
As for measuring the frequency of the dynamo’s output, [Lukas] simply used a digital input on the MSP430 microcontroller, with a little signal conditioning of course. He also added a barometer chip for altitude data, plus an ambient light sensor to control the LCD backlight. Everything lives in a clever 3D-printed case with a minimalist but thoughtful design that docks and undocks from the bike easily; [Lukas] assures us that a waterproof version of the case is in the works.
We really appreciate the elegance of this design, and the way it uses the data that’s embedded in the power supply. While [Lukas] appears to have used a commercially available generator, we’ve seen other examples of home-brew hub dynamos before — even one that offers regenerative braking.
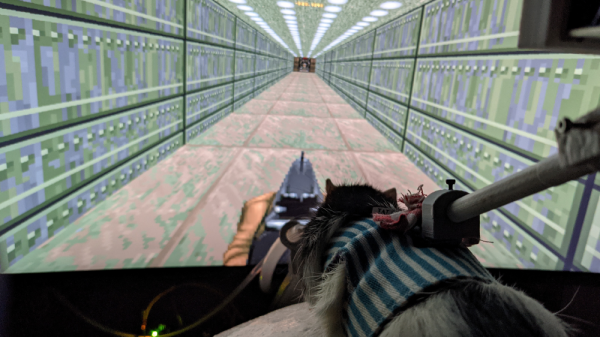
When we run an article with “DOOM” in the title, it’s typically another example of getting the venerable game running on some minimalist platform. This DOOM-based VR rig for rats, though, is less about hacking DOOM, and more about hacking the rats.
What started as a side project for [Viktor Tóth] has evolved into quite a complex apparatus. At the center of the rig is an omnidirectional treadmill comprised of a polystyrene ball about the size of a bowling ball. The ball is free to rotate, with sensors detecting rotation in two axes — it’s basically a big electromechanical mouse upside down. The rat rides at the top of the ball, wearing a harness to keep it from slipping off. A large curved monitor sits right in front of the rat to display the virtual environment, which is a custom DOOM map.
With the VR rig built, [Viktor] worked on automating the training. A treat dispenser provides the proper motivation, while powered drive wheels engage with the ball to nudge the rat if it gets stuck in the virtual world. [Viktor] says he has trained three rats — [Romero], [Carmack], and [Tom] — to walk down a straight hallway using this automated method. As for the meat of the game — shooting monsters — [Viktor] has that covered too, with a sensor that detects when a rat rears up on its hind legs to register a shot.
Total training time to get the rats to the point seen in the video was about six weeks, and [Viktor] reports the whole thing cost him about $2000. That’s a lot of time and money, but the results are pretty interesting. If you’re more interested in minimalist DOOM builds, we understand — check out DOOM on a lightbulb, or a thermostat, or even a GPS.
It’s a pity that more electronics enthusiasts haven’t taken the hobby to its ultimate level: making your own semiconductors. There are plenty of good reasons for that: chief among them is the huge expense involved in obtaining the necessary equipment. But for the sufficiently clever, there are ways around that.
[Zachary Tong] is dipping his toes into the DIY semiconductor world, and further to the goal of keeping costs to a hobbyist scale, is experimenting with laser doping of silicon. Doping is the process of adding impurities to silicon wafers in a controlled manner to alter the electrical properties of the semiconductor. [Zach]’s doping method is a more localized version of the simple thermal diffusion method, which drives a dopant like phosphorus into silicon using high temperatures, but instead of using a tube furnace, he’s using a fiber laser.
The video below shows his two-step process, which first blasts the silicon oxide layer off the wafer before doping with the laser shining through a bath of phosphoric acid. The process is admittedly fussy, and the results were mixed at best. [Zach]’s testing seems to suggest that some doping occurred, and it even looks like he managed to make something reasonably diode-like using the method.
Although the jury is still out on [Zach]’s method, we thought the effort was the important bit here. Granted, not everyone has a fiber laser kicking around to replicate his results, but it’s always good to see progress in the DIY semiconductor field. Here’s hoping [Zach]’s work, along with the stuff that [Sam Zeloof] is doing, kicks off a spate of garage semiconductor fabs.
At the time of this writing, the James Webb Space Telescope was perched upon its ride to space, ready for its much-delayed launch from the ESA spaceport in French Guiana. The $10 billion space observatory suffered one final delay (knocks on wood) when predictions of high winds aloft pushed it back from a Christmas Eve launch to a Christmas Day departure, at 12:20 UTC. Given the exigencies of the day, we doubt we’ll be able to watch the launch live — then again, past experience indicates we’ll still be wrapping presents at 4:20 PST. Either way, here’s hoping that everything comes off without a hitch, and that astronomers get the present they’ve been waiting many, many Christmases for.
In other space news, things are getting really interesting on Mars. The ESA announced that their ExoMars Trace Gas Orbiter has detected signs of water in the Valles Marineris. The satellite found a large area of increased hydrogen concentration in the top meter of Martian soil; the assumption is that the hydrogen comes from water, meaning that as much as 40% of the material in the region scanned may be water. If so, that’s a huge find, as we thought most of Mars’ water was locked in the polar regions. The Mariner Valley stretches more than 4,000 km just below the equator, and so may prove to be an important resource for future explorers.
Meanwhile, in Jezero crater, Perseverance has decided to upstage its rotorcraft sidekick for a change by finding signs of organic molecules on Mars. It’s not the first time organic compounds have been found — Perseverance’s cousin Curiosity found some too, ESA’s Mars Express mission spotted methane from on high, and then there were the equivocal but intriguing results from the Viking missions in the 1970s. But the latest evidence is really great news for the scientists who picked Jezero crater as a likely place to search for signs of past life on Mars. The organics found are not proof of life by any means, as there are many ways to make organic molecules abiotically. But then again, if you’re going to find evidence of life on Mars, you’ve got to start with detecting organics.
Back on Earth, getting your laptop stolen would be bad enough. But what if it got yoinked while it was unlocked? Depending on who you are and what you do with that machine, it could be a death sentence. That’s where BusKill could come in handy. It’s a hardware-software approach to securing a laptop when it — or you — suddenly goes missing. A dongle with a breakaway magnetic lanyard gets plugged into a USB port, and the other end of the lanyard gets attached to your person. If you get separated from your machine, the dongle sends customizable commands to either lock the screen or, for the sufficiently paranoid, nuke the hard drive. The designs are all up on GitHub, so check it out and think about what else this could be useful for.
If you like the look of low-poly models but hate the work involved in making them, our friend and Hack Chat alumnus Andrew Sink came up with a solution: an online 3D low-poly generator. The tool is pretty neat; it uses three.js and runs completely in-browser. All you have to do is upload an STL file and set sliders to get rid of as many triangles as you want. Great stuff, and fun to play with even if you don’t need to decimate your polygons.
And finally, what have you done with your oscilloscope for the last three years? Most of us can’t answer that except in the vaguest of terms, but then there’s DrTune, who took three years’ worth of screencaps from this Rigol DS1054z and strung them together into a 60-second movie. He swears he didn’t purposely sync the video to the soundtrack, which is “Flight of the Bumblebee” by Rimsky-Korsakov, but in some places it’s just perfect. See if you can guess what DrTune has been working on by watching the waveforms fly by. And watch for Easter eggs.
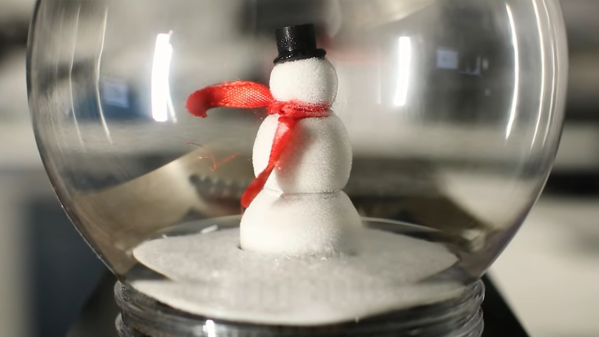
We doubt that few of us ever thought that snow globes contain real snow, but now that we’ve seen a snow globe that makes its own snow, we have to admit the water-filled holiday decorating mainstay looks a little disappointing.
Like a lot of the Christmas decorations [Sean Hodgins] has come up with over the years, this self-frosting snowman is both clever in design and cute in execution. The working end is a piece of aluminum turned down into the classic snowman configuration; the lathe-less could probably do the same thing by sticking some ball bearings together with CA glue. Adorned with 3D-printed accessories, the sculpture sits on a pedestal of Peltier coolers, stacked on top of a big CPU cooler. Flanking the as-yet underdressed snowman is a pair of big power resistors, which serve as heating elements to fill the globe with vapor. [Sean]’s liquid of choice is isopropyl alcohol, and it seems to work very well as the figurine is quickly enrobed with frost.
It’s hard to say when inspiration will strike, or what form it’ll take. But we do know that when you get that itch, it’s a good idea to scratch it, because you might just end up with something like this cool new design for a 3D printer extruder as a result.
Clearly, the world is not screaming out for new extruder designs. In fact, the traditional spring-loaded, toothed drive wheel on a stepper really does the job of feeding filament into a printer’s hot end just fine, all things considered. But [Jón Schone], aka Proper Printing on YouTube, got the idea for his belt-drive extruder from seeing how filament manufacturers handle their products. His design is a scaled-down version of that, and uses a pair of very small timing belts that run on closely spaced gears. The gears synchronize the movement of the two belts, with the filament riding in the very narrow space between the belts. It’s a simple design, with the elasticity of the belt material eliminating the need for spring pre-loading of the drive gears.
Simple in design, but not the easiest execution. The video below tells [Jón]’s tale of printing woe, from using a viscous specialty SLA resin that was really intended for a temperature-controlled printer, to build tank damage. The completed extruder was also a bit too big to mount directly on the test printer, so that took some finagling too. But at the end of the day, the idea works, and it looks pretty cool doing it.
As for potential advantages of the new design, we suppose that remains to be seen. It does seem like it would eliminate drive gear eccentricity, which we’ve seen cause print quality issues before.
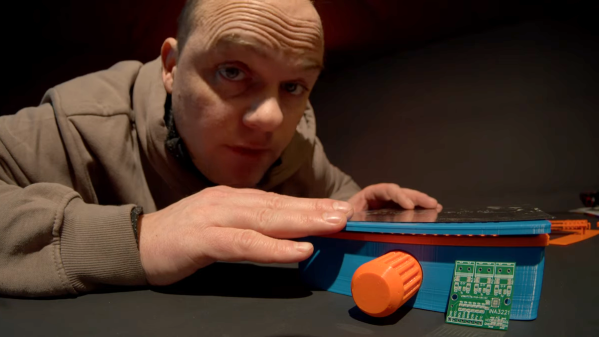
While using a stencil should make solder paste application onto PCBs a simple affair, there are a number of “gotchas” that make it more art than science. Luckily, there are tools you can build, like this 3D-printed vacuum-assist stencil jig, that take a little of the finesse out of the process.
For those who haven’t had the pleasure, solder paste stencils are often used to make the job of applying just the right amount of solder paste onto the pads of a PCB, and only on the pads. The problem is that once the solder paste has been squeegeed through the holes in the stencil, it’s not easy to remove the stencil without smearing. [Marius Heier]’s stencil box is essentially a chamber that attaches to a shop vac, along with a two-piece perforated work surface. The center part of the top platform is fixed, while the outer section moves up and down on 3D-printed springs.
In use, the PCB is placed on the center fixed platform, while the stencil sits atop it. Suction pulls the stencil firmly down onto the PCB and holds it there while the solder paste is applied. Releasing the suction causes the outer section of the platform to spring up vertically, resulting in nice, neat solder-covered pads. [Marius] demonstrates the box in the video below, and shows a number of adapters that would make it work with different sized PCBs.
If you think you’ve seen a manual vacuum stencil box around here recently, you’re right — we featured one by [UnexpectedMaker] not too long ago.