Hybrid 50cc Ultracapacitor Scooter

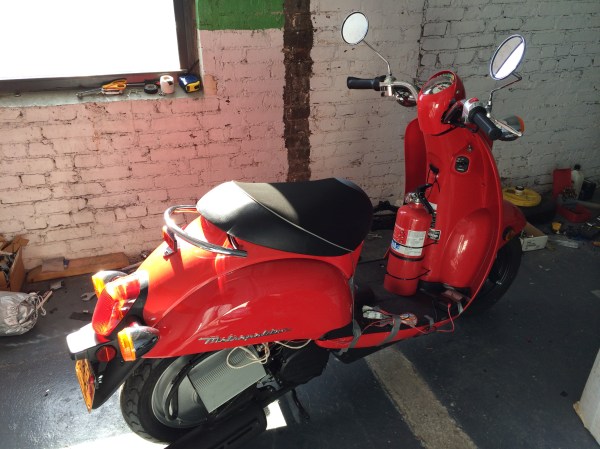
We’re all familiar with hybrid gas-electric cars these days, but how about a hybrid scooter that uses supercapacitors instead of batteries? Our hats are off to [Alex] from Labs Bell for the almost entirely-DIY conversion.

The hybrid idea is to drive the vehicle’s wheels with electric motors, but generate the electricity with a normal gasoline engine. This allows the hybrid to control the engine speed almost independently of the wheel motors’ demand for power, allowing the gas engine to run at its most efficient speed and charge up batteries with the extra energy. As an extra bonus, many hybrids also use regenerative braking to recoup some of the energy normally wasted as heat in your brake pads.

[Alex]’s hybrid scooter does all of the above and more. Since the stock vehicle is a 50cc scooter, any increase in acceleration is doubtless welcome. We’d love to see the scooter starting from stop with a full charge. Using supercapacitors as storage instead of batteries is a win for charging efficiency. In urban stop-and-go traffic, the natural habitat of the 50cc scooter, the regenerative braking should help further with gas consumption.

What’s most impressive to us is the completely DIY hybrid control unit that takes some simple inputs (wheel speed and throttle position) and controls regenerative braking, the gas engine’s throttle, etc. Since the hybrid control system is currently under development, there’s even a button to switch between different trial algorithms on the fly. Very cool!

Oh yeah, and [Alex] points out the fire extinguisher on-board. He had occasion to use it for his hybrid motorcycle V1. Safety first!

Use A Cheap PIN Diode As A Geiger Counter

After the Fukushima nuclear power plant disaster, radiation measurement became newly relevant for a lot of people. Geiger-Müller tubes, previously a curiosity, became simultaneously important and scarce.

Opengeiger.de (English-language version here) has complete instructions for making a Geiger counter without a Geiger-Müller tube. Instead, this counter uses a PIN photodiode and some carefully chosen operational amplifiers. The total cost of such a device is significantly cheaper than the alternative: under $1 for the diode and around $5 for the rest. And since the PIN photodiode in question is used in many other devices, it’s not a niche component like a Geiger tube is.

The secret sauce is in component selection and tuning. Opengeiger uses the BPW34 diode because it is relatively common and has a large surface area, but also because it has a very low capacitance when reverse-biased. The first-stage opamp choice is also fairly critical. Considering that an average gamma radiation event produces only around 10 nanoamps for about 50 microseconds, a lot of amplification (100,000x), low noise, and high bandwidth are a must.

If you want to get started with this project, you could first browse through the explanation (PDF) to get an overview of the project’s goals, read up on all the technical considerations (PDF) or just head straight for the DIY instructions for the “Stuttgarter Geigerle” (PDF, schematic is on the last page). All of the documentation is chock-full of relevant references and totally worth the read.

Dottie The Flip Dot Clock

What is it that we like so much about inefficient, noisy clocks made with inappropriate technology? Answer the question for yourself by watching the video (below) that [David Henshaw] sent us of Dottie, the flip-dot clock.

But besides the piece itself, we really like the progression in the build log, from “how am I going to do this?” to a boxed-up, finished project.

Another stunning aspect of this build is just how nice an acrylic case and a raft of cleverly written software can make a project look. You’d never guess from the front that the back-side was an (incredible) rat’s nest of breadboards and Ethernet wires. Those random switching patterns make you forget all the wiring.

And the servo-steered, solenoid-driven chimes are simply sweet. We’re sure that we’d love to hear them in real life.

Continue reading “Dottie The Flip Dot Clock”

HuddleLamp Turns Multiple Tablets Into Single Desktop

Imagine you’ve got a bunch of people sitting around a table with their various mobile display devices, and you want these devices to act together. Maybe you’d like them to be peepholes into a single larger display, revealing different sections of the display as you move them around the table. Or maybe you want to be able to drag and drop across these devices with finger gestures. HuddleLamp lets you do all this.

How does it work? Basically, a 3D camera sits above the tabletop, and watches for your mobile displays and your hands. Through the magic of machine vision, a server sends the right images to each screen in the group. (The “lamp” in HuddleLamp is a table lamp arranged above the space with a 3D camera built into it.)

A really nice touch is that the authors also provide JavaScript objects that you can embed into web apps to enable devices to join the group without downloading special software. A new device will flash an identifying pattern that the computer vision routine will recognize. Once that’s done, the server starts sending the correct parts of the overall display to the new device.

The video, below the break, demonstrates the possible interactions.

Continue reading “HuddleLamp Turns Multiple Tablets Into Single Desktop”

Destroy Your Volkswagen Touch Adapter For Bluetooth’s Sake

[Mansour]’s Volkswagen Polo has a touch-screen adapter with voice recognition to control a bunch of the car’s features, but he wanted it gone.

Voice control of your car sounds like a great thing, right? Well, the touch adapter blocked other Bluetooth devices from connecting directly to the car, and prevented him from streaming music from his phone while he’s connecting it through the adapter. But if you simply throw the adapter away, the car won’t connect to any Bluetooth devices.

So what options are left? Other than a couple of expensive or complicated options, [Mansour] decided to open up the device and desolder the Bluetooth chip and antenna. Admittedly, it’s not the deepest hack in the world, but we’ve gotta give [Mansour] credit for taking the technology into his own hands.

Disabling unwanted functionality is not uncommon these days. Who hasn’t stuck tape over their laptop’s camera or kept an RFID card in a Faraday wallet? What other devices have you had to “break” in order to make them work for you?

Digital “Crystal” Breathes New Life Into Old Radio

[Bill Meara] of the Soldersmoke Podcast has a nice old Drake 2B radio, and wanted to use it for the 12 meter amateur band. These old radios normally make switching tuning bands easy — you just swap out one frequency crystal for another and you’re set.

Only [Bill] didn’t have the 21 MHz crystal that he needed. No problem, because he had a junk crystal, a hacksaw, and a modern direct-digital synthesis (DDS) chip sitting around. So he takes the donor crystal, cuts it open, and solders the two wires directly from the DDS to the crystal’s pins. Now he’s got a plug-in replacement digital oscillator that doesn’t require modifying the nice old Drake receiver at all. A sweet little trick.

The video’s a little bit long, but the money shot comes in around 5:00.

Now, one might worry about simply plugging a powered circuit (the DDS) in place of a passive element (the crystal), but it seems to work and the proof of the pudding is in the tasting. We wonder how far this digitally-controlled-analog-receiver idea could be extended.

Dusty Junk-bin Downconverter Receives FM On An AM Radio

This amateur radio hack is not for the faint of heart! With only three transistors (and a drawer-full of passive parts), [Peter Parker, vk3ye] is able to use a broken-looking AM car radio to receive FM radio signals (YouTube link) on 2 meters, an entirely different band.

There are two things going on here. First, a home-made frequency downconverter shifts the 147 MHz signal down to the 1 MHz neighborhood where the AM radio can deal with it. Then, the AM radio is tuned just slightly off the right frequency and the FM signal is slope detected.

The downconverter consists of a local tuned oscillator and a mixer. The local oscillator generates an approximate 146 MHz signal from an 18 MHz crystal, accounting for two of the three transistors. Then this 146 MHz signal and the approximately 147 MHz signal that he wants to listen to are multiplied together (mixed) using the third transistor.

If you’re not up on your radio theory, a frequency mixer takes in two signals at different frequencies and produces an output signal that has various sums and differences of the two input signals in it. It’s this 147 MHz – 146 MHz = 1 MHz FM signal, right in the middle of the AM radio band’s frequency range, that’s passed on to the AM radio.

Next, the AM radio slope detects the frequency-modulated (FM) signal as if it were amplitude modulated (AM). This works as follows: FM radio encodes audio as changes in frequency, while AM radios encode the audio signal in the amplitude, or volume, of the radio signal. Instead of tracking the changing frequency as an FM radio would, slope detectors stick on a single frequency that’s tuned just slightly off from the FM carrier frequency. As the FM signal gets closer to or farther away from this fixed frequency, the received signal gets louder or quieter, and FM is detected as AM.

At 5:23, [vk3ye] steps through the circuit diagram. As he mentions, these are old tricks from circa 50 years ago, but it’s very nice to see a junk-box hack working so well with so few parts and receiving (very) high frequency FM on an old AM car radio. A circuit like this could make a versatile front end for an SDR setup. It makes us want to warm up the soldering iron.

Continue reading “Dusty Junk-bin Downconverter Receives FM On An AM Radio”