Portable Apple II On An AVR

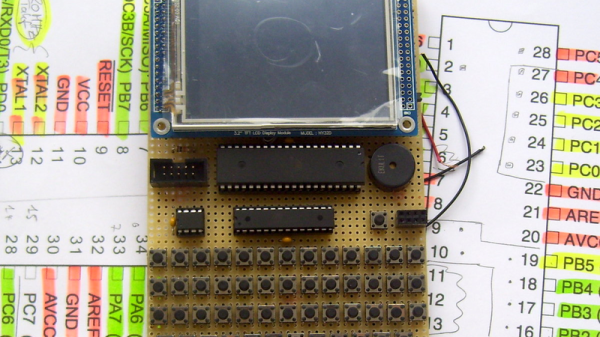
The Apple II was one of the first home computers. Designed by Steve “Woz” Wozniak, it used the MOS technologies 6502 processor, an 8-bit processor running at about 1 MHz. [Maxstaunch] wrote his bachelor thesis about emulating the 6502 in software on an AVR1284 and came up with a handheld prototype Apple II with screen and keyboard.
pic_15
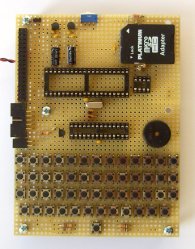
Prototype on veroboard

Originally, [maxstrauch] wanted to build an NES, which uses the same 6502 processor, but he calculated the NES’s Picture Processing Unit would be too complicated for the AVR, so he started on emulating the Apple II instead. It’s not quite there – it can only reference 12K of memory instead of the 64K on the original, so hi-res graphic mode, and therefore, many games, won’t work, but lo-res mode works as well as BASIC (both Integer BASIC and Applesoft BASIC.)

[Maxstrauch] details the 6502 in his thesis and, in a separate document, he gives an overview of the project. A third document has the schematic he used to build his emulator. His thesis goes into great detail about the 6502 and how he maps it to the AVR microcontroller. The build itself is pretty impressive, too. Done on veroboard, the build has a display, keyboard and a small speaker as well as a micro SD card for reading and storing data. For more 6502 projects, check out the Dis-Integrated 6502 and also, this guide to building a homebrew 6502.

Continue reading “Portable Apple II On An AVR”

Another Desktop LED Xmas Tree!

We love it when someone takes inspiration from one of our posts and comes up with their own twist on it. [Matthew] liked one builds he saw on Hackaday so much, he built his own LED desktop Xmas tree!

[Matthew] was inspired by [designer2k2]’s DIY desktop Xmas tree that was posted in October. To get started, he found a set of concentric WS2812 rings over on Ali Express. The five rings total 93 LEDs, plus a single WS2812 for the top of the tree. He also got a laser cut tree model from Thingiverse and had it cut, combining the LED rings with the tree in the final product

The whole thing running on a Digispark USB Development Board from DigiStump, the same as the original project. There aren’t many details in the video, but [Matthew] has put links to where he got the rings and the tree, the laser cutting service, a link to the DigiStump website as well as a link to [designer2k2]’s original tree project. There’s no source code yet, but [Matthew] says a link to it is coming along with some more pictures.

Continue reading “Another Desktop LED Xmas Tree!”

Speed-Test Your Toys With Die-Cast Drag Strip

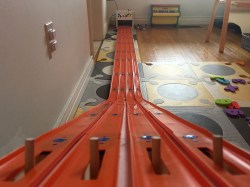
I’m sure many of us remember building toy car race tracks as kids, racing the cars, and then arguing over which car came in first and who cheated because they let go of their car too soon. Ah, good times. [Phil] wanted to create a drag strip race track for his son to introduce him to die-cast cars. The only commercial drag strip [Phil] could find didn’t have an electronic start gate or a timer, so he created his own with the help of an Arduino, a servo, and some light dependent resistors.

The Arduino controls everything, the button input, the lightrace2 sensor input, and the servo. A button press tells the Arduino to start the race by pulling the start gate down and starting the timer. When the light sensor is covered, the timer for that lane stops. The time is shown for each lane using a different colored 4-digit 7-segment LED.

There were a couple of problems that had to be solved. The servo launching the cars was pulling too much power when activated so that the IR LEDs used at the finish line would dim enough to trigger before the race had even begun! [Phil]’s article goes over these issues and his design ideas as he built the track.

It’s a simple build that should provide hours of fun for [Phil]’s son and his friends over the years and will hopefully put to rest any arguments over who won. There are lots of photos in [Phil]’s article, as well as several videos showing off how things work and at the end of the article, he includes the code he used to control everything. This would be a great surprise for any nieces and nephews coming to visit over the holidays — you might want to wait for final assembly and include them in the fun!

If you like these kind of projects, we’ve seen a similar Hot Wheels timing system, and a different kind of race track based on a turntable system.

Continue reading “Speed-Test Your Toys With Die-Cast Drag Strip”

Mini Retro PET Computer

There was a time that the Commodore PET was the standard computer at North American schools. It’s all-in-one, rugged construction made it ideal for the education market and for some of us, the PET started a life-long love affair with computers. [Ruiz Brothers] at Adafruit has come up with a miniature PET model run on a microcontroller and loaded up with a green LED matrix for a true vintage look.

While not a working model of a PET, the model runs on an Adafruit Feather M0 Basic Proto which is an Atmel ATSAMD21 Cortex M0 microcontroller and can display graphics on Adafruit’s 16×9 charlieplexed led matrix.The ATSAMD21 is the chip used in the Arduino Zero, so I’m sure we’ll see more of this chip in the future. Like all of the tutorials at Adafruit, this one is very detailed with step-by-step animated pictures to help you along. Obviously, you don’t need the exact hardware that they’re using, but if you’re putting in an order from Adafruit anyway, why not?

The plans for the 3D printed PET are available for free, so even if you don’t want to put their LED matrix and microcontroller in it, you can still print yourself out a great looking prop and 3D printing the PET will only use about a dollar’s worth of filament. Of course, while this is a cool retro model, if you have a Commodore PET lying around, you could probably do something else with it. We don’t, so that sound you hear is the sound of our 3D printer printing up the past.

Continue reading “Mini Retro PET Computer”

Speed Run [James Bruton’s] Star Wars Builds

We’ve been following [James Bruton]’s builds here on Hackaday for quite a while and he has built some impressive stuff. We love how he often doesn’t cover everything up, leaving enough room to admire the working bits under the hood. Just in time for the release of the new Star Wars movie, Rogue One, [James] put together an overview of his Star Wars robot builds.

The build summary includes his R6 droid, his GNK walking droid and the third revision of his BB-8 droid. [James Bruton]’s videos have tons of detail in them over many, many parts (for example, his BB-8 R3 playlist is 15 parts and his Ultron build currently has 26 episodes and counting!)

There’s a quick overview of each of the three robot builds in this video, and it includes links to the playlists for each build for those who want more detail. This is just what you need to glimpse all of the clever design that went into these wonderfully crafted droids. And if you haven’t seen it yet, you should check out his series elastic actuators that he’s working on for the Ultron build, they give a robot some relief from rigidity.

Continue reading “Speed Run [James Bruton’s] Star Wars Builds”

Thwomp Drops Brick On Retro Gaming

[Geeksmithing] wanted to respond to a challenge to build a USB hub using cement. Being a fan of Mario Brothers, a fitting homage is to build a retro-gaming console from cement to look just like your favorite Mario-crushing foe. With a Raspberry Pi Zero and a USB hub embedded in it, [Geeksmithing] brought the Mario universe character that’s a large cement block — the Thwomp — to life.

[Geeksmithing] went through five iterations before he arrived at one that worked properly. Initially, he tried using a 3D printed mold; the cement stuck to the plastic ruining the cement on the face. He then switched to using a mold in liquid rubber (after printing out a positive model of the Thwomp to use when creating the mold). But the foam board frame for the mold didn’t hold, so [Geeksmithing] added some wood to stabilize things. Unfortunately, the rubber stuck to both the foam board and the 3D model making it extremely difficult to get the model out.

Like [Han] in carbonite, that's a Rapsberry Pi Zero being encased in cement
Like [Han] in carbonite, that’s a Raspberry Pi Zero being encased in cement
Next up was regular silicone mold material. He didn’t have enough silicone rubber to cover the model, so he added some wood as filler to raise the level of the liquid. He also flipped the model over so that he’d at least get the face detail. He found some other silicone and used it to fill in the rest of the mold. Despite the different silicone, this mold worked. The duct tape he used to waterproof the Raspberry Pi, however, didn’t. He tried again, this time he used hot glue – a lot of hot glue! – to waterproof the Pi. This cast was better, and he was able to fire up the Pi, but after a couple of games his controller stopped working. He cracked open the cement to look at the Pi and realized that a small hole in the hot glue caused a leak that shorted out the USB port on the Pi. One last time, he thought, this time he used liquid electrical tape to waterproof the Pi.

The final casting worked and after painting, [Geeksmithing] had a finished cement Thwomp console that would play retro games. He missed the deadline for the USB Hub Challenge, but it’s still a great looking console, and his video has a lot of detail about what went wrong (and right) during his builds. There’s a great playlist on YouTube of the other entries in the challenge, check them out along with [Geeksmithing]’s video below!

Continue reading “Thwomp Drops Brick On Retro Gaming”

A Smart Wand For All Us Muggles

Arthur C. Clarke said that “any sufficiently advanced technology is indistinguishable from magic.” Even though we know that something isn’t “magic”, it’s nice to see how close we can get. [Dofl] and his friends, big fans of the magic in Harry Potter, thought the same thing, and decided to create a magic wand that they could use themselves.

muggle-wand-internalsThe wand itself is 3D printed and has a microcontroller and WiFi board, a voice recognition board, a microphone, and a vibrating motor stuffed inside. The wand converts the voice into commands and since the wand is connected to WiFi, the commands can be used to communicate with your WiFi connected lights (or your WiFi connected anything, really.) Five voice commands are recognized to turn on and off music, the lights, and a “summon” command which is used in the video to request a hamburger from delivery.com. For feedback, the motor is vibrated when a command is recognized.

There’s not much technical information in the original article, but I’m sure our readers could figure out the boards used and could suggest some alternatives to get the wand’s form factor down a bit.  Over the years, other wands have appeared on our pages, using some different technologies.  It’s a fun way to interact with the environment around you, even if you know the “magic” involved is just boring old technology.

Continue reading “A Smart Wand For All Us Muggles”