ArduinoCamera

A Single Pixel Digital Camera With Arduino

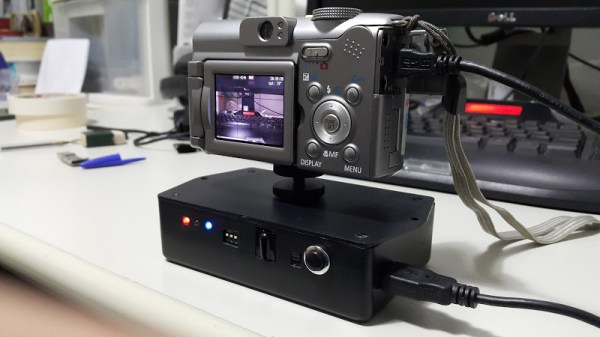
[Jordan] managed to cobble together his own version of a low resolution digital camera using just a few components. The image generated is pretty low resolution and is only in grey scale, but it’s pretty impressive what can be done with some basic hardware.

The heart of the camera is the image sensor. Most consumer digital cameras have tons of tiny receptors all jammed into the sensor. This allows for a larger resolution image, capturing more detail in a smaller space. Unfortunately this also usually means a higher price tag. [Jordan’s] sensor includes just a single pixel. The sensor is really just an infrared photodiode inside of a tube. The diode is connected to an analog input pin on an Arduino. The sensor can be pointed at an object, and the Arduino can sense the brightness of that one point.

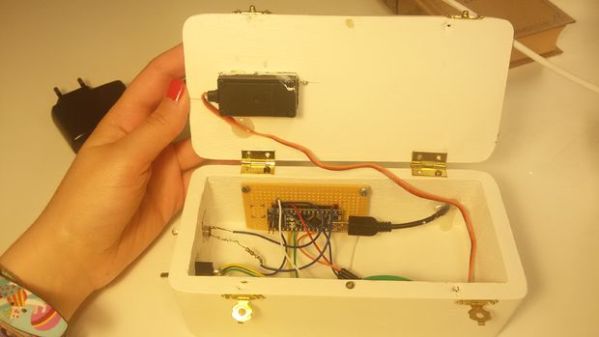
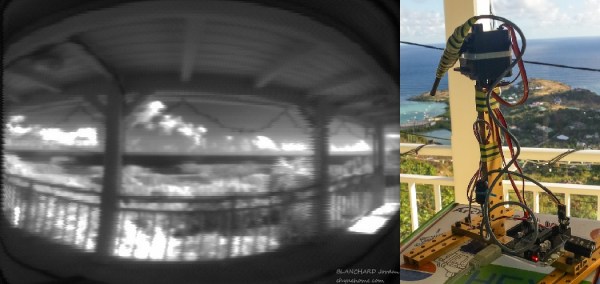
In order to compile an actual image, [Jordan] needs to obtain readings of multiple points. Most cameras do this using the large array of pixels. Since [Jordan’s] camera only has a single pixel, he has to move it around and take each reading one at a time. To accomplish this, the Arduino is hooked up to two servo motors. This allows the sensor to be aimed horizontally and vertically. The Arduino slowly scans the sensor in a grid, taking readings along the way. A Processing application then takes each reading and compiles the final image.

Since this camera compiles an image so slowly, it sometimes has a problem with varying brightness. [Jordan] noticed this issue when clouds would pass over while he was taking an image. To fix this problem, he added an ambient light sensor. The Arduino can detect the amount of overall ambient light and then adjust each reading to compensate. He says it’s not perfect but the results are still an improvement. Maybe next time he can try it in color.

CAMdrive

CAMdrive Is An Open Source Time-lapse Photography Controller

[Nightflyer] has been working on an open source project he calls CAMdrive. CAMdrive is designed to be a multi-axis controller for time-lapse photography. It currently only supports a single axis, but he’s looking for help in order to expand the functionality.

You may already be familiar with the idea of time-lapse photography. The principal is that your camera takes a photo automatically at a set interval. An example may be once per minute. This can be a good way to get see gradual changes over a long period of time. While this is interesting in itself, time-lapse videos can often be made more interesting by having the camera move slightly each time a photo is taken. CAMdrive aims to aid in this process by providing a framework for building systems that can pan, tilt, and slide all automatically.

The system is broken out into separate nodes. All nodes can communicate with each other via a communication bus. Power is also distributed to each node along the bus, making wiring easier. The entire network can be controlled via Bluetooth as long as any one of the nodes on the bus include a Bluetooth module. Each node also includes a motor controller and corresponding motor. This can either be a stepper motor or DC motor.

The system can be controlled using an Android app. [Nightflyer’s] main limitation at the moment is with the app. He doesn’t have much experience programming apps for Android and he’s looking for help to push the project forward. It seems like a promising project for those photography geeks out there. Continue reading “CAMdrive Is An Open Source Time-lapse Photography Controller”

hassler_pcb

Annoy Your Enemies With The Hassler Circuit

[Craig] recently built himself a version of the “hassler” circuit as a sort of homage to Bob Widlar. If you haven’t heard of Bob Widlar, he was a key person involved in making analog IC’s a reality. We’ve actually covered the topic in-depth in the past. The hassler circuit is a simple but ingenious office prank. The idea is that the circuit emits a very high frequency tone, but only when the noise level in the room reaches a certain threshold. If your coworkers become too noisy, they will suddenly notice a ringing in their ears. When they stop talking to identify the source, the noise goes away. The desired result is to get your coworkers to shut the hell up.

[Craig] couldn’t find any published schematics for the original circuit, but he managed to build his own version with discrete components and IC’s. Sound first enters the circuit via a small electret microphone. The signal is then amplified, half-wave rectified, and run through a low pass filter. The gain from the microphone is configurable via a trim pot. A capacitor converts the output into a flat DC voltage.

The signal then gets passed to a relaxation oscillator circuit. This circuit creates a signal whose output duty cycle is dependent on the input voltage. The higher the input voltage, the longer the duty cycle, and the lower the frequency. The resulting signal is sent to a small speaker for output. The speaker is also controlled by a Schmitt trigger. This prevents the speaker from being powered until the voltage reaches a certain threshold, thus saving energy. The whole circuit is soldered together dead bug style and mounted to a copper clad board.

When the room is quiet, the input voltage is low. The output frequency is high enough that it is out of the range of human hearing. As the room slowly gets louder, the voltage increases and the output frequency lowers. Eventually it reaches the outer limits of human hearing and people in the room take notice. The video below walks step by step through the circuit. Continue reading “Annoy Your Enemies With The Hassler Circuit”

TeaSteeper

Automated Tea Maker

[Pariprohus] wanted to make an interesting gift for his girlfriend. Knowing how daunting it can be to make your own tea, he decided to build a little robot to help out. His automated tea maker is quite simple, but effective.

The device runs off of an Arduino Nano. The Nano is hooked up to a servo, a piezo speaker, an LED, and a switch. When the switch is turned to the off position, the servo rotates into the “folded” position. This moves the steeping arm into a position that makes the device easier to store and transport.

When the device is turned on to the “ready” position, the arm will extend outward and stay still. This gives you time to attach the tea bag to the arm and place the mug of hot water underneath. Finally the switch can be placed into “brew” mode. In this mode, the bag is lowered into the hot water and held for approximately five minutes. Each minute the bag is raised and lowered to stir the water around.

Once the cycle completes, the Nano plays a musical tune from the piezo speaker to remind you to drink your freshly made tea. All of the parameters including the music can be modified in the Nano’s source code. All of the components are housed in a small wooden box painted white. Check out the video below to see it in action. Continue reading “Automated Tea Maker”

BagAlarm

Motion Activated Alarm For Your Bag

Many of us carry around a bag with our expensive personal belongings. It can be a pain to carry a bag around with you all day though. If you want to set it down for a while, you often have to try to keep an eye on it to ensure that no one steals it. [Micamelnyk] decided to build a solution to this problem in the form of a motion sensing alarm.

The device is built around a Trinket Pro. The Trinket Pro is a sort of break out board for the ATMega328. It’s compatible with the Arduino IDE and also contains a USB port for easy programming. The Trinket is hooked up to a GY-521 accelerometer, which allows it to detect motion. When the Trinket senses that the device has been moved, it emits a loud high-pitched whine from a piezo speaker.

To arm the device, the user first holds the power button for 3 seconds. Then the user has ten seconds to enter their secret code. This ensures that the device is never armed accidentally and that the user always remembers the code before arming the device. The code is entered via four push buttons mounted to a PCB. The code and code length can both be easily modified in the Trinket software.

Once the code is entered, the status LED will turn solid. This indicates to the user that the device must be placed stationary. The LED will turn off after 20 seconds, indicating that the alarm is now armed. If the bag is moved for more than five seconds at a time, the alarm will sound. The slight delay gives the user just enough time to disarm the alarm. This parameter can also be easily configured via software.

Using HID Tricks To Drop Malicious Files

[Nikhil] has been experimenting with human interface devices (HID) in relation to security. We’ve seen in the past how HID can be exploited using inexpensive equipment. [Nikhil] has built his own simple device to drop malicious files onto target computers using HID technology.

The system runs on a Teensy 3.0. The Teensy is like a very small version of Arduino that has built-in functionality for emulating human interface devices, such as keyboards. This means that you can trick a computer into believing the Teensy is a keyboard. The computer will treat it as such, and the Teensy can enter keystrokes into the computer as though it were a human typing them. You can see how this might be a security problem.

[Nikhil’s] device uses a very simple trick to install files on a target machine. It simply opens up Powershell and runs a one-liner command. Generally, this commend will create a file based on input received from a web site controlled by the attacker. The script might download a trojan virus, or it might create a shortcut on the user’s desktop which will run a malicious script. The device can also create hot keys that will run a specific script every time the user presses that key.

Protecting from this type off attack can be difficult. Your primary option would be to strictly control USB devices, but this can be difficult to manage, especially in large organizations. Web filtering would also help in this specific case, since the attack relies on downloading files from the web. Your best bet might be to train users to not plug in any old USB device they find lying around. Regardless of the methodology, it’s important to know that this stuff is out there in the wild.

Camera Controller

A Remote For CHDK Cameras Made Possible With Arduino

[AlxDroidDev] built himself a nice remote control box for CHDK-enabled cameras. If you haven’t heard of CHDK, it’s a pretty cool software modification for some Canon cameras. CHDK adds many new features to inexpensive cameras. In this case, [AlxDroidDev] is using a feature that allows the camera shutter to be activated via USB. CHDK can be run from the SD card, so no permanent modifications need to be made to the camera.

[AlxDroidDev’s] device runs off of an ATMega328p with Arduino. It operates from a 9V battery. The circuit contains an infrared receiver and also a Bluetooth module. This allows [AlxDroidDev] to control his camera using either method. The device interfaces to the camera using a standard USB connector and cable. It contains three LEDs, red, green, and blue. Each one indicates the status of a different function.

The Arduino uses Ken Shirrif’s IR Remote library to handle the infrared remote control functions. SoftwareSerial is used to connect to the Bluetooth module. The Arduino code has built-in functionality for both Canon and Nikon infrared remote controls. To control the camera via Bluetooth, [AlxDroidDev] built a custom Android application. The app can not only control the camera’s shutter, but it can also control the level of zoom.