
Buoyant Aero MK4 keeps station in a tail wind

Aerodynamic Buoyant Blimp Budges Into Low Cost Cargo Commerce

Before the Wright Brothers powered their way across the sands of Kitty Hawk or Otto Lilienthal soared from the hills of Germany, enveloping hot air in a balloon was the only way to fly. Concepts were refined as time went by, and culminated in the grand Zeppelins of the 1930’s. However since the tragic end of the Zeppelin era, lighter than air aircraft have often been viewed as a novelty in the aviation world.

Several companies have come forward in the last decade, pitching enormous lighter than air machines for hauling large amounts of cargo at reduced cost. These behemoths rely on a mixture of natural buoyancy and lifting body designs and are intended to augment ferries and short haul commercial aviation routes.

It was this landscape where Buoyant Aero founders [Ben] and [Joe] saw an underserved that they believe they can thrive in: Transporting 300-600 lbs between warehouses or airports. They aim to increase the safety, cargo capacity, and range of traditional quadcopter concepts, and halve the operating costs of a typical Cessna 182. They hope to help people such as those rural areas of Alaska where high transportation costs double the grocery bill.

Like larger designs, Buoyant Aero’s hybrid airship relies on aerodynamic lift to supply one third the needed lift. Such an arrangement eliminates the need for ballast when empty while retaining the handling and navigation characteristics needed for autonomous flight. The smaller scale prototype’s outstanding ability to maneuver sharply and hold station with a tailwind is displayed in the video below the break. You can also learn more about their project on their Hacker News launch. We look forward to seeing the larger prototypes as they are released!

Perhaps this project will inspire your own miniature airship, in which case you may want to check out the Blimpduino for some low buck ideas. We recently covered some other Hybrid Airships that are trying to scale things even further. And if you have your own blimpy ideas you’d like to pass along, please let us know via the Tip Line!

Continue reading “Aerodynamic Buoyant Blimp Budges Into Low Cost Cargo Commerce” →
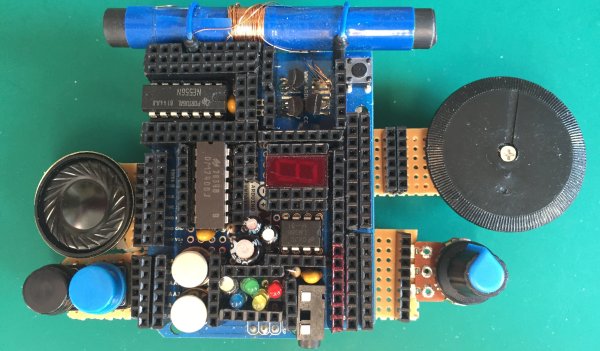
The Retro Shield, an Arduino Proto Shield for making many different circuits.

Retro Shield Replaces Springs With Jumpers, Includes Blinkenlights!

Is it an AM radio? Yes. It is a 555 LED flashing circuit? Yep. How about a hex counter with a 7 segment display? That too. Five different colored LED’s to satisfy your need for blinkenlights? Even that! What is this magical contraption? Is it one of those old school 30-in-1 or 50-in-1 “Science Fair” kits with the jumper wires and the springs? Almost!

When [grandalf]’s friend showed them a project where a 555 timer was installed on an Arduino shield, they realized two things: This whole “could have done that with a 555 timer” meme is a lot of fun, and “I’ve got an old 556 chip, I wonder if I can build one?” The answer is yes, and so much more.

Starting with the 556 timer, and inspired by the old spring-and-jumper kits of the past, [grandalf]’s “556 on a Proto Shield” project evolved into a creation they call the Retro Shield. Snowballing like so many hacker projects, it now includes several built in circuits and components. Breadboard jumpers are used to connect components through strategically placed pin headers, of which there are quite a few!

To make it all fit, some parts were substituted with more compact pieces such as an LM386 instead of an LM380.  The AM radio portion is supplied by an all-in-one radio chip, the ZN414. With the scope creep picking up steam, [grandalf] eventually added so called sidecars- bits of board that contain controls and a speaker hanging off the side of the Proto Shield.

It is not mentioned if the Retro Shield integrates with the Arduino or not. All the same, the Retro Shield has been used to pick up local AM stations, blink LED’s and amplify audio with the LM386. Like [grandalf] we’re sure that the Retro Shield can be used for much more. We hope that [grandalf] expands on the concept and inspires future hackers to answer the question “I wonder what happens if I try this.” 

If you haven’t set eyes on one of the all-in-one kits, check out this 200-in-1 kit teardown and review. And of course, if you have your own hacked up projects to share, be sure to let us know through the Tip Line!

Troubleshooting: A Method For Solving Problems The Right Way

We’ve all experienced that magic moment when, after countless frustrating hours of experimentation and racking your brain, the object of our attention starts working. The 3D printer finally produces good output. The hacked up laptop finally boots. The car engine finally purrs. The question is, do we know why it started working?

This is more important than you might think. Knowing the answer lets you confirm that the core problem was solved, otherwise you may have just fixed a symptom. And lack of understanding means fixing one problem may just create another.

The solution is to adopt a methodical troubleshooting method. We’re talking about a structured problem solving technique that when used properly can help us solve a problem at its core without leaving any loose ends. Such methodology will also leave you knowing why any solution did or didn’t work in the end, and will give you reproducible results.

Continue reading “Troubleshooting: A Method For Solving Problems The Right Way” →

School Surplus Laptop BIOS Hacked To Remove Hardware Restrictions

Why did [Hales] end up hacking the BIOS on a 10 year old laptop left over from an Australian education program? When your BIOS starts telling you you’re not allowed to use a particular type of hardware, you don’t have much of a choice.

Originally [Hales] planned on purchasing a used Lenovo X260 to replace his dying laptop, but his plans were wrecked. A pandemic-induced surge in demand that even the used laptop market caused prices to bloat. The need for a small and affordable laptop with a built in Ethernet port led to the purchase of a Lenovo Thinkpad x131e. Although the laptop was older than he liked, [Hales] was determined to make it work. Little did he know the right-to-repair journey he was about to embark on.

Problems first arose when the Broadcom WiFi adapter stopped working reliably. He replaced it, but the coaxial antenna cable was found to be damaged. Even after replacing the damaged cabling, the WiFi adapter was still operating very poorly. Recalling past problems with fickle Broadcom WiFi adapters, it was decided that an Intel mPCIe WiFi adapter would take its place. When power was re-applied, [Hales] was shocked to find the following message:

Unauthorized network card is plugged in – Power off and remove the miniPCI network card

And this is where things got interesting. With off the shelf SOIC8 clips and a CH340 programmer, [Hales] dumped the BIOS from the laptop’s flash chip to another computer and started hacking away. After countless hours of researching, prodding, hacking, and reverse engineering, the laptop was useful once again with the new Intel WiFi adapter. His site documents in great detail how he was able to reverse engineer the BIOS over the course of several days.

But that’s not all! [Hales] was also able to modify the hardware so that his slightly more modern mPCIe WiFi adapter would come back on after the computer had been put in Hibernation. It’s an elegant hack, and be sure to check [Hales’] site to get the full details. And at the end, there’s a nice Easter egg for anybody who’s ever wanted to make their laptop boot up with their own logo.

We applaud [Hales] for his fine efforts to keep working equipment out of the landfill. We’ve covered many hacks that had similar goals in the past. Do you have a hack you’d like to share? Submit it via the Tips Line.

Nixie Robot Head with LED eyes and retro-futuristic design

Artful Nixie Bot Sculpture Sees, Thinks, And Talks

When [Tavis] and his father were inspired to lend their talents to building a robot sculpture, they split the duties. [Tavis]’ father built a robot head, and [Tavis] utilized designs old and new to breathe life into their creation.

Many a hardware hacker has been inspired by robotic art over the years. Whether it’s the vivid descriptions by the likes of Asimov and Clarke, the magnificent visuals from the formative 1927 film Metropolis, or the frantic arm-waving Robot from Lost In Space, the robots of Science Fiction have impelled many to bring their own creations to life.

For [Travis]’s creation, Two rare Russian Nixie Tubes in the forehead convey what’s on the robot’s mind, while dual 8×8 LED matrices from Adafruit give the imagination a window to the binary soul. A sound board also from Adafruit gives voice to the automaton, speaking wistful words in a language known only to himself.

A DC to DC converter raises the LiPo supplied 3.7v to the necessary 170v for the Nixies, and a hidden USB-C port charges the battery once its two-hour life span has expired. Two custom Nixie driver boards are each host to an Arduino Pro Micro, and [Tavis] has made the PCB design available for those wishing to build their own Nixie projects.

As you can see in the video below the break, the results are nothing short of mesmerizing!

Of course, we’re no strangers to robots here at Hackaday. Perhaps we can interest you in a drink created by the industrial-grade Robotic Bartender while you consider the best way to Stop the Robot Uprising. And remember, if you spot any awesome hacks, let us know via the Tip Line!

Continue reading “Artful Nixie Bot Sculpture Sees, Thinks, And Talks” →

80's vintage Tomy Omnibot and Futaba RC Transmitter

80’s Omnibot Goes RC And Gets A Modern Refresh

Thrift stores, antique shops, knick-knack stores- Whatever you might call them in your locale, they’re usually full of “another man’s treasure”. More often than not, we leave empty-handed, hoping another shop has something we just can’t live without. But on rare occasions, when the bits all flip in our favor, we find real gems that although we have no idea what we’re going to do with them, just have to come home with us.

[Charles] ran into this exact situation recently when he walked into yet another shop among many dotting the highways and byways of Georgia and spotted it: A Tomy Omnibot beckoning to him from the 1980s. [Charles] didn’t know what he’d do with the Omnibot, but he had to have it. Not being one to have things just sit around, he set out to make it useful by combining it with an era-appropriate Futaba 4 channel AM radio, and updating all of the electronics with modern hardware.  The Mission? Drive it around at car shows and meetups where he already takes his 1980’s era vans.

We’re not going to spoil the goodies, but be sure to read [Charles]’ blog post to see how he hacked a modern 2.4 GHz 7 channel radio into the vintage Futaba 4 channel AM radio case. We appreciated his analytical approach to meshing the older gimbals and potentiometers with the new radio guts. Not to mention what it took to get the Omnibot back into service using parts from his battle bots bin. You’ll love the attention to detail on the new battery, too!

We’ve featured [Charles] work in the past, and his Power Wheels racer fed by a recovered Ford Fusion battery is simply unforgettable. You might also appreciate another Omnibot revival we featured recently. And as always, if you have a hack to share, submit it via the Tip Line!

Interactive Musical Art Installation Mixes Vintage, Modern, Lasers, And…Bubbles? Bubbles.

Acorn BBC Master. Apple IIe. Ampex 270 Terminal. Vectrex game console. You’d be hard pressed to find a more diverse hardware collection in the average hacker’s lab. When you add seven Raspberry Pi’s, five CRT monitors, an analog oscilloscope and an LED wall to the mix, one starts to wonder at the menagerie of current and retro hardware. What kind of connoisseur would have such a miscellaneous collection? That’s when you spot smoke and fog machines sitting next to an RGB Laser.

Finally, you learn that all of this disparate paraphernalia is networked together. It is then that you realize that you’re not just dealing with a multi-talented hacker- you’re dealing with a meticulous maestro who’s spent lockdown finishing a project he started nearly twenty years ago!

AUVERN comes alive in a show of light and sound whenever someone enters its view.

The machine is called AUVERN and it’s the product of the creative mind of [Owen]. Taking advantage of advances in technology (and copious amounts of free time), [Owen] laboriously put his collection of older rigs to work.

A Python script uses a Kinect sensor’s input to control a Mac Mini running Digital Audio Workstation software. The operator’s location, poses and movements are used to alter the music, lights, and multimedia experience as a whole. MIDI, Ethernet, and serial communications tie the hardware together through Raspberry Pi’s, vintage MIDI interfaces, and more. Watch the video below the break for the technical explanation, but don’t miss the videos on [Owen]’s website for a mesmerizing demonstration of AUVERN in full swing.

AUVERN makes use of the Vectrex32 upgrade which we have previously covered, and we are unavoidably reminded of another pandemic inspired bubble machine. Don’t forget to send us your hacks, projects, and creations through the Tip Line!

Continue reading “Interactive Musical Art Installation Mixes Vintage, Modern, Lasers, And…Bubbles? Bubbles.” →