Help Solve The Single-Transistor Latch Mystery

If you’ve spent any time on hackaday.io, you may have noticed that more than a few denizens of the site are fans of “alternative” electronic logic. Aiming to create digital circuits from such things as relays, vacuum tubes, discrete transistors, and occasionally diodes, they come up with designs that use these components in either antiquated or occasionally new and unexpected ways. This is exactly what [Mark Sherman] has done with his latest project, a single-transistor latch.

If you think every design has to compete with cutting-edge integrated circuits, or even must have an immediate practical application, you might as well stop reading now — and to play on the famous Louis Armstrong quip about jazz, if you have to ask why someone would do such a thing, you’ll never know.

Given that you’ve come this far, you’ll appreciate what [Mark] has come up with. It’s semi-well-known that the collector-emitter junction of a bipolar junction transistor (BJT) can exhibit a negative resistance characteristic when reverse-biased into avalanche breakdown. It’s this principle that allows a single BJT to be used as an ultra-simple LED flasher. [Mark] took this concept and ran with it, creating a single-transistor latch that can store one bit of information. As a bonus — or is it a requirement? — the transistor also drives an LED, so that you can visualize the state. We’ve seen a one-transistor flip-flop before, but that one also required diodes and an AC bias supply. In this new device, none of this is necessary, so it’s a step up according to the unwritten, unspoken, and generally agreed upon rules of the game.

In true hacker fashion, [Mark] came up with a working device without fully understanding exactly how it works.  We, too, are a little mystified at first glance. So, [Mark] is asking for your help in replicating and/or analyzing the circuit. He explains what he has found so far in the video after the break, but the main questions seem to revolve around why the base resistor is required, and why it works with 2N4401s but not 2N2222s.

So, Hackaday, what’s going on here? Sound off in the comments below.

Continue reading “Help Solve The Single-Transistor Latch Mystery”

Fun With Negative Resistance: Jellybean Transistors

The concept of negative resistance has always fascinated me. Of course, a true negative resistance is not possible, and what is meant is a negative differential resistance (NDR). But of course knowing the correct term doesn’t do anything to demystify the topic. Negative resistance sounds like an unusual effect, but it turns out to be relatively common, showing up in places like neon lamps and a number of semiconductor structures. Now’s as good a time as any to dig in and learn more about this common principle.

NDR means a portion of a device’s I/V curve where the current falls with increasing applied voltage. The best-known semiconductor device exhibiting negative resistance is the tunnel diode, also known as the Esaki diode after one of the Nobel-Prize-winning discoverers of the quantum tunneling effect responsible for its operation. These diodes can perform at tremendous speeds; the fastest oscilloscope designs relied on them for many years. As the transistor and other technologies improved, however, these diodes were sidelined for many applications, and new-production models aren’t widely available — a sad state for would-be NDR hackers. But, all hope is not lost.

Rummaging through some old notebooks, I rediscovered an NDR design I came up with in 2002 using two common NPN transistors and a handful of resistors; many readers will already have the components necessary to experiment with similar circuits. In this article, we’ll have a look at what you can do with junkbox-class parts, and in a future article we’ll explore the topic with some real tunnel diodes.

So, let’s see what you can do with a couple of jellybean transistors!

Continue reading “Fun With Negative Resistance: Jellybean Transistors”

Getting That Neon Sign Look Without All The Hassle

We all love the look of neon signage, but the between the glassblowing equipment, gas cylinders, high voltage, and the associated skill set, it’s not practical for everyone. Luckily, these days there’s a good alternative: “neon” flexible LED strips. This is the approach [Benni] recently took in making a large logo display, and the results speak for themselves.

[Benni] sourced the strips from AliExpress. They’re 8 mm wide and can be cut to length in multiples of 4.2 cm. Inside, there are strips of RGB LEDs, making the displays that much more versatile than actual neon. Covering the LEDs is a silicone diffuser strip that completes the illusion of a neon tube. The flexibility of the strips make them easy to bend into different shapes, but also mean a solid substrate of some sort is required to make them hold their shape. In [Benni]’s case, he used a metal frame to which he glued the strips with cyanoacrylate adhesive. He used zip ties to clamp the strips in place while the glue cured, and the fact that he clipped the tails of the zip ties is a testament to his detail-oriented nature; we would probably have left them on. All of the attention payed off though because the end product looks awesome. The finishing touches are supplied by some 3D-printed bezels carrying acrylic diffuser panels and traditional LED strips for the eyes, plus a DMX LED controller.

We’ve seen [Benni]’s work before, like this slick USB rotary encoder peripheral, and like that time, there’s a video which really shows off the project. Have a look, after the jump.

Continue reading “Getting That Neon Sign Look Without All The Hassle”

Benchmarking A Garbage Disposal Using The 3DBenchy Tugboat

We’ve always had a love-hate relationship with 3DBenchy, the tugboat-shaped 3D printer calibration target. On one hand, it’s incredibly useful to have a common, widely used, and challenging benchmark object to evaluate printer performance and improve tuning, but we’d somehow like to get back the countless frustrated hours we’ve spent trying to get the damn thing perfect with various printers. So, it was with no little joy that we watched the video below by [Eric R Mockler], in which he uses 3DBenchy prints to benchmark his newest acquisition: a new-in-box garbage disposal he scored off Craigslist. Take that, tugboat!

[Eric] is considering using the disposal as the first step in a failed-print-recycling method to ultimately turn the waste back into filament, presumably to print more tugboats. The tiny bits produced by the disposal should provide a reasonable substitute for pelleted plastic feedstock going into a filament extruder, if the disposal is up to the task, that is. Reasoning that any device capable of grinding chicken bones should handle little plastic tugboats just as well, [Eric] gave it shot, and found that the ⅓-horsepower disposal had no problem grinding even 100%-infill PLA prints.

The video is short and to-the-point, so we’ll even excuse the portrait orientation, just this once. If you’re considering recycling your failed prints, too, you’ll also need a filament extruder, and we’ve got you covered with a low-cost version, or a high-throughput one.

Continue reading “Benchmarking A Garbage Disposal Using The 3DBenchy Tugboat”

Component Shelf Life: How To Use All That Old Junk

There are two types of Hackaday readers: those that have a huge stock of parts they’ve collected over the years (in other words, an enormous pile of junk) and those that will have one a couple of decades from now. It’s easy to end up with a lot of stuff, especially items that you’re likely to use in more than one design; the price breakpoints at quantities of 10 or 100 of something can be pretty tempting, and having a personal stock definitely speeds the hacking process now that local parts shops have gone the way of the dinosaur. This isn’t a perfect solution, though, because some components do have shelf-lives, and will degrade in some way or another over time.

If your stash includes older electronic components, you may find that they haven’t aged well, but sometimes this can be fixed. Let’s have a look at shelf life of common parts, how it can be extended, and what you can do if they need a bit of rejuvenation.

Continue reading “Component Shelf Life: How To Use All That Old Junk”

Flip Chips And Sunken Ships: Packaging Trick For Faster, Smaller Semiconductors

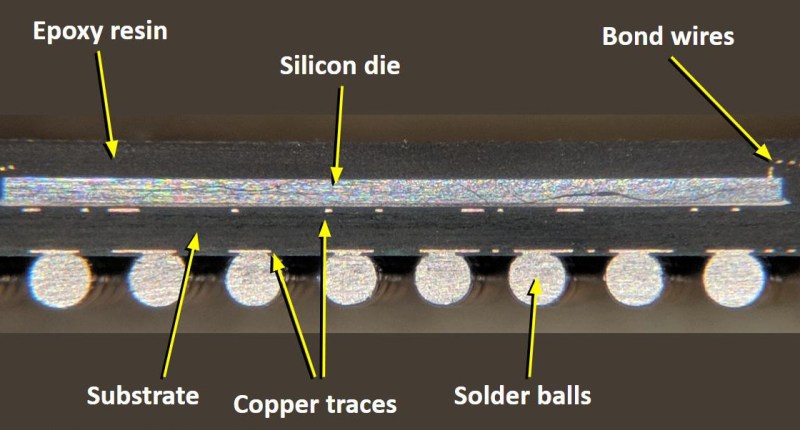
You may have heard the phrase “flip-chip” before: it’s a broad term referring to several integrated circuit packaging methods, the common thread being that the semiconductor die is flipped upside down so the active surface is closest to the PCB. As opposed to the more traditional method in which the IC is face-up and connected to the packaging with bond wires, this allows for ultimate packaging efficiency and impressive performance gains. We hear a lot about advances in the integrated circuits themselves, but the packages that carry them and the issues they solve — and sometimes create — get less exposure.

Cutaway view of traditional wire-bond BGA package. Image CC-BY-SA 4.0 @TubeTimeUS

Let’s have a look at why semiconductor manufacturers decided to turn things on their head, and see how radioactive solder and ancient Roman shipwrecks fit in.

Continue reading “Flip Chips And Sunken Ships: Packaging Trick For Faster, Smaller Semiconductors”

Bye Bye Vi: GNU/Linux Distros Drop Support

If you grew up with Unix systems like we did, you’ll be sorry to hear the news: vi, the noble text editor that has served us so well these 40 years, is going away — from many GNU/Linux systems, anyway. As of this writing, GNU/Linux Mint, Debian, Ubuntu, and OpenSUSE — four of the five most popular GNU/Linux distributions — have all announced that they will no longer ship the ‘vi’ editor as part of their base installs. For those of us who got our start in the punched-card era and still think of files as a collection of lines instead of a stream of bytes, this is a major blow. But, we can all take some comfort in the fact that, at least for now, the stripped-down version of vim synonymous with vi on these systems will continue to be available from package repositories.

The reasons for the move aren’t entirely clear to us, but from what we can see on the GNU/Linux mailing lists, the confusing modal interface and the fact that novice (and many seasoned) users can’t figure out how to save a file and exit the program seem to have influenced the decision. Also cited were support changes expected as GNU/Linux gains in popularity. As the user base expands to include less technically-savvy individuals, fewer people will be able to fix their constant boot issues, which is the primary use-case for vi. Replacing the self-help model will be a support infrastructure where users can take their machines to “GNU/Linux Geniuses” who will solve the problems for them.

Continue reading “Bye Bye Vi: GNU/Linux Distros Drop Support”