A DIY Stun Gun You Probably Shouldn’t Build

In these troubled times, when a trip to the grocery store could turn into a brawl over toilet paper, you might be inclined to build yourself a low-cost electroshock weapon. Or at least, that’s what [Alex Zidros] did. We don’t necessarily recommend you follow in his footsteps, and we’re certainly not advocating testing it on a loved one. We just bring you this information, you have to decide what you do with it.

This is what peer pressure looks like.

So what does it take to build an improvised stun gun? Not a whole lot, it turns out. As you might have guessed, the star of the show is a high voltage transformer which supposedly puts out 400 kV. Just looking at it (and the price) we’re going to go out on a limb and say the performance specs are way overrated, but in this case that might actually be a good thing.

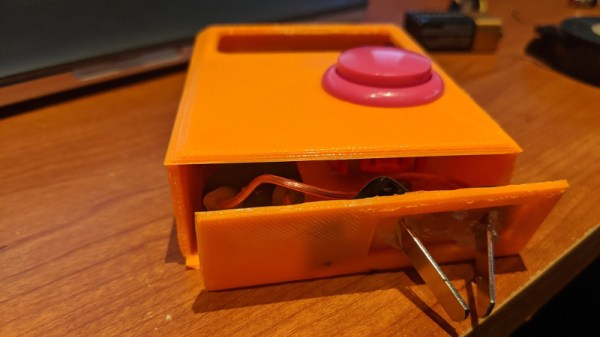
Beyond the transformer, there’s a simple 9 V battery holder and electrodes made from the prongs of a hacked up travel adapter. To deliver the lightning, [Alex] is using a pink arcade button. Just because you might be fighting for your life doesn’t mean you can’t have a little fun, right? Everything is packed into a simple 3D printed enclosure, but you could easily replace that with any suitably sized box. Something made out of wood might be a good idea, considering.

If you’d like to see another person shocked by a cobbled together high-voltage weapon, and potentially even learn something in the process, check out the “tutorial” video [Mehdi Sadaghdar] did back in 2014. We did mention you definitely shouldn’t do this at home, right?

This Compact Pi Terminal Will Show You The Way

The Raspberry Pi holds incredible promise for those looking to build a small mobile terminal that they can take with them on the go, something you can throw into your bag and pull out whenever there’s some hacking to be done. But getting the diminutive Linux board to that point can take quite a bit of work. You need to find a suitably small keyboard, design a custom case, and wire it all up without letting any of that pesky Magic Smoke escape.

But a recent project from [remag293] might make things a bit easier for those looking to get their feet wet in the world of custom mobile computers. The boxy handheld device has everything you need, and nothing you don’t. A basic case, a short parts list, and an absolute minimum of wiring. What’s not to love? Even if you don’t make an exact clone of this device, it’s an excellent reference to quickly bootstrap your own bespoke terminal.

So what’s inside the 3D printed case? Not a whole lot, really. Obviously there’s a Raspberry Pi, a 3.5 inch TFT touch screen display, and a miniature keyboard. The keyboard is of the Bluetooth variety, and other than being freed from its enclosure and wired into the header on the display module for power, it’s otherwise stock.

As for the parts you can’t see from the outside, there’s a 3.7 V 4400 mAh battery pack and an Adafruit PowerBoost 1000 module to handle charging and power distribution. Beyond the big lighted button on the side (which you could certainly replace with something more low-key should you chose), that’s about it. When it’s all together, you’ve got a battery powered computer that’s ready for the road with a minimum amount of fuss.

If you’re looking for something that’s a bit larger, and more than a little unconventional, you could start by printing out a full cyberdeck. After all, if you’re going to build your own non-traditional portable computer, you might as well go all out.

3D Printed Swirl Rocket Injector Turns Up The Heat

Conceptually speaking, a liquid propellant rocket engine is actually a very simple piece of hardware. All you need to do is spray your fuel and oxidizer into the combustion chamber at the proper ratio, add a spark, and with a carefully designed nozzle you’re off to the races. Or the Moon, as the case may be. It’s just that doing it in the real-world and keeping the whole thing from exploding for long enough to do some useful work is another story entirely.

Taking the process one step at a time, [Luke Walters] has been working on a 3D printed injector that tackles the first half of the problem. After nearly a dozen different prototypes, he’s come up with a printable injector design that atomizes the fuel and combines it with pressurized air at a suitable ratio for combustion. As you can see in the video at the break, it’s certainly capable of generating some impressive fireballs.

A cloud of highly atomized alcohol from the injector.

The internal passages of the injector have been designed in such a way that fuel (91% isopropyl alcohol) and air are spinning in opposite directions when they meet. This promotes more complete mixing, which in turn leads to a more efficient burn. Originally developed in the 1930s, so-called “swirl injectors” of this type were one of the key technological advancements made by Germany’s V-2 rocket program. Some ideas never go out of style.

Since the injector only touches the fuel and air prior to ignition, it doesn’t need to be particularly heat resistant. To be on the safe side [Luke] has printed the part in PETG at 100% infill, but in reality the flame front is far enough away that temperature isn’t much of a concern. That said, he does hope to eventually fit these injectors into some kind of combustion chamber, which is where things will start getting toasty.

To be clear this is not a rocket engine, and it produces no appreciable thrust. Turning a big flame into a useful means of propulsion is where things get tricky, almost as though it’s rocket science or something. But that doesn’t mean it can’t be done by suitably ambitious hackers.

Continue reading “3D Printed Swirl Rocket Injector Turns Up The Heat”

Surviving The Apocalypse With A Briefcase Full Of Pi

Let’s imagine that you’ve spent most of your life indoors tinkering with electronic gadgets and that you don’t have a lot of practical survival experience. Since you’re currently reading Hackaday, it shouldn’t be much of a stretch for you. Let’s further imagine that our entire civilization gets upended by an ecological disaster, nuclear war, invaders from Zeta Reticuli, that sort of thing. What do you do?

If you’re [Evan Meaney], you might start by retrieving the Crash Recovery Device from its EMP shielded storage nook. This mobile digital library is designed to serve as a backup copy of all the information we’d lose in a post-Internet world. It holds detailed geological maps, a library of survival manuals, agriculture guides, and should you get bored, the entirety of Wikipedia.

Of course, having all that information in a digital format is no good if you can’t access it. Rather than designing a device from scratch, [Evan] based his rugged command center on the Raspberry Pi Recovery Kit by [Jay Doscher].

He deleted the more esoteric components such as the mil-spec connectors on the front panel, and improved the ability to switch between different power sources with a capacitor bank big enough to smooth out any momentary interruptions. There’s also added circuitry so the device can be run on a wider range of voltages, allowing the use of whatever batteries or power sources can be scrounged up. [Evan] even thought to use automotive style fuses that could be pilfered from abandoned vehicles if necessary.

We know what you’re probably thinking; a better way to hone your survival skills and prepare for a disaster would be to just go camping a few times a year. Fair enough. But if you’re a city dweller who might not have the option, it’s hard to argue that you wouldn’t be better off having a mobile repository of survival information to consult should you need it. Doubly so if it looks this cool.

Continue reading “Surviving The Apocalypse With A Briefcase Full Of Pi”

Forming Sheet Metal Parts With 3D Printed Dies

Using 3D printed forms to bend sheet metal isn’t exactly new. We’ve seen several people create custom dies for their brakes, and the results have shown the concept has merit for small-scale production. But that’s usually where the process ends. A bend here or there is one thing, but the ability to form a complex shape with them has always seemed like asking too much. But judging by his recent experiments, [Shane Wighton] is very close to changing that perception.

The process at work here is, relatively speaking, pretty simple. You print out the upper and lower die, put a piece of sheet metal between them, and then smash them together with a hydraulic press. If everything works correctly, and your CAD skills hold true, the metal will take the desired shape.

Of course, that’s vastly oversimplifying things. As [Shane] explains in the video after the break, there are many nuances to forming sheet metal like this that need to be taken into account, and iteration and experimentation are basically unavoidable. So it’s a good thing you can rapidly redesign and reprint the dies.

Which isn’t to say that the dies themselves didn’t come with their own unique set of challenges. The first ones shattered under the pressure, and it took a few design revisions and eventually a switch to a stronger resin before [Shane] got a set of dies that could form the desired piece. Even still, he’s had a lot of trouble getting the printed parts to survive multiple uses. But he’s confident with some more refinements he could get a repeatable process going, and thinks ultimately producing runs of up to 100 parts on a set of printed dies isn’t out of the question.

Logically, it would seem plastic isn’t an ideal choice for punching and shaping metal. Frankly, it’s not. But if you’re doing in-house manufacturing, the ability to produce complex tooling quickly and easily can help make up for any downsides it might have.

Continue reading “Forming Sheet Metal Parts With 3D Printed Dies”

Divvy Out The Crypto With This Physical Bitcoin Faucet

For those unfamiliar with the term, a “Bitcoin Faucet” is usually used as an incentive in software that wants your attention. Complete a captcha or look at and advertisement and you get one millionth of a BTC, that sort of thing. You’re never going to get rich off of one of them, but most people aren’t going to turn down free money either. The latest project from [TJ Bruno] follows that same concept and brings it into the physical world. But you still aren’t going to get rich off of it.

The hardware used for this corporeal Bitcoin Faucet is pretty simple. All you need is a Raspberry Pi, a camera module, and a 2.8″ touch LCD. Naturally you could use a larger screen if you wanted, but then it wouldn’t fit inside of the very slick 3D printed stand that [TJ] developed. We might consider upgrading to a slightly speedier Pi though, in the demonstration video it looks like the Zero is struggling pretty hard to handle the GUI.

Using the Faucet is straightforward enough. You tap the screen and place a QR code representing your Bitcoin wallet on the device’s tray, where it’s scanned by the camera. In a few seconds the Faucet shows a QR code on its own screen that will point your phone’s browser to the transaction details so you can verify your digital coinage is on the way.

You might be wondering why you’d want to have a device that sits there waiting to pay out fractions of a BTC to anyone who’s willing to flash their wallet at it. We’re not entirely sure, though it might make for an interesting way to raise awareness about cryptocurrency. In this particular case though, [TJ] says he was just looking for a project that would give him an excuse to hone his Python skills. Nothing wrong with that around these parts.

Watching the growth of cryptocurrency from our unique vantage point, we can see how the hacker’s interest in Bitcoin as changed over the years. Where we once saw people excited about building custom mining rigs, we now see counters that tick down as the last coins are put into circulation. Looking at projects like this, it seems hackers are happy enough to just give the things away in an interesting way.

A Wireless Controller For The Mostly Printed CNC

The Mostly Printed CNC (MPCNC) is an impressive project in its own right, allowing anyone with a 3D printer and some electrical conduit to build their own fairly heavy-duty CNC platform perfect for routing. Customization is the name of the game with the MPCNC, and few machines will look the same when they’re done. But even fewer will feature a control interface nearly as slick as the wireless handset that [Steve Croot] has put together for his.

On the hardware side, the project is fairly straightforward. Inside the 3D printed enclosure is a 4.3″ Nextion touchscreen, a Mega 2560 PRO microcontroller, a nRF24L01 2.4 GHz transceiver, and a 4000 mAh 3.7 V LiPo battery with appropriate charging circuit. Besides the physical toggle switch to turn the handheld on and off, all of the device’s functions are touch controlled. For the receiver side, [Steve] is using another nRF24L01 radio and microcontroller pair to toggle relays and shuffle the appropriate G-code commands around.

But what really makes this project shine is the software. As you can see in the video after the break, [Steve] has done an absolutely phenomenal job with the user interface on this controller. The themed boot screen and concise iconography give the controller a very professional look, and the ability to jog the machine around using taps on a virtual workspace helps keep the touch interface from being a gimmick.

We’ve seen some impressive custom-built CNC controllers over the years, but between the mostly off-the-shelf hardware used and impressive UI, we think [Steve] has created something unique. It looks like he’s keeping the source code to himself for the time being, but hopefully he sees fit to release it in the future; a project of this caliber deserves to become more than a one-off creation.

Continue reading “A Wireless Controller For The Mostly Printed CNC”