A Robust ESP8266 RFID Access Control System

By now we’ve seen plenty of projects that use an ESP8266 as a form of rudimentary access control: tap a button on your smartphone, and the door to your apartment unlocks. With the power and flexibility of the ESP, it’s a very easy project to pull off with minimal additional hardware. But what about if you want to get a little more serious, and need to support many users?

Rather than reinvent the wheel, you might want to check out the extremely impressive ESP-RFID project. It’s still based on the ESP8266 we all know and love, but it combines the diminutive WiFi-enabled microcontroller with a nice custom PCB and some exceptionally slick software to create a very professional access control system without breaking the bank. As the name implies, the system is geared towards RFID authentication and supports readers such as the MFRC522, PN532 RFID, or RDM6300. Add in a stack of Mifare Classic 1KB cards, and your hackerspace is well on the way to getting a new door control system.

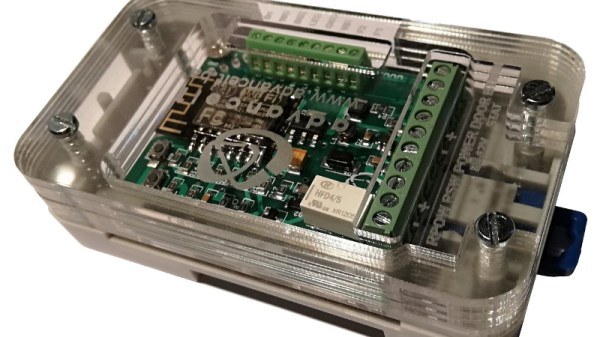
The official hardware for ESP-RFID can be purchased through Tindie with or without an installed ESP-12F module, but as it’s a fully open source project, you’re also free to build your own version if you’d like. In either event, the board allows you to easily connect the ESP up to your RFID reader of choice, as well as door sensors and of course the door locks themselves.

On the software side of things, ESP-RFID should be able to handle about 1000 unique users and their RFID cards before the relatively limited RAM and storage of the ESP catches up with it. But if you’ve got that many people coming and going in your hackerspace, it might be time to update your systems to begin with. Incidentally, the project makes no guarantees about the security of the ESP-RFID code, and says that the system shouldn’t be used for secure locations. That said, you can run ESP-RFID without an Internet connection to reduce your attack surface, at the cost of losing NTP time synchronization.

If you’re not managing a few hundred users and their RFID cards, one of the more simplistic ESP8266 door locks might be more your speed. We’ve also seen similar tricks pulled off with the Particle Photon, in case you’ve got one of those rattling around the parts bin.

Bringing A Child’s Play Kitchen To Life

Given how many adults will go out of their way to avoid spending any extended amount of time in the kitchen, it’s pretty amazing how much children love playing in their miniature versions. Especially since they tend to be pretty simple: usually they’re little more than different sized boxes made out of MDF to represent the refrigerator, oven, and microwave. Of course, some kids are fortunate enough to have hackers and makers for parents.

[Brian Lough] wanted to get his two year old daughter her own play kitchen, but wasn’t terribly impressed with anything on the market. So he decided to start with the IKEA Duktig and add in his own personal touches to turn the stark white playset into something that would really get his daughter’s imagination going. With the liberal application of RGB LEDs and microcontrollers, her kitchen is sure to be envy of the sandbox.

Being the class act that he is, [Brian] starts his write-up acknowledging the various IKEA Duktig hacks and modifications that served as inspiration for his own build. Most of the prior art out there relates to making the microwave and oven a bit more exciting with the addition of lights and sounds, which ultimately ended up being the way he approached his daughter’s version as well.

For the oven, [Brian] decided to add some big arcade buttons over the door which would change the color of the RGB LEDs inside. He thought this association would be a good way to help his daughter learn her colors, since she’ll be able to see the oven change color when she presses the corresponding button. He also added a knob to control the intensity of the light, meant to be analogous to the temperature control in a real oven.

The modifications to the microwave are a bit more extensive, including a “timer” made out of a TM1637 LED display in a 3D printed panel complete with a buzzer to indicate when the plastic food has been thoroughly illuminated. [Brian] even made it so the LEDs in the NeoPixel ring light up in a spinning pattern to cast some shadows and simulate movement. He notes that the microwave was actually a bit overwhelming to his daughter at first, but after a couple months of getting used to the functions, she enjoys it as much as the oven.

While hacking a play kitchen might be new territory for him, [Brian] is no stranger to building awesome stuff. We’ve previously seen him put together a YouTube subscriber counter in the style of Tetris, and he even managed to create a gorgeous looking display out of shoelaces of all things.

Mods Keep The WaveBird Kicking In The Switch Era

Nintendo made some questionable decisions during the early 2000’s, but developing the WaveBird certainly wasn’t one of them. Years before wireless controllers were the standard on home game consoles, the WaveBird gave GameCube owners a glimpse into the future. It managed to deliver lag-free gaming without resorting to easily-blocked infrared, and had a battery life and range long enough that there was really no downside to cutting the cord aside from the lack of rumble support.

In fact, the WaveBird was such a good controller that some fans just can’t put the thing down even in 2019. [Bill Paxton] loves his so much that he decided to modify it so he could use it on Nintendo’s latest money printing machine, the Switch, without having to fiddle with any adapters. While he was at it, he decided to fix the only serious drawback of the controller and hack in some rumble motors; arguably making his re-imagined WaveBird superior in just about every way to the original.

It might be counter-intuitive, but the trick here is that [Bill] actually took the internals from a standard wired GameCube controller and fitted it all into the case for the WaveBird. That’s how he got the rumble support back, but where does the signature wireless capability come from?

For that, he took apart a “GBros. Wireless Adapter” from 8BitDo. This gadget is intended to let you use your existing GameCube controllers on the Switch wirelessly, so all he had to do was shove its PCB inside the controller and wire it directly to the pads on the controller’s board. Thankfully, the WaveBird was rather husky to begin with, so there’s enough space inside to add all the extra hardware without much fuss.

Between modifications like this and efforts to reverse engineer the controller’s wireless protocol, hackers aren’t about to let this revolutionary accessory go gently into that good night. You might see a GameCube slaughtered for a meme, but WaveBirds never die.

Continue reading “Mods Keep The WaveBird Kicking In The Switch Era”

Building An RC Air Boat From Garbage

What do you get when you combine an old optical drive, some empty soda bottles, and a microcontroller? Well…nothing, really. That’s still just a pile of rubbish. But if you add in a battery, an RC receiver, and some motors, you’re getting dangerously close to a fun little toy to kick around the pond as [Antonio Rizzo] recently demonstrated.

A couple of plastic bottles lashed together make up the hull of the boat, and [Antonio] has used the internal frame of an old optical drive bent at a 90 degree angle to hold the two small DC motors. In a particularly nice touch, the drive’s rubber anti-vibration bushings are reused as motor mounts, though he does admit it was just dumb luck that the motors were a perfect fit.

For the electronics, [Antonio] has paired a custom motor controller up with the uChip, a diminutive Arduino-compatible microcontroller in a narrow DIP-16 package. Wireless communication is provided by an off-the-shelf cPPM receiver such as you might see used in a small plane or quadcopter.

The whole build is powered by a common 18650 lithium-ion battery, which could also be easy enough to recover from the trash given how common they are in laptop batteries; though if you threw a new cell into this build we wouldn’t hold it against you. Everything is put into a high-tech plastic sandwich bag to provide minimum of waterproofing with the minimum of effort.

If using a commercial RC receiver and transmitter is a bit too mainstream for your tastes, you could always roll your own radio.

Continue reading “Building An RC Air Boat From Garbage”

Gardening As Nature Intended, With An Arduino

We’re not exactly what you’d call naturalists here at Hackaday, so to us, the idea that hot pepper seeds need to germinate in hot conditions sounds suspiciously like a joke. The sort of thing somebody might tell you right before they try to sell you an elevator pass, or cram you into a locker. But we don’t think [Dean] would have gone through so much trouble if it wasn’t true. You’re still not going to sell us an elevator pass, though. Not again.

According to [Dean], the Carolina Reaper pepper seeds he bought from Puckerbutt Pepper Company (truly a name you can trust) recommend that they be germinated at a temperature between 80 and 85 degrees Fahrenheit for up to eight weeks. To make sure they were maintained at the optimal temperature for as long as possible, he decided to get a heating pad he could place under the seeds to keep them warm. He just needed some way to make sure the heat only kicked on once the soil temperature fell out of the sweet spot.

To get an accurate reading, [Dean] ended up going with a waterproof K-type thermocouple connected to a SainSmart MAX6675 module that could be buried amongst the seeds. When the soil temperature drops below 82.5 F, it kicks on the heating mat through an IoT Relay by Digital Loggers. He even added in a capacitive soil moisture sensor and a couple of LEDs so he could tell from across the room if he needed to water what he loving refers to as his “Hell Berries”

Looking back through the archives, we see a considerable overlap between hacking and gardening. Since success demands the careful control and monitoring of a myriad of variables, it seems the sort of thing that’s ripe for gloriously over-engineered automation. Especially if you’re trying to get the things to sprout off-world.

Israel’s Moon Lander Crashed, And That’s OK

Some bittersweet news today as we get word that Israel’s Beresheet spacecraft unfortunately crashed shortly before touchdown on the Moon. According to telemetry received from the spacecraft right up until the final moments, the main engine failed to start during a critical braking burn which would have slowed the craft to the intended landing velocity. Despite attempts to restart the engine before impact with the surface, the craft hit the Moon too hard and is presumably destroyed. It’s likely that high resolution images from the Lunar Reconnaissance Orbiter will eventually be able to give us a better idea of the craft’s condition on the surface, but at this point the mission is now officially concluded.

The Beresheet Lander

It’s easy to see this as a failure. Originally conceived as an entry into the Google Lunar X Prize, the intended goal for the $100 million mission was to become the first privately funded spacecraft to not only touch down on the lunar surface, but navigate laterally through a series of powered “hops”. While the mission certainly fell short of those lofty goals, it’s important to remember that Beresheet did land on the Moon.

It didn’t make the intended soft landing, a feat accomplished thus far only by the United States, Russia, and China; but the fact of the matter is that a spacecraft from Israel is now resting on the lunar surface. Even though Beresheet didn’t survive the attempt, history must recognize Israel as the fourth country to put a lander on the surface of our nearest celestial neighbor.

It’s also very likely this won’t be the last time Israel reaches for the Moon. During the live broadcast of the mission, after it was clear Beresheet had been lost, Prime Minister Benjamin Netanyahu vowed his country would try again within the next two years. The lessons learned today will undoubtedly help refine their next mission, and with no competition from other nations in the foreseeable future, there’s still an excellent chance Israel will be able to secure their place in history as the fourth country to make a successful soft landing.

Beresheet’s view during descent

Of course you’ve got to get to the Moon before you can land on it, and in this respect, Beresheet was an unmitigated success. We previously covered the complex maneuvers required to put the craft into lunar orbit after riding to space as a secondary payload on the Falcon 9 rocket; a technique which we’ll likely see more of thanks to the NASA’s recent commitment to return to the Moon. Even if Beresheet never attempted to land on the surface, the fact that it was able to enter into a stable lunar orbit and deliver dramatic up-close images of the Moon’s surface will be a well deserved point of pride for Israel.

If there’s one thing to take away from the loss of Beresheet, it’s that travel among the stars is exceptionally difficult. Today we’re reminded that even the slightest miscalculation can quickly escalate into tragedy when we leave the relative safety of Earth’s atmosphere. In an era when a mega-rocket launching a sport’s car live on YouTube seems oddly common place, it can be easy to forget that humanity’s long path to space featured as many heartbreaking defeats as it does triumphant successes.

This won’t be the last time that hundreds of millions of dollars worth of high-tech equipment will be lost while pushing the absolute edge of the envelope, and that’s nothing to be upset over. Humans have an insatiable need to see what’s over the horizon and that means we must take on a certain level of risk. The alternative is stagnation, and in the long run that will cost us a lot more than a few crashed probes.

ESP32 Alarm Clock Doesn’t Skimp On The Features

The ESP family of microcontrollers is absolutely on fire right now, with a decent chunk of the projects that come our way now based on one of the impossibly cheap WiFi-enabled boards. In fact, they are so cheap and popular that we’ve started to see a somewhat unexpected trend; people have a tendency to use them as drop-in replacements, despite the more modern boards being considerably more powerful than required. The end result is a bunch of projects in which the ESP is simply underutilized. It’s not a big deal, but somewhat disappointing to see.

But we can assure you this ESP32 alarm clock created by [Pangodream] is absolutely not one of them. He’s packed an impressive number of features into this unassuming little timepiece, and it’s really an excellent example of how much these boards are capable of without breaking a sweat. From DIY touch sensors to the Android application used to configure the clock over the network, this project is overflowing with neat hardware and software tricks worth taking a closer look at.

Inside the 3D printed case, the clock features a BH150 light sensor, the very popular DHT-11 for detecting temperature and humidity, as well as a ILI9341 2.8 inch LCD for the display. In a particularly clever touch (get it?), [Pangodream] used three coins connected to the digital pins of the ESP32 as capacitive sensors. These allow him to interact with the click just by tapping the top of the case, and saved him the trouble of adding traditional switches or buttons. We might have put some indentations in the top case to make identifying which of the three “buttons” you’re pushing, but we suppose the invisible interface does make things look a little more futuristic.

But if even that is too much physical touching for you, then [Pangodream] has come up with a fairly robust system for controlling and interacting with the clock over the network. It’s not just a convenient way of setting the time, a good number of the clock’s functions can be polled and configured in this manner; everything from the sensitivity of the touch sensors to how many times it will beep when the alarm goes off. To make things easier, he’s even wrapped it all up in a handy Android application for on the go configuration.

If this clock doesn’t offer you the level of over-engineering you require, check out this build that uses no less than five ESP32s to get the job done. Or maybe this one that hooks into NASA’s Deep Space Network.

Continue reading “ESP32 Alarm Clock Doesn’t Skimp On The Features”