Be Ready To Roll With Universal Electronic Dice

There are applications you can download for your smartphone that can “roll” an arbitrary number of dice with whatever number of sides you could possibly want. It’s faster and easier than throwing physical dice around, and you don’t have to worry about any of them rolling under the couch. No matter how you look at it, it’s really a task better performed by software than hardware. All that being said, there’s something undeniably appealing about the physical aspect of die rolling when playing a game.

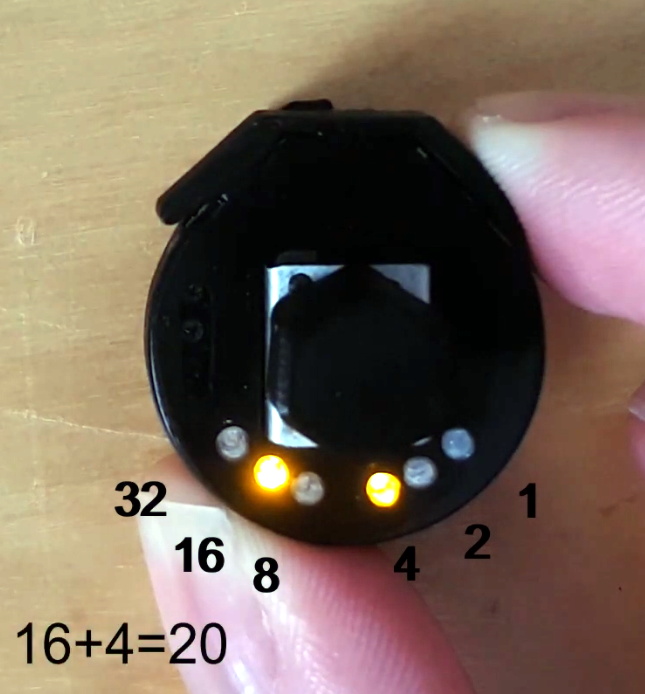
Luckily, [Paul Klinger] thinks he has the solution to the problem. His design combines the flexibility of software number generation with the small form factor of a physical die. The end result is a tiny gadget that can emulate anything from a 2 to 64 sided die with just 6 LEDs while remaining as easy to operate as possible. No need to tap on your smartphone screen with Cheetos-stained hands when you’ve got to make an intelligence check, just squeeze the Universal Electronic Die and off you go. Granted you’ll need to do some binary math in your head, but if you’re the kind of person playing D&D with DIY electronic dice, we think you’ll probably be able to manage.

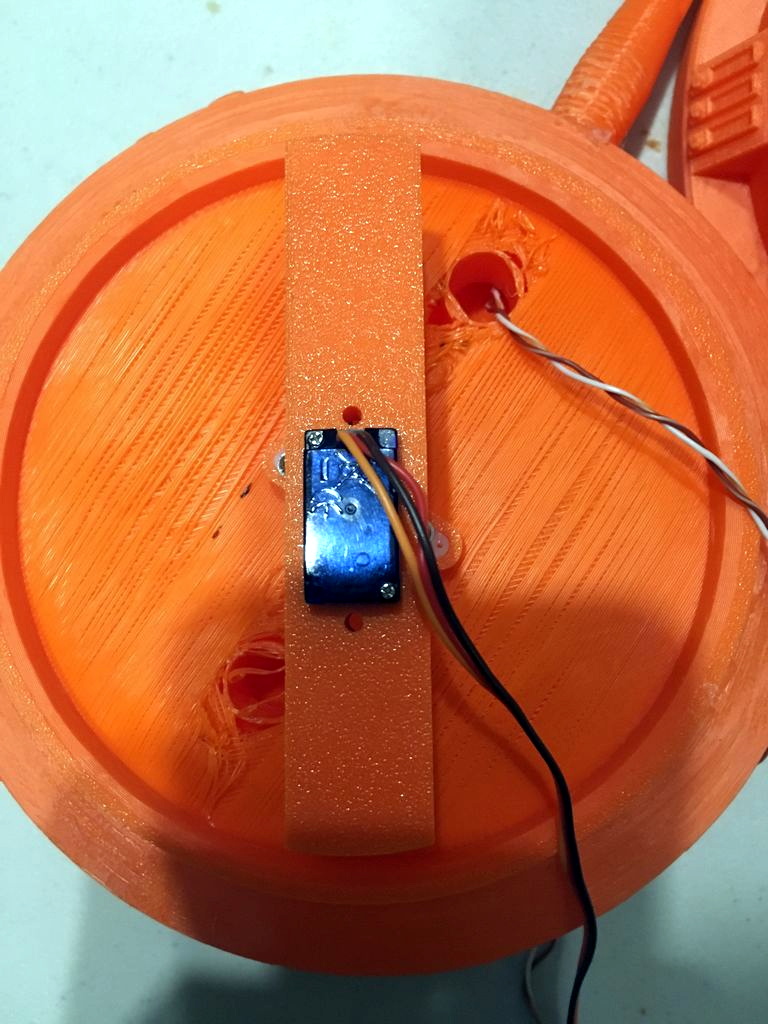
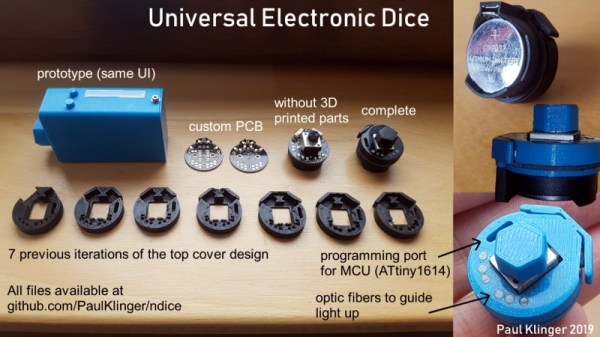
The 3D printed case that [Paul] came up with for his digital die is very clever, though it did take him awhile to nail it down. As shown in the video after the break, it took seven iterations before he got the various features such as the integrated button “flaps” right. There’s also a printed knob to go on the central potentiometer, to make it easier to select how many sides your virtual die will have.

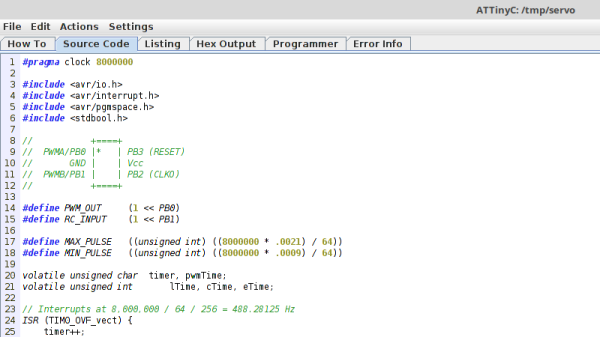
In terms of the electronics, the design is actually quite simple. All that lives on the custom PCB is a ATtiny1614 microcontroller, the aforementioned LEDs, and a couple of passive components. A CR2032 coin cell powers the whole operation, and it should provide enough juice for plenty of games as it’s only turned on when the user is actively “rolling”.

We’ve seen a number of very impressive electronic dice projects over the years, and it doesn’t look like the trend is slowing down anytime soon. Of course, if you absolutely must hear those physical dice rolling, we can help you with that too.

The Empire Strikes Back With The ESP8266

Like many of us, [Matthew Wentworth] is always looking for a reason to build something. So when he found a 3D model of the “DF.9” laser turret from The Empire Strikes Back intended for Star Wars board games on Thingiverse, he decided it was a perfect excuse opportunity to not only try his hand at remixing an existing 3D design, but adding electronics to it to create something interactive.

As the model was originally intended for a board game, it was obviously quite small. So the first order of business was scaling everything up to twice the original dimensions. As [Matthew] notes, the fact that it still looks so good when expanded by such a large degree is a credit to how detailed the original model is. Once blown up to more useful proportions, he modified the head of the turret as well as the barrel to accept the electronics he planned on grafting into the model.

He created a mount for a standard nine gram servo inside the head of the turret which allows it to rotate, and the barrel got an LED stuck in the end. Both of which are controlled with a NodeMCU ESP8266 development board, allowing [Matthew] to control the direction and intensity of the pew-pew over WiFi. He mentions that in the future he would like to add sound effects that are synchronized to the turret rotation and LED blinking.

For the software side of the project, he used Blynk to quickly build a smartphone interface for the turret. This is the first time he had used Blynk, and reports that outside of a little trial and error, it was some of the easiest code he’s ever written for the Arduino. This is a sentiment we’ve been seeing a lot of recently towards Blynk, and it’s interesting to see how often it shows up in ESP8266 projects now.

Looking ahead [Matthew] says he wants to paint and detail the turret, as the bright orange color scheme probably wouldn’t do terribly well on Hoth. If he can manage the time, he’d also like to add it to the long list of OpenCV-powered turrets that hackers love harassing their friends and family with.

Continue reading “The Empire Strikes Back With The ESP8266”

The “Impossible” Tech Behind SpaceX’s New Engine

Followers of the Church of Elon will no doubt already be aware of SpaceX’s latest technical triumph: the test firing of the first full-scale Raptor engine. Of course, it was hardly a secret. As he often does, Elon has been “leaking” behind the scenes information, pictures, and even video of the event on his Twitter account. Combined with the relative transparency of SpaceX to begin with, this gives us an exceptionally clear look at how literal rocket science is performed at the Hawthorne, California based company.

This openness has been a key part of SpaceX’s popularity on the Internet (that, and the big rockets), but its been especially illuminating in regards to the Raptor. The technology behind this next generation engine, known as “full-flow staged combustion” has for decades been considered all but impossible by the traditional aerospace players. Despite extensive research into the technology by the Soviet Union and the United States, no engine utilizing this complex combustion system has even been flown. Yet, just six years after Elon announced SpaceX was designing the Raptor, they’ve completed their first flight-ready engine.

The full-flow staged combustion engine is often considered the “Holy Grail” of rocketry, as it promises to extract the most possible energy from its liquid propellants. In a field where every ounce is important, being able to squeeze even a few percent more thrust out of the vehicle is worth fighting for. Especially if, like SpaceX, you’re planning on putting these new full-flow engines into the world’s largest operational booster rocket and spacecraft.

But what makes full-flow staged combustion more efficient, and why has it been so difficult to build an engine that utilizes it? To understand that, we’ll need to first take a closer look at more traditional rocket engines, and the design paradigms which have defined them since the very beginning.

Continue reading “The “Impossible” Tech Behind SpaceX’s New Engine”

A Network Attached Radiation Monitor

It started as a joke, as sometimes these things do. [Marek Więcek] thought building a personal radiation detector would not only give him something to work on, but it would be like having a gadget out of the Fallout games. He would check the data from time to time and have a bit of a laugh. But then things got real. When he started seeing rumors on social media that a nearby nuclear reactor had suffered some kind of radiation leak, his “joke” radiation detector suddenly became serious business.

With the realization that having his own source of detailed environmental data might not be such a bad idea after all, [Marek] has developed a more refined version of his original detector (Google Translate). This small device includes a Geiger counter as well as sensors for more mundane data points such as temperature and barometric pressure. Since it’s intended to be a stationary monitoring device, he even designed it to be directly plugged into an Ethernet network so that it can be polled over TCP/IP.

[Marek] based the design around a Soviet-era STS-5 Geiger tube, and outfitted his board with the high voltage electronics to provide it with the required 400 volts. Temperature, barometric pressure, and humidity are read with the popular Bosch BME280 sensor. If there’s no Ethernet network available, data from the sensors can be stored on either the built-in SPI flash chip or a standard USB flash drive.

The monitor is powered by a PIC32MX270F256B microcontroller with an Ethernet interface provided by the ENC28J60 chip. In practice, [Marek] has a central Raspberry Pi that’s polling the monitors over the network and collecting their data and putting it into a web-based dashboard. He’s happy with this setup, but mentions he has plans to add an LCD display to the board so the values can be read directly off of the device. He also says that a future version might add WiFi for easier deployment in remote areas.

Over the years we’ve seen a fair number of radiation monitors, from solar-powered WiFi-connected units to the incredible work [Radu Motisan] has done building his global network of radiation detectors. It seems hackers would rather not take somebody else’s word for it when it comes to the dangers of radiation.

Get Organized With This Raspberry Pi E-Ink Calendar

Like many hackers, we love e-ink. There’s something mesmerizing and decidedly futuristic about the way the images shift around and reconstitute themselves. Like something from Harry Potter, but that you can buy on Alibaba instead of from a shop in Diagon Alley. But as anyone who’s used the technology can tell you, the low refresh rate of an e-ink screen limits its potential applications. It works great for reading books, but beyond that its struggled to find its niche in a world of cheap LCDs.

But [Zonglin Li] has recently wrapped up a project which shows that e-ink has at least one more use case: personal calendars. You can get way with only updating the screen once a day so the refresh rate won’t matter, and the rest of the time it’s going to be static anyway so you might as well enjoy the energy savings of leaving the screen off. With a Raspberry Pi behind the scenes pulling data from the Internet, it can populate the calendar with everything from your personal schedule to when your favorite podcast drops.

In practice, [Zonglin] is actually updating the display every hour as he’s included the current weather conditions on the top left of the screen, but even still, this is a perfect application for the very unique properties of e-ink displays. The display is a 7.5 inch 640×384 model from Waveshare that retails for about $50 USD, so between the display, the Raspberry Pi, and something to put it all in (here, a picture frame) this is a pretty cheap build compared to some of the large format e-ink displays out there.

The software side is written in Python 3, and [Zonglin] has documented how others can easily plug in their own information so it can pull schedule data from Google Calendar and local conditions from Open Weather Map. The MIT licensed source code is also very well organized and commented, so this could serve as an excellent base if you’re looking to create a more comprehensive e-ink home information display.

If this seems a little too pedestrian for your tastes, you could always put together an e-ink movie player, a surprisingly functional Linux terminal, or a very slick ESP8266-based name tag. If you’ve got the better part of $1K USD and don’t know what to do with it, you could even get an e-ink license plate.

This 3D Printed LED Softbox Really Shines

Generally speaking, objects made on desktop 3D printers are pretty small. This is of course no surprise, as filament based printers are fairly slow and most don’t have very large beds to begin with. Most people don’t want to wait days for their project to complete, so they use 3D printed parts where it makes sense and supplement them with more traditional components such as aluminum extrusion wherever possible. But not always…

This 3D printed photography softbox created by [Nicholas Sherlock] doesn’t take the easy way out for anything. With the exception of the LEDs and the electronics to drive them, everything in the design has been printed on his Prusa i3. It wasn’t the easiest or fastest way to do it, but it’s hard to argue with the end result. Perhaps even more impressive than the final product is what it took to get there: he actually had to develop a completely new style of part infill he’s calling “Scattered Rectilinear” to pull it off.

Overall the design of the light itself isn’t that complex, ultimately it’s just a box with some LEDs mounted at the back and a pretty simple circuit to control their intensity. The critics will say he could have just used a cardboard box, or maybe wood if he wanted something a little bit stronger. But the point of this project was never the box itself, or the LEDs inside it. It’s all about the diffuser.

[Nicholas] forked Prusa’s version of Slic3r to add in his “Scattered Rectilinear” infill pattern, which is specifically designed to avoid the standard “ribs” inside of a 3D printed object. This is accomplished with randomized straight infill passes, rather than the traditionally overlapped ones. The inside of the print looks very reminiscent of fiberglass mat, which is perhaps the best way to conceptualize its construction. In terms of the final part strength, this infill is abysmal. But on the plus side, the light from the LEDs passing through it emerges with a soft pleasing look that completely obscures the individual points of light.

Anyone with a big enough 3D printer can run off their own copy of his light, as [Nicholas] has released not only his forked version of Slic3r but all of the STL files for the individual components. He’s also put together an exceptionally well documented Thingiverse page that has instructions and detailed build photos, something that’s unfortunately very rare for that platform.

If you’re in the market for a DIY softbox and don’t have a 3D printer handy, fear not. We’ve covered a few that you can build with more traditional methods, as well as several tips and tricks which you can use to get the most out of your photos and videos.

A Tiny IDE For Your ATtiny

When writing code for the ATtiny family of microcontrollers such as a the ATtiny85 or ATtiny10, people usually use one of two methods: they either add support for the chip in the Arduino IDE, or they crack open their text editor of choice and do everything manually. Plus of course there are the stragglers out there using Eclipse. But [Wayne Holder] thinks there’s a better way.

The project started out as a simple way for [Wayne] to program the ATtiny10 in C under Mac OS, but has since evolved into an open source, cross-platform integrated development environment (IDE) for programming a wide range of ATtiny chips in C, C++, or Assembly. Not only does it integrate the source code editor and programmer, but it even bundles in documentation for common variants of the chips including block diagrams and pinouts; making it a true one-stop-shop for ATtiny hacking.

His IDE runs under Java, including OpenJDK, and [Wayne] provides a stable pre-built executable for those who don’t want to clone the whole GitHub repository. He’s included the GNU/AVR toolchains, though notes that testing so far has been limited to Mac OS, and he’s interested in feedback from Windows and Linux users. Assembly is done either with GNU AVR-AS, or an assembler of his own design, though the latter is currently limited to the ATTiny10.

To actually get the code onto the chip, the IDE supports using the Arduino as a programmer as well as dedicated hardware like the BusPirate or the USBasp. If you go the Arduino route, [Wayne] has even come up with a little adapter board which he’s made available through OSH Park to help wrangle the diminutive chips.

The ATtiny10 might have something of a learning curve, but in exchange this family of tiny microcontrollers offers an incredible amount of capability. When you’re working with what’s essentially a programmable grain of rice, the only limit is your own creativity.