Home Server Has AMD CPU And IKEA Case

Readers who took part in the glory days of custom PC building will no doubt remember the stress of having to pick a case for their carefully-curated build. You may have wanted to lower the total cost a bit by getting a cheap case, but then you’d be stuck looking at some econo-box day in and day out. Plus, how do you post pictures online to boast about your latest build if there are no transparent windows and a lighting kit?

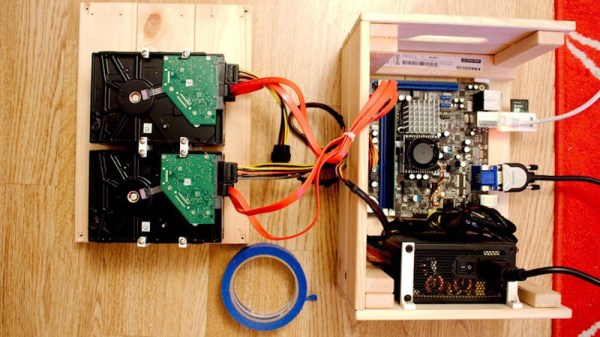
While some may have spent more time choosing their lighted case fans than their optical drive, [Miroslav Prašil] was surely not one of them. When he decided to build a new NAS for his home network, [Miroslav] decided he wanted to put all his money into the device’s internals, and house his build in a wooden storage crate from IKEA. While the low cost was certainly a major factor in the decision, it turns out the crate actually offers a decent amount of room for hardware components. As an added bonus, it doesn’t look completely terrible sitting out in the living room.

In a detailed series of posts on his blog, [Miroslav] walks us through the entire process of building what he has come to call the “NAScrate”. Wanting gigabit Ethernet and a real SATA controller, [Miroslav] went for the ASRock C70M1, a Mini-ITX board with integrated dual-core AMD processor. While not exactly a powerhouse, it will certainly wipe the floor with the fruit-inspired single board computers that so often dominate these types of builds.

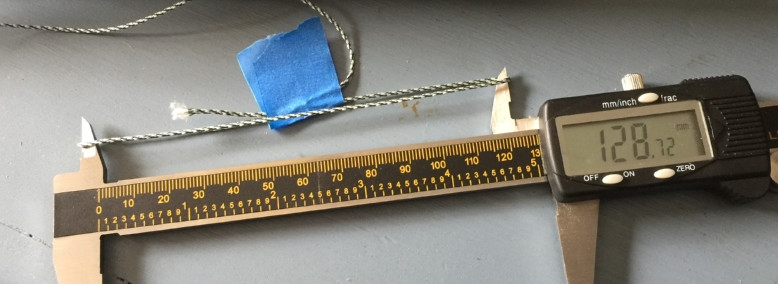
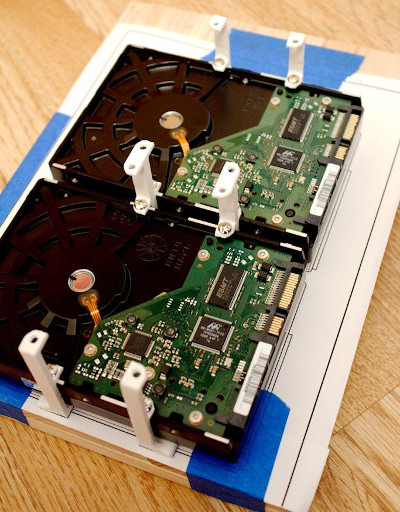
To get his clearances worked out, [Miroslav] rendered the entire build in OnShape, which gave him enough confidence in his design to move on to actual construction. The build involves several 3D printed parts, most notably some clever hard drive mounting brackets which allow the drives to be stacked into a space-saving arrangement while still leaving room for airflow between them.

[Miroslav] deftly avoids any religious debates by leaving off his particular choice for software and operating system on his newly constructed NAS, but he does mention that something like FreeNAS would be a logical choice.

While this may be the first wooden one we’ve covered so far, home servers in general are a favorite project for hackers, from budget-friendly scratch builds all the way up to re-purposed enterprise hardware.

3D Printed Helical Satcom Feed

With the advent of cheap software defined radios made popular by the RTL-SDR project a few years back, satellite communications are now within the budget of even the most modest hacker. For $20 USD you can get a USB SDR module that is more than capable of receiving signals from any number of geosynchronous satellites, but you’ll need something a little more robust than rabbit ears to pick up a signal broadcast from over 22,000 miles away.

Building a satellite-capable antenna isn’t necessarily difficult, but does involve a fair bit of arcane black magic and mathematics to do properly; something that can scare away those new to the hobby. But by using a 3D printed mandrel, [Tysonpower] has come up with a feed you can build and mount on a standard dish without having to take a crash course in antenna theory. [Tysonpower] reports the feed has a center frequency 1550 MHz, and works well for reception of Inmarsat, AERO and HRPT signals.

The channel in the 3D printed core of the feed ensures that the inserted wire is of the correct length and in the perfect position for optimal reception. All you need to do is print the core, wrap it with wire, and then solder the end to a connector on a ground-plane that’s nothing more than a sheet of aluminum. [Tysonpower] was even kind enough to model up a mount that will allow you to bolt this feed to a standard satellite dish.

We’ve previously covered using RTL-SDR to receive Inmarsat transmissions, and hardware for the Outernet project, both of which would be great applications for an antenna like this.

Continue reading “3D Printed Helical Satcom Feed”

Laser Levitation With Scrap Parts

After a year away from YouTube, the ever-energetic [Styropyro] has returned with whiteboard in hand to remind us just how little we actually know about lasers. In the last month he’s really hit the ground running with plenty of new content, but one video of his particularly stands out: a practical demonstration of laser levitation. Even better, unlike most of his projects, it looks like we can replicate this one without killing ourselves or burning our house down!

For those unaware, laser levitation is probably as close as we’ll get to Star Trek-style tractor beams in our lifetimes. In fact, the NASA Innovative Advanced Concepts program has been examining using the technology for capturing small particles in space, since it would allow sample collection without the risk of physical contamination. While the demonstration [Styropyro] performs lacks the “tractor” part of the equation (in other word’s, there’s no way to move the particle along the length of the beam) it does make us hopeful that this type of technology is not completely outside the reach of our home labs.

The trick seems to be with the focus of the laser beam itself. Your average laser pointer just doesn’t have the appropriate beam for this kind of work, but with a diode pulled from a DVD burner and a driver circuit made from parts out of the junk bin, the effect can be demonstrated very easily as long as you can keep the air in the room extremely still. Of course, what you’re trying to pick up is also very important, [Styropyro] has found that synthetic diamond powder works exceptionally well for this experiment. At about $1.60 a gram, it won’t break the bank either.

So how does it work? With a few trips to the aforementioned white board, Professor Pyro explains that the effect we’re seeing is actually electromagnetic. If the particle you want to levitate is small enough it will become polarized by the light, which is in itself an electromagnetic wave. Once you’ve got your mind wrapped around that, it logically follows that the levitating particle will experience the Lorentz force. Long story short, the particle is suspended in the air for the same reason that a projectile is ejected from a rail gun: if you’ve got enough power and the mass of the object is low enough, there will be an observable force.

We’ve been covering the work of [Styropyro] for years now, and are glad to see him back on YouTube creating new content and terrifying a new generation of viewers. Between this and the return of [Jeri Ellsworth], it’s like we’re experiencing a YouTube hacker Renaissance.

Continue reading “Laser Levitation With Scrap Parts”

Remote Controlled Jeep Destroyed For Your Amusement

Something you learn when you spend a good portion of your day trolling the Internet for creative and unique projects is that “Why?” is one question you should always be careful about asking. Just try to accept that, for this particular person, at this particular time, the project they poured heart and soul into just made sense. Trust us, it’s a lot easier that way.

This mantra is perhaps best exemplified (at least for today), by the incredible amount of work [Stephen Robinson] did to convert a real Jeep Cherokee into a remote control toy. But the crazy part it isn’t so much that he managed to convert a real Jeep to RC, it’s that the first thing he did with it was take it into a field and destroy it.

The stunt is part of a series of videos [Stephen] has on his YouTube channel called “How to learn anything”. His goal in this series is to learn two different skills from industry professionals and combine them in interesting and unconventional ways. The production quality on these videos is really top-notch, and definitely blew us away considering how few subscribers he currently has. If we had to guess, we’d say [Stephen] is about to get real big, real fast.

As it turns out, the process for turning a full size vehicle into a remote-controlled one isn’t actually that complex, relatively speaking. [Stephen] starts by removing the seat and replacing it with a metal frame that holds a motor salvaged from an electric wheelchair to turn the wheel, and a linear actuator to push the brake pedal. He lucked out a bit with the throttle, as this particular Jeep was old enough that there was still an easily accessible throttle cable they could yank with a standard hobby servo; rather than some electronic system they would have had to reverse engineer.

The rest of the hardware is pretty much your standard RC hobby gear, including a Spektrum DX6 transmitter and FPV equipment. Though due to continual problems with his FPV setup, [Stephen] eventually had to drive the Jeep up the ramp by line of sight, which took a few tries.

While this is still probably safer than riding around in a life-size quadcopter, we can’t say it’s the most sophisticated way a hacker has taken over a Jeep remotely.

Continue reading “Remote Controlled Jeep Destroyed For Your Amusement”

Homemade LED Clock Stands Test Of Time

In an era when you might get chastised if your mobile phone is more than two years old, it’s easy to forget that hardware was not always meant to be a temporary commodity. We acknowledge a few standout examples of classic hardware still surviving into the modern era, such as vintage computers, but they’re usually considered to be more of a novelty than an engineering goal. In a disposable society, many have forgotten that quality components and a well thought out design should give you a service life measured in decades, not months.

A perfect example of this principle is the beautiful LED clock built 40 years ago by [Davide Andrea]. A teenager at the time, [Davide] built this clock to be used by the local radio station, as clocks that showed seconds were important for timing radio shows. Finding it in storage recently, [Davide] took to the /r/electronics subreddit to report that it still works fine after all these years.

Cracking open the case shows a unique and highly functional construction style. Notches cut into the side panels of the case accept individual protoboards in a “blade” type configuration, with the blades connected by a handful of individual wires. No digging through the parts bin for a “worthless” old IDE cable to tear up back in the 1970’s.

Continue reading “Homemade LED Clock Stands Test Of Time”

Mini Millennium Falcon Is Envy Of The Neighborhood

Here’s a tip for any readers who may be expecting a child in the near future: there’s about a two year period where you can basically use your child as a Halloween prop. They’re too young to express any serious interest in what they want to dress up as, and as an added bonus, they generally spend most of their time being rolled around in a wheeled contraption anyway. As long as you can keep the little one warm and securely seated in the thing, you’ve essentially got free reign to put them into all sorts of elaborate vehicles.

Case in point, the awesome build that [shnatko] has dubbed the “Millennium Flyer”. Built atop his daughter’s plastic Radio Flyer wagon, the Millennium Flyer is constructed out of wood and foam board. By using the mounting holes in the wagon originally intended for an optional canopy, the ship itself can be removed to fly again next year.

[shnatko] notes that he possess no particular talent for the fine arts, so he decided to skin his build by printing out a high resolution image of the Millennium Falcon he found online. The amount of patience (not to mention printer ink) that this method took is considerable, but we think the final results speak for themselves.

To finish off his build [shnatko] found a blue cold cathode light from his PC modding days and rigged it up with a laptop battery he had laying around. Some foam ribs and wax paper to diffuse the light give it that iconic look from the “real” Falcon.

Between this build and the AT-AT rocking horse from a few weeks back, it seems we are in the golden age of childhood Star Wars conveyances. Though we wouldn’t mind seeing this get mounted to a racing Power Wheels either.

3D Printing Belts For Vintage Hardware

It may be hard for some of the younger readers to believe, but there was a time when hardware was full of little rubber belts. Tape decks, VCRs, even some computers: they all had rotating parts that needed to transfer power to other components, and belts were a cheap and quiet way to do it. Unfortunately, now decades later we realize that these little belts are often the Achilles heel of classic hardware, getting brittle and breaking long before the rest of the components are ready to give up the fight.

Which is exactly what [FozzTexx] found when trying to revive his newly purchased Commodore PET 2001. The belt inside of the cassette drive had become hard and fallen to pieces, and rather than hunt around for a replacement, [FozzTexx] reasoned he might be able to print one out of a flexible 3D printer filament like NinjaFlex. Besides, this wasn’t the only piece of vintage tech in his house that needed a belt replacement, so he figured it would be a worthwhile experiment.

As the original belt was little more than dust, [FozzTexx] had to design his replacement from scratch. He started by cleverly replicating the path the belt would need to take with string, and then measuring the inside diameter of the string circle with his calipers. [FozzTexx] then reduced the diameter by 5% to take into account the stretching of the new belt.

The profile of the belt was square, which made modeling and 3D printing much easier. [FozzTexx] just subtracted a smaller circle from a larger one in 2D, and then extruded that circle into the third dimension by 1.18 mm to match the height of the original part. Careful measurement paid off, and the newly printed NinjaFlex belt had his Commodore loading and saving programs on the first try.

We’ve covered the difficulty in sourcing replacement belts for old hardware previously, so it will be interesting to see if others are able to make use of the research [FozzTexx] has done here. Of course, longevity concerns are always brought up when NinjaFlex is used, so hopefully [FozzTexx] keeps us updated.