Face ID Defeated With 3D Printed Mask (Maybe)

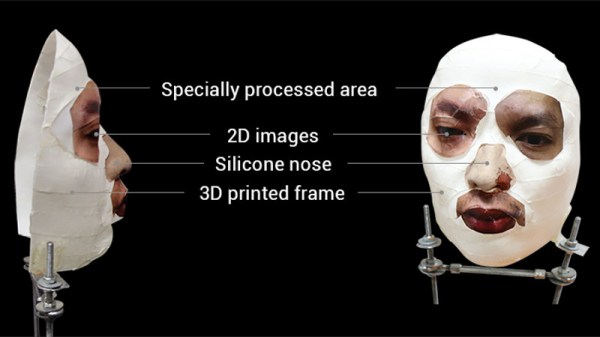
Information about this one is still tricking in, so take it with a grain of salt, but security company [Bkav] is claiming they have defeated the Face ID system featured in Apple’s iPhone X [Dead link, try the Internet Archive]. By combining 2D images and 3D scans of the owner’s face, [Bkav] has come up with a rather nightmarish creation that apparently fools the iPhone into believing it’s the actual owner. Few details have been released so far, but a YouTube video recently uploaded by the company does look fairly convincing.

For those who may not be keeping up with this sort of thing, Face ID is advertised as an improvement over previous face-matching identification systems (like the one baked into Android) by using two cameras and a projected IR pattern to perform a fast 3D scan of the face looking at the screen. Incidentally, this is very similar to how Microsoft’s Kinect works. While a 2D system can be fooled by a high quality photograph, a 3D based system would reject it as the face would have no depth.

[Bkav] is certainly not the first group to try and con Apple’s latest fondle-slab into letting them in. Wired went through a Herculean amount of effort in their attempt earlier in the month, only to get no farther than if they had just put a printed out picture of the victim in front of the camera. Details on how [Bkav] managed to succeed are fairly light, essentially boiling down to their claim that they are simply more knowledgeable about the finer points of face recognition than their competitors. Until more details are released, skepticism is probably warranted.

Still, even if their method is shown to be real and effective in the wild, it does have the rather large downside of requiring a 3D scan of the victim’s face. We’re not sure how an attacker is going to get a clean scan of someone without their consent or knowledge, but with the amount of information being collected and stored about the average consumer anymore, it’s perhaps not outside the realm of possibility in the coming years.

Since the dystopian future of face-stealing technology seems to be upon us, you might as well bone up on the subject so you don’t get left behind.

Thanks to [Bubsey Ubsey] for the tip.

Continue reading “Face ID Defeated With 3D Printed Mask (Maybe)”

Conductive Concrete Confounds Circuitry

There’s a fairly good chance you’ve never tried to embed electronics into a chunk of concrete. Truth be told, before this one arrived to us via the tip line, the thought had never even occurred to us. After all, the conditions electronic components would have to endure during the pouring and curing process sound like a perfect storm of terrible: wet, alkaline, and with a bunch of pulverized minerals thrown in for good measure.

But as it turns out, the biggest issue with embedding electronics into concrete is something that most people aren’t even aware of: concrete is conductive. Not very conductive, mind you, but enough to cause problems. This is exactly where [Adam Kumpf] of Makefast Workshop found himself while working on a concrete enclosure for a color-changing barometer called LightNudge.

While putting a printed circuit board in the concrete was clearly not workable, [Adam] was hoping to simplify manufacturing of the device by embedding the DC power jack and capacitive touch sensor into the concrete itself. Unfortunately, [Adam] found that there was a resistance of about 200k Ohm between the touch sensor and the power jack; more than enough to mess with the sensitive measurements required for the touch sensor to function.

Even worse, the resistance of the concrete was found to change over time as the curing process continued, which can stretch out for weeks. With no reliable way to calibrate out the concrete’s internal conductivity, [Adam] needed a way to isolate his electronic components from the concrete itself.

Through trial and error, [Adam] eventually found a cheap method: dipping his sensor pad and wire into an acrylic enamel coating from the hardware store. It takes 24 hours to fully cure, and two coats to be sure no metal is exposed, but at least it’s an easy fix.

While the tip about concrete’s latent conductivity is interesting enough on its own, [Adam] also gives plenty of information about casting concrete parts which may be a useful bit of knowledge to store away for later. We have to admit, the final result is certainly much slicker than we would have expected.

This is the first one we’ve come across that’s embedded in concrete, but we’ve got no shortage of other capacitive touch projects if you’d like to get inspired.

Fluid Simulations In The Kitchen Sink

In an age of ultra-powerful GPUs and cheap processors, computational techniques which were once only available to those with a government-sized R&D budgets are now available to the everyday hacker. An example of industry buzzword turned desktop software is the field of “computational fluid dynamics”, which put simply allow modeling how gasses or liquids will behave when moving through a cavity under specific conditions. Extensive utilization of these fluid simulations are often cited as one of breakthrough techniques which allowed SpaceX to develop their engine technology so rapidly when compared to Apollo and Shuttle era methods.

But just because anyone with a decent computer has access to the technology used for developing rocket engines doesn’t mean they have to use it. What if you prefer to do things the old-fashioned way? Or what if, let’s me honest, you just can’t figure out how to use software like Autodesk CFD and OpenFOAM? That’s exactly where [Desi Quintans] found himself when developing GUST, his cooling duct for i3-type 3D printers.

[Desi] tried to get the big name fluid simulation projects working with his prototype designs for an improved cooling duct, but had no end of trouble. Either the learning curve was too steep, or the simulation wasn’t accurate enough to give him any useful data. But remembering that air is itself a fluid, [Desi] took his simulation from the computer to the sink in order to better visualize what his cooling duct was doing to the airflow.

[Desi] printed up a box with a hole in the bottom that would connect up to his nozzles under test. As the volume of water in the box would be a constant between tests, he reasoned that this would allow him to evaluate the different nozzles at the same pressure. Sure enough, he found that the original nozzle design he was using caused chaotic water flow, which backed up what he was seeing in his experiments when mounted onto the printer.

After several iterations he was able to tame the flow of water by using internal baffles and fins, which when tested in water created something of a laminar flow effect. When he tried this version on the printer, he saw a clear improvement in part cooling, verifying that the behavior of the air and water was close enough for his purposes.

We’ve seen other projects that successfully used fluid simulations in their design before, but the quick and dirty test procedure [Desi] came up with certainly has its charms.

Cat Feeder Has Steampunk Flair And A GMail Account

While it is often said that “necessity is the mother of invention”, we can’t say that’s always been our experience here at Hackaday. You won’t need to search too long before you find a project or hack on this site that definitely falls out of the realm of strict necessity. But that’s part of the fun, there’s a reason this site isn’t called AppropriateUseOfTime.com

But when [Sam Storino] couldn’t seem to stop his cats from howling for their supper at 3:00 AM, he had the perfect opportunity to fulfill that age-old wisdom. Not only did he manage to turn a trip to the plumbing isle of his local home improvement store into a very Steampunk-looking automatic cat feeder, but he also found the time to write up an exceptionally detailed series of blog posts on what he learned during the process.

The heart of the machine is everyone’s favorite Linux board, the Raspberry Pi. You might be thinking the Pi is overkill for a simple timer, and you’d be right. Rather than just dump the food out on a set schedule, [Sam] decided to get a little fancy and come up with some Python scripts that will monitor a GMail inbox and activate the feeder hardware when it receives an email with the title “feed cats”. He then uses IFTTT to send the appropriately named email to the GMail account of his cat feeder on a specific schedule. Hey, nobody said necessity was the mother of straightforward invention.

In the final post of the series, [Sam] goes over the hardware side of the device. Copper pipe makes up the frame, which holds a commercial off-the-shelf dry food dispenser. The feeder was designed for manual operation, but by attaching a continuous rotation servo [Sam] can spin it up and dump a pre-measured amount of food via the Pi’s GPIO pins. The addition of some PVC pipe and fittings takes the food and (at least in theory) divides it equally between the two cat bowls below.

If you think [Sam] may have put a bit more thought than was necessary into something as simple as feeding his pets, keep in mind that he’s in exceptionally good company. Paging through the archives, it seems the intersection of felines and hackers is littered with gloriously complex contraptions.

Weatherproof Pi Looks Up So You Don’t Have To

Skywatching is a fascinating hobby, but does have the rather large drawback of needing to be outside staring at the sky for extended periods of time. Then there’s the weather to contend with, even if you’ve got yourself a nice blanket and it isn’t miserably cold, there might be nothing to see if cloud cover or light pollution is blocking your view.

Highly scientific testing procedure.

To address these issues, [Jason Bowling] decided to put a Raspberry Pi in a weatherproof enclosure and use it as a low-cost sky monitoring device. His setup uses the No-IR camera coupled with a cheap wide-angle lens designed for use with smartphone camera. The whole setup is protected from the elements by a clear acrylic dome intended for a security camera, and a generous helping of gasket material. Some experiments convinced [Jason] to add a light pollution filter to the mix, which helped improve image contrast in his less than ideal viewing area.

The software side is fairly straightforward: 10 second exposures are taken all night long, which can then be stitched together with ffmpeg into a timelapse video. [Jason] was concerned that the constant writing of images to the Pi’s SD card would cause a premature failure, so he set it up to write to a server in the house over SSHFS. Adding a USB flash drive would have accomplished the same thing, but as he wanted to do the image processing on a more powerful machine anyway this saved the trouble of having to retrieve the storage device every morning.

This isn’t the first time [Jason] has used a Pi to peer up into the heavens, and while his previous attempts might not be up to par with commercial offerings, they definitely are very impressive considering the cost of the hardware.

Continue reading “Weatherproof Pi Looks Up So You Don’t Have To”

Home Server Has AMD CPU And IKEA Case

Readers who took part in the glory days of custom PC building will no doubt remember the stress of having to pick a case for their carefully-curated build. You may have wanted to lower the total cost a bit by getting a cheap case, but then you’d be stuck looking at some econo-box day in and day out. Plus, how do you post pictures online to boast about your latest build if there are no transparent windows and a lighting kit?

While some may have spent more time choosing their lighted case fans than their optical drive, [Miroslav Prašil] was surely not one of them. When he decided to build a new NAS for his home network, [Miroslav] decided he wanted to put all his money into the device’s internals, and house his build in a wooden storage crate from IKEA. While the low cost was certainly a major factor in the decision, it turns out the crate actually offers a decent amount of room for hardware components. As an added bonus, it doesn’t look completely terrible sitting out in the living room.

In a detailed series of posts on his blog, [Miroslav] walks us through the entire process of building what he has come to call the “NAScrate”. Wanting gigabit Ethernet and a real SATA controller, [Miroslav] went for the ASRock C70M1, a Mini-ITX board with integrated dual-core AMD processor. While not exactly a powerhouse, it will certainly wipe the floor with the fruit-inspired single board computers that so often dominate these types of builds.

To get his clearances worked out, [Miroslav] rendered the entire build in OnShape, which gave him enough confidence in his design to move on to actual construction. The build involves several 3D printed parts, most notably some clever hard drive mounting brackets which allow the drives to be stacked into a space-saving arrangement while still leaving room for airflow between them.

[Miroslav] deftly avoids any religious debates by leaving off his particular choice for software and operating system on his newly constructed NAS, but he does mention that something like FreeNAS would be a logical choice.

While this may be the first wooden one we’ve covered so far, home servers in general are a favorite project for hackers, from budget-friendly scratch builds all the way up to re-purposed enterprise hardware.

3D Printed Helical Satcom Feed

With the advent of cheap software defined radios made popular by the RTL-SDR project a few years back, satellite communications are now within the budget of even the most modest hacker. For $20 USD you can get a USB SDR module that is more than capable of receiving signals from any number of geosynchronous satellites, but you’ll need something a little more robust than rabbit ears to pick up a signal broadcast from over 22,000 miles away.

Building a satellite-capable antenna isn’t necessarily difficult, but does involve a fair bit of arcane black magic and mathematics to do properly; something that can scare away those new to the hobby. But by using a 3D printed mandrel, [Tysonpower] has come up with a feed you can build and mount on a standard dish without having to take a crash course in antenna theory. [Tysonpower] reports the feed has a center frequency 1550 MHz, and works well for reception of Inmarsat, AERO and HRPT signals.

The channel in the 3D printed core of the feed ensures that the inserted wire is of the correct length and in the perfect position for optimal reception. All you need to do is print the core, wrap it with wire, and then solder the end to a connector on a ground-plane that’s nothing more than a sheet of aluminum. [Tysonpower] was even kind enough to model up a mount that will allow you to bolt this feed to a standard satellite dish.

We’ve previously covered using RTL-SDR to receive Inmarsat transmissions, and hardware for the Outernet project, both of which would be great applications for an antenna like this.

Continue reading “3D Printed Helical Satcom Feed”