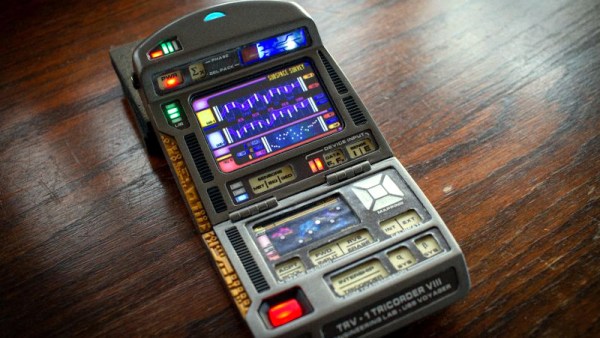
Enter The Matrix With This Custom PC Side Panel

With a new Matrix movie out now, it’s hardly a surprise that we’re starting to see more and more projects centered around the franchise’s iconic “Digital Rain” effect. A few particularly unique examples have floated to the top of this virtual tsunami of green-tinted sushi recipes, such as this very slick RGB LED PC side panel built by [Will Donaldson].

In place of the normal clear window in his PC case, [Will] has mounted a black acrylic sheet that has had all of the “code” characters laser-cut from it. Behind that is an array of WS2812B LED strips, nestled into vertically aligned channels that keep the light from bleeding out horizontally. A sheet of frosted plastic is sandwiched between the two, which helps diffuse the light so the individual LEDs aren’t as visible.

All of the LEDs are connected to a NodeMCU ESP8266 by way of a 74AHCT125 level-shifter, though [Will] notes you could certainly use a different microcontroller with some tweaks to the code. As it stands, the user selects from various lighting patterns using two potentiometers and a button that have been mounted next to the panel. But if you were so inclined, it certainly wouldn’t take much to adapt the firmware so that the lighting effects could be triggered from the PC.

The sticklers will note that this means the characters can’t actually change or move, but as you can see in the video below, it still looks quite impressive when the LEDs get going behind them. If you’re looking to recreate the look on a considerably smaller scale, check out this Arduino library that can make it rain on a TFT display with just a few lines of code.

Continue reading “Enter The Matrix With This Custom PC Side Panel”

The Pinouts Book Is Here, And It’s Just What You Need

Updates from the enigmatic [NODE] are unfortunately few and far between these days. In fact his latest post is only the second time we’ve heard from the hacker in 2021. But as we’ve come to expect from his white-on-sorta-black releases, it certainly doesn’t disappoint.

Just in time to ring in whatever holiday you may celebrate, [NODE] has unveiled The Pinouts Book. A project he’s been working on for some time now with colleague [Baptiste], the free PDF download contains over 300 pages of high-contrast hardware diagrams and their respective pinouts. It’s about as straightforward as you can get, beyond the dedication page in the beginning, there’s not a word of fluff in the entire document. This is a work of hacker minimalism at its best, and we’re all about it.

From audio/video connectors all the way to development boards and single-board computers, The Pinouts Book sticks to the same format of a diagram and accompanying chart, making it exceptionally easy to find what you’re looking for. If you need more information than this streamlined layout can provide, each entry includes a link to a dedicated page on the book’s companion website. This will redirect you to supplemental data such as the manufacturer’s website, the part’s full datasheet, etc.

According to [NODE], the original plan for the Creative Commons BY-SA licensed work was to release it as a physical book, but the project ballooned up to such a scale that they realized it would be much easier to navigate and use as a digital document. While we don’t disagree, a physical release would certainly look lovely on our bookshelf. In the meantime, those who want to support the effort financially can purchase shirts emblazoned with diagrams pulled straight from the book’s pages.

We’ve long believed that a large-format electronic paper device would be an ideal gadget for the hacker’s workbench, as it allows for browsing through schematics and datasheets with a minimum of eye strain. Now we can also add a copy of The Pinouts Book to the list of things we’d install on our hacker-friendly e-ink compendium.

Continue reading The Pinouts Book Is Here, And It’s Just What You Need”

Custom Christmas Light Controller Blocks Blinks

Finding that his recently purchased LED Christmas lights defaulted to an annoying blinking pattern that took a ridiculous seven button presses to disable each time they were powered up, [Matthew Millman] decided to build a new power supply that keeps things nice and simple. In his words, the goal was to enable “all lights on, no blinking or patterns of any sort”.

Connecting the existing power supply to his oscilloscope, [Matthew] found the stock “steady on” setting was a 72 VAC peak-to-peak square wave at about 500 Hz. To recreate this, he essentially needed to find a 36 VDC power supply and swap the polarity back and forth at the same frequency. In the end the closest thing he could find in the parts bin was a HP printer power supply that put out 30 volts, so the lights aren’t quite as bright as they were before, but at least they aren’t blinking.

To turn that into a pair of AC square waves, the power supply is connected to a common L298 H-Bridge module. You might expect a microcontroller to show up at this point, but [Matthew] went old school, and created his two alternating 500 Hz square waves with a 555 timer and a 74HC74D dual flip-flop.

Unfortunately, he didn’t have the time to get a custom PCB made before Santa’s big night. Though as he points out, since legitimate L298s are backordered well into next year anyway, having the board in hand wouldn’t have helped much. The end result is that the circuit has to live on a breadboard for the current holiday season, but hopefully around this time next year we’ll get a chance to see the final product.

Planning Custom Aluminum Enclosures With OpenSCAD

We’ve seen a number of projects over the years that let you create custom enclosures using OpenSCAD, and for good reason. The parametric CAD tool is ideal for generating 3D models based on user-adjustable variables, and if you leverage its integrated Customizer, producing a bespoke box is as easy as moving some sliders around. The resulting files get sent off to the 3D printer, and you’re set. But what if you’re looking for a custom enclosure that’s not so…plastic?

In that case, AlClosure by [0xPIT] might be the answer. Rather than generating STL files intended for your 3D printer, the code is written to help you design an enclosure made from aluminum sheets. The top and bottom panels are intended to be cut from 1.5 mm – 2.5 mm sheets, while the sides are made from thicker 5 mm – 8 mm stock to accept a machined pocket that holds the front and rear inserts.

Since it’s OpenSCAD, much of the design is governed by variables which you can tweak. Obviously the outside dimensions of the enclosure can be changed in a flash, but it’s just as easy to modify the thickness of the aluminum sheet being used, or the size of the screw holes. [0xPIT] has also done a great job of documenting the code itself, so you’ll know exactly what you’re modifying.

Obviously, you’ll need the ability to cut and machine aluminum to actually utilize this project. The code itself is really just a way to conceptualize the design and get your dimensions figured out ahead of time. But as we were recently reminded by the keynote presentation [Jeremy Fielding] gave at the 2021 Remoticon, this sort of early prototyping can often save you a lot of headaches down the line.

Keynote Video: Jeremy Fielding Wants To Help You Get Moving

For many DIY hardware projects, the most movement it’s likely to see is when we pick the assembled unit up off the workbench and carry it to wherever it’s destined to spend the rest of its functional life. From weather sensors to smart mirrors, there’s a huge array of devices that don’t need to move one millimeter to function. But eventually, you’re likely to run into a project that’s a bit more dynamic. Maybe you’d like to motorize your window shades, or go all out and build a remote controlled rover. With these more active designs comes a whole slew of new problems you may never have encountered before.

Luckily for us, folks like Jeremy Fielding are out there and willing to share their knowledge. In his fascinating presentation for the 2021 Hackaday Remoticon, Building Hardware that Moves: the Fundamentals that Everyone Should Know, he took viewers on a whirlwind tour of what he’s learned about designing and building complex machines from his years of professional experience. Whether its a relatively simple articulated workbench for the shop, a gargantuan earthmoving machine, or a high-dexterity robotic arm, each project he’s worked on has presented unique challenges that needed to be solved.

Not all of Jeremy’s machines will fit in your average workshop.

A lot of the projects that Jeremy has worked on are on a much larger scale than what your average hobbyist is ever going to run into. When there’s an arrow pointing out the tiny human in a picture of you and the machine you’re currently working on, you know things are getting serious. But as anyone who’s watched his YouTube videos knows, he’s got a real knack for taking these high-level concepts and distilling them into something more digestible for the home gamer.

Continue reading “Keynote Video: Jeremy Fielding Wants To Help You Get Moving”

All Hail Your New Giant 555 Timer Overlord

You asked for it, and now you’ve got it. It’s taken more than a decade of accumulated complaining, but this gigantic 555 timer IC has finally gathered enough psychokinetic energy to take corporeal form and demand fealty from the readers of Hackaday.

Or not. The less exciting explanation is that creator [Rudraksha Vegad] was looking for a way to combine his interests in discrete electronic components and woodworking. The result is an incredible build that’s more than just a conversation starter; this desktop-sized version of the iconic integrated timer circuit is fully functional. You can even hook it up to a breadboard, assuming you’ve got some alligator clips handy.

Lifting the lid on this wooden “chip” uncovers an intricate hand-wired array of discrete components that stand in for the microscopic goings on inside the real thing. He’s even gone through the trouble of recreating the symbols for the comparators and flip-flops that you’d see in a diagram of a 555 using wooden shapes to elevate their respective components. It might not fit the classical definition, but surely this must count as some form of circuit sculpture.

[Rudraksha] credits several other projects for not just inspiring him to create his own mega 555, but for helping him wrap his head around the internal workings of everyone’s favorite IC. Using components he salvaged from old hardware, he says the project ended up being very educational for him. These days, when most makers are more likely to reach for a microcontroller than a logic chip, spending some quality time with transistors and passives can be quite illuminating.

Continue reading “All Hail Your New Giant 555 Timer Overlord”

SDR Toolkit Bends Weather Station To Hacker’s Whims

We probably don’t have to tell most Hackaday readers why the current wave of low-cost software defined radios (SDRs) are such a big deal for hackers looking to explore the wide world of wireless signals. But if you do need a refresher as to what kind of SDR hardware and software should be in your bag of tricks, then this fantastically detailed account from [RK] about how he hacked his La Crosse WS-9611U-IT weather station is a perfect example.

Looking to brush up his radio hacking skills, [RK] set out to use the ADALM-PLUTO software defined radio from Analog Devices to intercept signals between the La Crosse base station and its assorted wireless sensors. He notes that a $20 USD RTL-SDR dongle could do just as well if you only wanted to receive, but since his ultimate goal was to spoof a temperature sensor and introduce spurious data into the system, he needed an SDR that had transmit capabilities.

No matter your hardware, Universal Radio Hacker (URH) is the software that’s going to be doing the heavy lifting. In his write-up, [RK] walks the reader through every step required to find, capture, and eventually decode the transmissions coming from a TX29U wireless temperature sensor. While the specifics will naturally change a bit depending on the device you’re personally looking to listen in on, the general workflow is going to be more or less the same.

In the end, [RK] is not only able to receive the data coming from the wireless sensors, but he can transmit his own spoofed data that the weather station accepts as legitimate. Getting there took some extra effort, as he had to figure out the proper CRC algorithm being used. But as luck would have it, he found a Hackaday article from a couple years back that talked about doing exactly that, which help put him on the right path. Now he can make the little animated guy on the weather station’s screen don a winter coat in the middle of July. Check out the video below for a demonstration of this particular piece of radio prestidigitation.

Continue reading “SDR Toolkit Bends Weather Station To Hacker’s Whims”