Building A DIY Flight Yoke For Flight Simulator

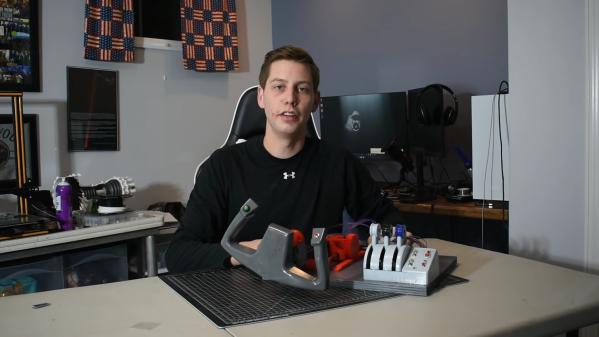
Flight yokes are key to getting an authentic experience when playing a flight simulator, but [Michel Rechtin] didn’t want to pay big money for a commercially-available solution. He ended up building a design using a lot of parts he had laying around, which saved money and worked out great.

The build is based around an Arduino Micro, which reads a series of potentiometers from the yoke and pedals to control pitch, roll, and yaw, A series of buttons are then added to control ancillary functions for the plane and simulator software.

Much of the build uses old 3D printer components, including linear bearings and rods for the pitch axis for smooth operation. There’s even a throttle setup and some more buttons and switches for a more complete flying experience.

Files are available on Thingiverse from anyone looking to replicate [Michael]’s build. We love to see a yoke built from scratch, though we’ve also seen creative builds repurpose PlayStation controllers for the same purpose. Video after the break.

Continue reading “Building A DIY Flight Yoke For Flight Simulator”

Cute Oscilloscope Uses LEDs For Display

Oscilloscopes were once commonly called CROs, for the fact that they relied on cathode ray tubes for display. Since then, technology has moved quickly, and oscilloscopes these days almost entirely rely on modern screens like LCDs. However, [lonesoulsurfer] went a different route with this fun DIY build, creating an oscilloscope with a low-resolution LED display.

Yes, the signals are shown on a 10×10 matrix made up of red LEDs. The individual pixels look nicely diffused and chunky thanks to the fact that [lonesoulsurfer] was able to source square 5mm LEDs for the build. The whole project only uses four ICs – a decade counter and a LM3914 LED driver to run the display, a 555 timer for clock input, and an LM386 op-amp for amplifying incoming signals.

With a mic fitted onboard, the oscilloscope can act as a simple music visualizer, or be used with a probe to investigate actual circuits. It may not be of great enough resolution or precision for fine work, but it’ll at least tell you if your microcontroller’s clock is running properly if you’re scratching your head about the function of a simple project.

We’ve seen some great DIY oscilloscopes over the years, like this neat Arduino-based build. Video after the break.

Continue reading “Cute Oscilloscope Uses LEDs For Display”

You Can Turn Soft Drink Bottles Into Handy Solar Lamps

Solar lights are a popular garden decoration. Of course, they’re available cheaply from most hardware and garden stores, but if you’re more of the DIY type, you might like to build your own. [opengreenenergy] has done just that, using recycled materials for a cheap and simple design.

The design was inspired by the Moser bottle, which is a water-filled bottle used to diffuse sunlight into a room during the day. Instead of sunlight, however, this design uses an LED to provide the light, for decorating a garden or for use when out camping or traveling.

In this design, a solar panel is used to charge a lithium-polymer battery during the day using a LP4060B5F charge controller IC. It’s paired with a AP6685 battery protection IC to ensure the battery is not overly discharged or otherwise damaged in use. When the solar panel stops putting out power when it gets dark, the LED is automatically switched on. It can be set to a low or high brightness to provide more runtime or more light as needed.

All the circuitry is wrapped up in a neat 3D-printed case that allows the hardware to be screwed directly on top of a regular soft drink bottle. Paired with some water in the bottle, and perhaps a little bleach to stave off algal growth, the result is a handy, portable light that also has enough mass to avoid it being blown over easily.

It’s interesting to compare the design to commercial versions that aim to pare costs down to a minimum. Video after the break.

Continue reading “You Can Turn Soft Drink Bottles Into Handy Solar Lamps”

LED Kaleidoscope Uses Induction Power Magic

The kaleidoscope was first invented back in the early 1800s, with the curio known for showing compelling psychedelic patterns as light passes through colored glass and is reflected by mirrors in a tube. [Debra] of Geek Mom Projects recently gave the classic toy a thoroughly modern twist with her own build. (Thread Reader Link).

[Debra]’s kaleidoscope still relies on the typical mirror-tube construction to create reflections upon reflections which generate symmetrical patterns for the viewer. However, instead of colored glass beads lit by external light, she replaced these with so-called “wireless LEDs.” These little bead-like LEDs are fitted with small coils that allow them to be inductively powered without wires when they are placed in the magnetic field generated by a powered coil. Thus, [Debra]’s kaleidoscope works day or night, even in a dark room, since the light is coming from the little beady LEDs themselves.

It’s a great demonstration of wireless LED technology; there’s something almost magical about the tiny free-moving glowing beads. If you don’t want to buy them off the shelf, you can even make your own! Video after the break.

Continue reading “LED Kaleidoscope Uses Induction Power Magic”

LEGO String Winder Hints At Greater Possibilities

Unless you’re an avid fan of 1997’s box office hit Mouse Hunt, or actively working in the string industry, you probably don’t spend a lot of time thinking about how those balls of string are made. [ord] has, however, and built a tidy little winding machine that has us contemplating the possibilities of how useful LEGO machines can really be. 

The design uses a large and imposing-looking ring gear to drive a spinning arm which carries the string onto the bobbin. The bobbin itself is rotated along with the spinning arm as the hand crank that operates the machine is mechanically linked to both. As the arm and bobbin turn, string is deposited onto the bobbin, building up into a pleasing ball of string that looks just like the ones you buy at the store.

We suspect that, unless [ord] is doing some very interesting things that we haven’t seen yet, the string was probably sourced off a reel or ball anyway, and this machine just serves to demonstrate how the process works.

However, it does go to show how LEGO machines can do real work. We’d love to see LEGO put to more practical uses like winding pickups or transformers, or other jobs that are maddeningly tedious when done by hand. Video after the break.

Continue reading “LEGO String Winder Hints At Greater Possibilities”

Old Boat Becomes Toasty Floating Sauna

A sauna is a great place to feel warm and toasty and refreshed, but few of us have one at home. [Linus Strothmann] decided to build his own, using an old boat as the perfect base for his steamy build.

Finding the right boat was the first challenge; the vessel should be big enough to fully house the intended number of occupants, and be able to withstand sitting outside in the weather year-round. If it’s to be used in a place where it gets icy in winter, it’s best to go with a steel-hulled vessel.  [Linus] found a steel-hulled boat just under 8 m in length for less than 1000 Euros, and set to work on his project.

The boat was stripped out, and given high-quality glass windows capable of resisting the steam and high temperatures inside. A stove was installed for producing steam, and the boat-sauna was designed with multiple entries and exits for safety reasons. Insulation was also fitted to help keep heat in.

The result is a floating sauna that is an absolute pleasure to use in the winter months. Floating out on the lake, one can take in a steam, have a quick dip in the icy water, and then return to warm back up inside. [Linus] hopes to soon fit a small motor in order to allow the vessel to head out to the middle of the lake for an even better view during a steam session.

It’s not the first mobile sauna we’ve seen; a trailer-based design graced these pages last year. If you’re working on your own hot and steamy build, though, do share your work with us promptly!

Copper Modding Helps Cool A Toasty GPU

[DandyWorks] had an NVIDIA RTX 3070 Ti GPU, and found it was running incredibly hot, with the card’s memory hitting temperatures of 110 °C. He decided to try “copper modding” to solve the problem, and made some impressive improvements along the way.

Copper modding is where small copper shims are used to connect hot chips on the GPU to the heatsink more effectively than the standard thermal pads used by the manufacturer. Copper has much better thermal conductivity than thermal pads, and thus can help improve cooling of components when used in this fashion.

With the GPU carefully disassembled, [DandyWorks] notes the design uses a sub-heatsink specifically for the memory chips. He then sets about removing the thermal pads from the chips with isopropyl alcohol to help. They’re replaced with copper shims of a precise thickness, with a thin layer of thermal paste to ensure good heat flow. [DandyWorks] also shields all surrounding parts of the board with Kapton tape to avoid shorts if the copper shims happen to shift at any point.

Running the same hashing operation, the GPU now operates with its memory at a much cooler temperature of just 64 °C. [DandyWorks] ran the test for hours and temperatures didn’t climb beyond there. It’s evidence that the copper shims do a far better job of conducting the heat out of the memory chips versus the stock thermal pad setup.

We’ve seen some other interesting mods in this vein before, such as CPU die lapping for better thermal performance. Video after the break.

Continue reading “Copper Modding Helps Cool A Toasty GPU”