Electronics On Ice

We see all manner of electronics enclosures pass through these hallowed pages. Lasercut wooden builds with fancy kerf bending, expertly prepared acrylic boxes, and even the occasional device cast in concrete. [Mike Kohn] decided that all of these were too permanent, however, and chose a different material – ice.

[Mike] shares the ups and downs of his experiments with electronics and frozen water. Initial tests with a circuit sealed in DAP Ultra Clear were largely successful.  A tilt sensor was installed to allow the batteries to remain undrained during the freezing process, and once freed after a few hours of thawing, the circuit was operational. Later builds required some more work – the RC car in particular took a few attempts to avoid the mold leaking. The ice hands are a particular highlight, though – created with rubber gloves, these would be a remarkably spooky decoration come Halloween.

It’s a study in the techniques required to work with this ephemeral material, and there’s a few lessons to learn. Sealing electronics is good, and the best results are with simple circuits with a few LEDs that make everything glow nicely.

If you’re looking for other ideas, you could always create a frozen lens for photographical purposes. Video after the break.
Continue reading “Electronics On Ice” →

Etch-A-Snap Will Sketch Your Selfies

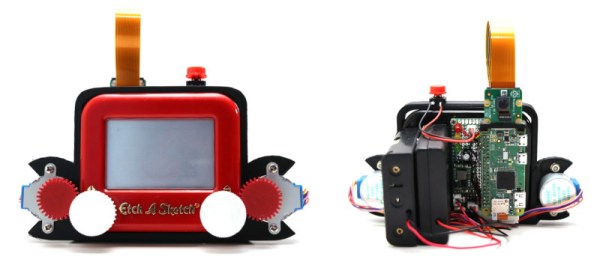
The Etch-a-Sketch was a hugely popular toy in the days before video games and the Internet became ubiquitous. These days, they’re a fun amusement, but can still be difficult to master. Rather than learn the necessary skills himself, [Martin Fitzpatrick] decided to build a machine to draw for him. Enter the Etch-a-Snap.

The build starts with a Raspberry Pi Zero, equipped with the requisite camera. Images taken are processed into a 100×60 pixel image with 1-bit color. At this stage, a network graph representation is built of the image and used to generate commands for the plotting mechanism to draw the scene. Plotting is achieved with stepper motors that turn the knobs through 3D-printed gears. Plotting is slow, with images taking 15 minutes to an hour to “develop”. The system can also be used to draw manually processed images, which can improve results when images are chosen carefully.

It’s a project that combines modern hardware with a classic toy for some interactive fun. We could imagine a large-scale version of this being a great installation at a science museum or MakerFaire. We’ve seen others tackle a computer-controlled Etch-A-Sketch, too. Video after the break.

Continue reading “Etch-A-Snap Will Sketch Your Selfies” →

Build Your Own Vacuum Chamber For Degassing And More

A vacuum chamber can be a useful thing to have around the shop. It can be used for all manner of purposes, from science experiments to degassing paints and epoxies. They’re not something you’d find in every workshop, but never fear – you can always build one from scrap you’ve got lying around! (YouTube video, embedded below.)

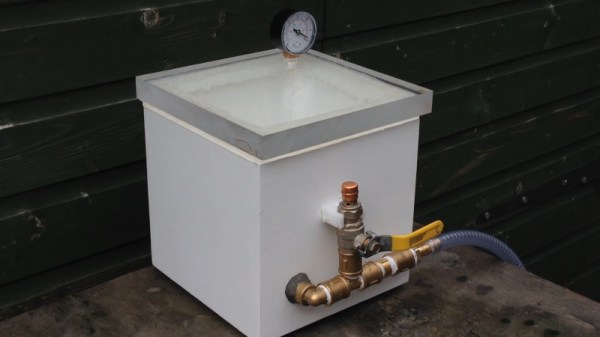
[VegOilGuy] begins the build with a simple plywood box, which gets screwed together and then tarted up with bodyfiller and paint. This helps to make the box airtight, as well as improving the aesthetics. A slot is then cut in the lid, and then filled with an excessive amount of silicone sealant. A flat plate covered in aluminium foil is placed on top, and the silicone is left to cure for several days.This is used to create a flat sealing surface for the lid to be placed on later.

Once the seal is complete, it’s a simple plumbing job to finish the chamber. [VegOilGuy] does a great job of demonstrating copper soldering and the proper way to install the necessary taps and check valves. Combined with an electric pump, the vacuum chamber passes its tests with flying colors, completely ruining some marshmallows in the process.

With a few dollars spent online for the special bits, it’s a build that any handy maker could throw together in a weekend. You can always go another route, though – like using an old fridge compressor to get the job done.

[Thanks to Keith O for the tip!]

Continue reading “Build Your Own Vacuum Chamber For Degassing And More” →

WiFi Controlled Plane Is Cheap Flying Fun

The world of radio controlled aircraft used to be an expensive and exclusive hobby, limited to those with the time and money to invest in difficult builds and pricey radio gear. More recently, the hobby has become more accessible, with cheap ready to fly planes available that can be flown in smaller spaces like suburban parks. [Ravi Butani] has built just such a plane, and you can even fly it with your smartphone!

An ESP8266 does double duty here as both the brains and the communication system. A custom smartphone app communicates with the plane over WiFi. Touching the screen increases the throttle, while steering is achieved through tilting the phone. There’s also monitoring of signal strength and battery level, with the phone vibrating if the plane is getting out of range or low on battery.

Flight control is via differential thrust, with power coming courtesy of two small DC motors controlled by tiny SMD MOSFETs. The plane flies remarkably well in still conditions, and the WiFi connection is stable in an open park environment. [Ravi] reports that control is possible at a range of around 70 meters using a Motorola G5S smartphone.

Despite the simplicity of the build and the low cost of the components, the final product performs admirably. It would be a great weekend project, and at the end of it, you get to go and fly your new plane! If you’re worried about keeping your batteries charged, don’t worry – there’s a solution for that. Video after the break.

Continue reading “WiFi Controlled Plane Is Cheap Flying Fun” →

A Simple Programmable Light Controller

Everything’s internet connected these days, garage doors, baby monitors, and the kitchen sink are all hooked up. There are benefits to having everything online, but also several pitfalls. Maintaining security on a home network is an ongoing job, made more difficult by the number of devices that must be kept track of. Sometimes all the hassle isn’t worth it, and you just want a non-connected solution. [Dilshan] found himself in just that camp, and built a simple programmable light controller that doesn’t connect to the Internet. 

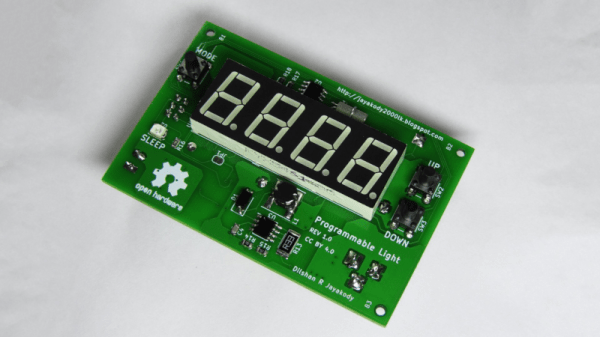
At the core of the project is an ATMEGA8 microcontroller, which is cheap, readily available, and can do the job. It’s combined with a DS1307 real time clock IC to keep track of time. The circuit is designed for 24V power, to allow it to be run from the same supply as the LED light modules it is designed to control.

The design was initially prototyped with through-hole parts on the breadboard, with the final design being built with surface mount parts on a custom PCB. Light is courtesy of a 7W warm white LED module. 3 push buttons and a 4-digit, 7-segment display act as the user interface, with an LDR to allow the light to also react to its surroundings.

It’s a build that goes against current trends, lacking WiFi connectivity, Twitter functionality, or cloud-based logging. It goes to show that the right solution isn’t always putting everything online. Sometimes the old methods are enough to do the job, and do it well.

Of course, if you’re still itching for a packet data fix, here’s how to blink an LED over the Internet.

Luxmeter Meets Linux

Over the past 30 years the price of hardware has slowly but surely come down, and it’s now possible to buy all manner of widgets and gizmos online for less than the price of a fancy Italian dinner. By and large this is a good thing, but it’s not uncommon to find that your new tools are let down by the software side of things. Of course, you can always develop your own solution – and in [ThePhil]’s case, that’s exactly what he did.

The hardware in question was a PCE-174 luxmeter, which came with an uncooperative Windows application as standard. This simply wouldn’t do, so [ThePhil] set about developing a Linux version in Python. This was achieved through the aid of documentation, not of the PCE-174, but its sibling from another corporation – the Extech HD450. The two meters were similar enough that the Extech’s better documentation was able to fill in the gaps of [ThePhil]’s understanding.

[ThePhil] has diligently implemented the full feature set of the PCE-174, and has documented the project well. There are even notes on the version numbers of various dependencies, which will surely be a great help if someone’s trying to run the code five years down the track.

It’s a great lesson that one need not be at the mercy of the software one is given. For a great many cases, it’s possible to roll your own solutions that are robust and get the job done. This approach can be taken to great lengths – you can go so far as replacing an entire camera firmware, if you so wish.


This Bike Pump Now Sucks

Pulling a vacuum is something every proud maker must do once in a while. Whether you’re degassing epoxy or vacuum forming parts, you’ll need a reliable pump to get the job done. [drcrash] has just the guide to help – on how to convert a regular handpump to vacuum duty. (Video embedded after the break.)

[drcrash] recommends starting with a Slime brand 2060-A pump or similar. It’s a basic hand pump, with no pressure gauges or other frills to get in the way. It’s also got a strong steel shaft that can hold up to repeated use. You’ll also need some tubing and a check valve to get the job done.

The basic concept is to reconfigure the pump to suck air out of things rather than blowing it into them. By removing the original check valve and installing one in the opposite direction, and reversing the pump’s piston, it’s possible to pull good vacuum without breaking a sweat. [drcrash] reports that it’s possible to go up to 11 psi below atmospheric with this setup, which is plenty for a wide range of applications. If you need to go further, you can try building your own turbomolecular pump instead.

Continue reading “This Bike Pump Now Sucks” →