How To Control The Lights With A TV Remote

In this day and age of the Internet of Things and controlling appliances over the internet, the idea of using an old-fashioned television remote to do anything feels distinctly 2005. That doesn’t mean it’s not a valid way to control the lights at home, and [Atakan] is here to show us how it’s done.

To the experienced electronics maker, this is yesterday’s jam, but [Atakan] goes to great lengths to hash out the whole process from start to finish, from building the circuitry to switch the lights through to the code necessary to make a PIC do your bidding. It’s rare to see such a project done with a non-Arduino platform, but rest assured, such things do exist. There’s even some SPICE simulation thrown in for good measure, if you really want to get down to the nitty-gritty.

Perhaps the only thing missing from the writeup is a primer on how to execute the project safely, given that it’s used with a direct connection to live mains wiring. We’d love to hear in the comments about any changes or modifications that would be necessary to ensure this project doesn’t hurt anyone or burn an apartment complex down. Sometimes you can switch lights without a direct connection to the mains, however – like this project that interfaces mechanically with a standard light switch.


How Current Shunts Work

Current. Too little of it, and you can’t get where you’re going, too much and your hardware’s on fire. In many projects, it’s desirable to know just how much current is being drawn, and even more desirable to limit it to avoid catastrophic destruction. The humble current shunt is an excellent way to do just that.

Ohm’s Law.

To understand current, it’s important to understand Ohm’s Law, which defines the relationship between current, voltage, and resistance. If we know two out of the three, we can calculate the unknown. This is the underlying principle behind the current shunt. A current flows through a resistor, and the voltage drop across the resistor is measured. If the resistance also is known, the current can be calculated with the equation I=V/R.

This simple fact can be used to great effect. As an example, consider a microcontroller used to control a DC motor with a transistor controlled by a PWM output. A known resistance is placed inline with the motor and, the voltage drop across it measured with the onboard analog-to-digital converter. With a few lines of code, it’s simple for the microcontroller to calculate the current flowing to the motor. Armed with this knowledge, code can be crafted to limit the motor current draw for such purposes as avoiding overheating the motor, or to protect the drive transistors from failure.

In fact, such strategies can be used in a wide variety of applications. In microcontroller projects you can measure as many currents as you have spare ADC channels and time. Whether you’re driving high power LEDs or trying to build protection into a power supply, current shunts are key to doing this.

Continue reading “How Current Shunts Work” →

Repairs You Can Print: Model Coal Car Fix

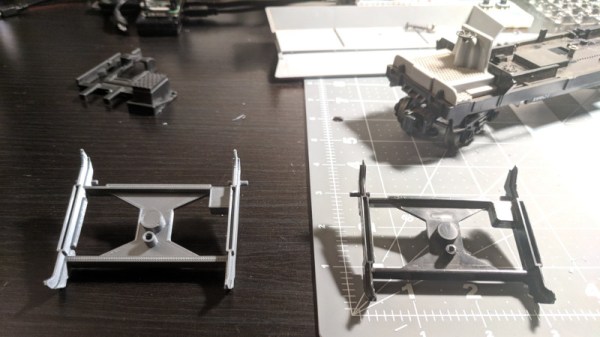
Model railways are a deep and rewarding hobby, and the mechanisms involved can be both surprisingly intricate and delightful. A great example that may surprise the unfamiliar is that of model train carriages, such as coal cars, that are capable of both receiving and dumping a load at various points on a model layout. This adds realism and, if we’re honest, just plain old fun.

When [Phil]’s father received his Lincoln coal car from eBay, it was unfortunately damaged, and incapable of dumping properly. Instead of throwing it away, a replacement part was developed and 3D printed. The part was iterated on until the coal hopper could dump and retract smoothly.

This is the perfect example of a tidy repair executed through 3D printing. The broken part was extremely detailed and would be difficult and expensive to repair or fabricate through other measures. However, through the power of 3D printing, all that’s required is a 3D modelling job and a few hours to print it.

It’s a great entry into our Repairs You Can Print challenge, and covers the fundamentals of modelling and iterative design well. Got a neat repair you’ve done yourself? Document it on Hackaday.io and enter yourself!

Making Smoke That Really Performs

Smoke is a useful thing, whether you want to hide from enemy combatants or just make a big scene at a local sporting match. Smoke devices have lots of applications, many of which will likely cause a nuisance to somebody, somewhere. With that said, they can also be really cool, and [Tech Ingredients] is here to tell you how to make them.

Far from a simple tutorial, the video guide is loaded with detail. It begins with an explanation of the basic chemistry involved, using potassium nitrate and sugar. This is the basis of rocket candy, a popular method for making solid rocket motors at home. However, it’s then explained how the formula is altered to suit a smoke-making, rather than a thrust-making device. The trick is the addition of paraffin to moderate the reaction.

The tips don’t stop there. The guide explains how to use a coffee grinder to make the coarse ingredients finer, which increases the surface area and allows the powder constituents to blend with the wax more easily. Enclosures are also discussed, with a cardboard tube and bentonite clay favored for its heat resistance and stability.

Overall, it’s an excellent guide which takes the time to explain the rationale behind each step in the process. It’s great to see the underlying concepts explained with the practical execution, giving a strong understanding of not just how to do it, but why. Video after the break.

Continue reading “Making Smoke That Really Performs” →

Boost Tube Replacement Through 3D Printing

[Sam] is the lucky owner of a 1990 VW Corrado G60. To the uninitiated, that’s the souped-up, go fast version with the fancy supercharger on top. While performing some mods to the air intake (car-speak for “hacks”), there came a need for a custom tube to eliminate the original silencer box. With available options costing up to $400, suddenly 3D printing a replacement seemed like a better answer.

3D printing intake parts for a supercharged vehicle has some unique challenges. The intake must be able to take the boost pressures seen by the engine, in this case up to around 10 psi. There must be no air leaks at all as this risks confusing the sensors that measure how much air is entering the engine. Lastly, the tube must be able to withstand the hot, and often oily environment under the hood.

The first attempt was completed with TPU filament, which unfortunately did not hold pressure. A followup with PLA fared better, but was unable to withstand the heat present in the engine bay. After some experimentation, a successful print was made in PETG which was more robust. In the final design, [Sam] applied a rubber coating and then some aluminum tape, to both help seal any micro-holes in the 3D printed surface as well as help protect against heat.

After over a month of testing, [Sam]’s data logs indicate the tube is performing well and holding boost. It goes to show that with some perseverance and iterative design, 3D printed parts can often save the day.

Perhaps you’re inspired by this hack but need to jack up your car to work on it? Never fear, you can 3D print those too.

Sculptural Grade M&M Sorter

Sorting M&Ms is really only a major concern if you happen to be working on a Van Halen tour, but it’s a fun exercise nonetheless. It’s for this reason we see plenty of sorting projects come our way, varying from the breadboard and cardboard variety, all the way up to final university projects. Today, [Karl] has blessed us with their sculptural-grade offering, and the attention to detail is stunning.

The project has been in gestation in [Karl]’s mind, on and off, for 10 years or so. The big problem centered around reliably separating out one M&M at a time from a hopper of many. From time to time, [Karl] would speak with other builders using similar techniques to his failed experiments, who often reported that the secret to their machine’s reliability was… careful video editing. It was only when a parts sorter flashed across the Hackaday feed that [Karl] found the mechanism that would work to make his project a reality.

Now that the individual candies could readily be separated and fed through a machine, the rest of the project came together quickly. A color sensor was combined with servos and a stepper motor to duct M&Ms into separate flasks.

The real value of this build, however, is in the overall attention paid to the aesthetics of the final product. The device was built to be a kinetic sculpture, able to run reliably with the minimum of attention at the behest of even an untrained user. By carefully optimising the mechanisms inside and building an attractive enclosure, [Karl] has developed something we’d be proud to show off in a living room.


Kids Kitchen That Says BEEP

Children have always liked to learn by copying the adults around them, and thus have always desired toys that emulate the tools which their older forebears use on a daily basis. [rhoalt]’s daughter wished for an oven to play with, so a trip to IKEA was in order to get started.

The build begins with the IKEA Duktig, a beautiful fun-sized oven. [rhoalt] then breaks out the hacker staple foods of 7-segment displays, swanky backlit buttons and an Arduino Nano. Through some careful handiwork, the wooden panels that make up the toy oven are drilled and routed out to fit the components.

The electronics are all used to create an oven with a digital timer, and the final effect achieved is rather nice. The glowy buttons can be used to set and reset the timer, while an LED strip inside lights up to simulate cooking. [rhoalt] shares all the construction details along with some parent-friendly tips, like taping over the buzzer to reduce the volume, and ensuring the timer is limited to 10 minutes to avoid any late-night surprises.

It’s a tidy project with a strong sense of fun, and the presentation is top-notch. Even we older, jaded hackers light up for a good glowy-buttoned project, so we’re sure [rhoalt]’s daughter loves her new toy. For more toy oven action, check out this Easy Bake converted to USB. Video after the break.

Continue reading “Kids Kitchen That Says BEEP” →