The Engineering Case For Fusing Your LED Strips

Modern LED strips are magical things. The WS2812 has allowed the quick and easy creation of addressable RGB installations, revolutionizing the science of cool glowy things. However, this accessibility means that it’s easy to get in over your head and make some simple mistakes that could end catastrophically. [Thomas] is here to help, outlining a common mistake made when building with LED strips that is really rather dangerous.

The problem is the combination of hardware typically used to run these LED strings. They’re quite bright and draw significant amounts of power, each pixel drawing up to 60 mA at full-white. In a string of just 10 pixels, the strip is already drawing 600 mA. For this reason, it’s common for people to choose quite hefty power supplies that can readily deliver several amps to run these installations.

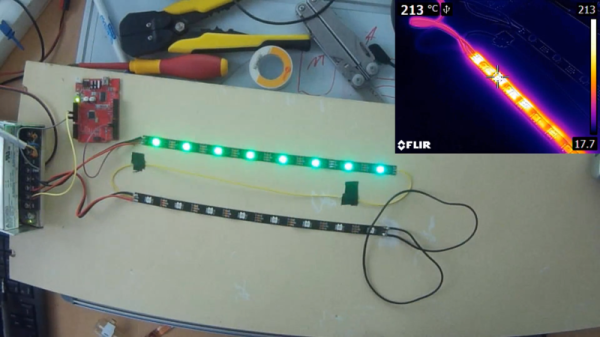
It’s here that the problem starts. Typically, wires used to hook up the LED strips are quite thin and the flex strips themselves have a significant resistance, too. This means it’s possible to short circuit an LED strip without actually tripping the overcurrent protection on something like an ATX power supply, which may be fused at well over 10 amps. With the resistance of the wires and strip acting as a current limiter, the strip can overheat to the point of catching fire while the power supply happily continues to pump in the juice. In a home workshop under careful supervision, this may be a manageable risk. In an unattended installation, things could be far worse.

Thankfully, the solution is simple. By installing an appropriately rated fuse for the number of LEDs in the circuit, the installation becomes safer, as the fuse will burn out under a short circuit condition even if the power supply is happy to supply the current. With the example of 10 LEDs drawing 600 mA, a 1 amp fuse would do just fine to protect the circuit in the event of an accidental short.

It’s a great explanation of a common yet dangerous problem, and [Thomas] backs it up by using a thermal camera to illustrate just how hot things can get in mere seconds. Armed with this knowledge, you can now safely play with LEDs instead of fire. But now that you’re feeling confident, why not check out these eyeball-searing 3 watt addressable LEDs?

Continue reading “The Engineering Case For Fusing Your LED Strips” →
3D Print The Blasphemous Helicopter Part Known As A Jesus Nut

Today, when we say “Jesus nut”, we’re not referring to the people who spend their days proselytizing down at the mall. The term, likely spawned in the Vietnam war, refers to the main nut holding the rotors on to the mast of a helicopter which is in the shape of the Christian cross. If the “Jesus nut” was to fail, the rotors would detach from the craft, and there would be little for crews to do except to pray.

[Marius] was presented with a failed Jesus nut, though thankfully from an R/C helicopter, meaning there was no loss of life. A friend needed the part replaced for their FQ777 copter, so it was time to bust out the 3D printer and get to work.

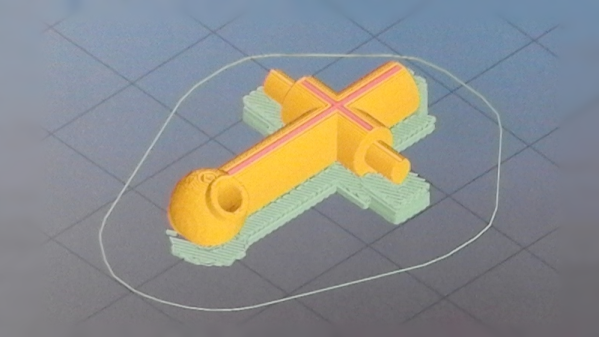
The first step was to reconstruct the broken piece so it could be measured and then modeled in CAD software with the help of calipers to determine the original dimensions. What followed will be familiar to many 3D printing enthusiasts — a case of educated trial and error, experimenting with different filaments and print settings until a usable part was produced. [Marius] notes on the part’s Thingiverse page  that they achieved the best print with an 0.2mm layer height, and printing two parts at once to allow the layers more time to cool during each pass. It was then a simple matter of tidying up the part with sandpaper and a drill bit before installing it on the vehicle.

[Marius] reports that the part was successful, being both strong enough to withstand the forces involved as well as having a fit that was just right to suit the rotor pin which needs to be able to turn freely within the Jesus nut. While they’re not always the right tool for the job, 3D printed replacement parts can sometimes surprise you. These prints that are used in repair work often don’t attract the same interest as printing cosplay armor, kinetic art, and low-poly Pokemon. But they quickly prove how transformative having a 3D printer, and the skills to use it, are. That’s why we’re running the Repairs You Can Print contest… take a few minutes to show off the really useful repairs you’ve pulled off with your 3D printer!

Slimline Proximity Fob Makes Life Easier

Modern cars these days tend to come with proximity keys, which allow the driver to unlock and start the vehicle without having to remove the key from one’s pocket. While this is a great usability upgrade, for some reason key fobs continue to be bulky plastic monstrosities that when stuffed into a pocket can easily ruin the lines of a well-chosen outfit. This wasn’t good enough so [Patrick] decided to sort it out.

Starting with a Prius key, the first step was to disassemble the already broken key fob and separate out the PCB from the case and battery holder. With those removed, a coin cell was soldered to some wires connected to the PCB. As a substitute for the original case, a plastic card was cut up and the PCB inserted within, allowing the setup to fit neatly in a wallet’s card pocket. Lashings of tape bring the project home.

Unsurprisingly, it works, and works well. It raises the question why key fobs are so large and ungainly, taking up so much precious pocket space. We’d love to see even slimmer takes on this with 3D printed enclosures or even completely redesigned PCBs. Give it a go, and hit up the tip line. Else, check out how key fobs are routinely hacked to steal cars.

The Current State Of The Black Market: You Can’t Buy Vantablack

Sometimes you need something to be utterly, totally, irredeemably black. Not just a little bit black, not just really really really dark blue, but as black as it is possible to get. It might be to trap light in a camera or a telescope, for artistic purposes, or even to make your warplane a more difficult target for enemy missiles. Either way, we’re here to help, not to judge. So what are your options?

Well, first of all, there’s the much-lauded Vantablack. The name itself is a clue as to its origin – Vertically Aligned Nano Tube Arrays. It works by coating an object with a forest of carbon nanotubes in a complicated vacuum deposition process. When light hits the surface, some of it is absorbed by the nanotubes, and any that is reflected tends to be absorbed by neighbouring nanotubes rather than escaping the surface coating of the object.

Continue reading “The Current State Of The Black Market: You Can’t Buy Vantablack” →

Running Programs On Paper

It’s a simple fact that most programs created for the personal computer involve the same methods of interaction, almost regardless of purpose. Word processors, graphics utilities, even games – the vast majority of interaction is performed through a keyboard and mouse. However, sometimes it can be fun to experiment with alternative technologies for users to interact with code – Paper Programs is an exciting way to do just that.

Paper Programs is a combination of a variety of existing technologies to create a way of interacting with code which is highly tangible. The setup consists of a projector, and a webcam which can see the projected area, combined with Javascript programs running in a browser. Programs can be edited in the browser, then printed out with special coloured dots around the page. When the page is placed in the projection area, these dots identify the unique program and are picked up by the webcam, and the server executes the relevant code, projecting back onto the page.

It’s a system that creates a very tactile way of interacting with a program – by moving the page around or placing different pages next to each other, programs can interact in various ways. The system is setup for collaboration as well, allowing users to edit code directly in the browser.

The project reminds us of earlier works on DIY multitouch screens, but with a greater focus on direct engagement with the underlying code. What other unique ways exist to interact with code? Let us know in the comments.

Continue reading “Running Programs On Paper” →

A Keyboard To Stomp On

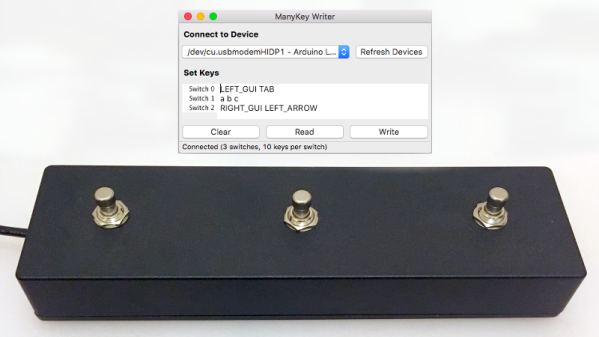
Macros are useful things. They allow one to execute a series of commands with a single keypress. There exists a wide variety of hardware and software solutions to create and use macros to improve your workflow, and now [Evan] has brought the open-source ManyKey into the fray, along with a build tutorial to boot.

The tutorial acts as a great introduction to ManyKey, as [Evan] walks through the construction of a macro keyboard designed to be operated by the feet. Based around the Arduino Leonardo and using off-the-shelf footswitches commonly used in guitar effects, it’s accessible while still hinting at the flexibility of the system. Macros are programmed into the keyboard through a Python app which communicates over serial, and configurations are saved into the Arduino’s onboard EEPROM. The ManyKey source is naturally available over at GitHub.

[Evan] tells us he uses his setup to run DJ software with his feet while his hands are busy on the turntables. That said, there’s all manner of other applications this could be used for. Efficiency is everything, and we love to see keyboard projects that aim to improve workflow with new ideas and custom builds – this shortcut keyboard makes a great example.


Over The Air Updates For Your Arduino

An Arduino and a data radio can make a great remote sensor node. Often in such situations, the hardware ends up installed somewhere hard to get to – be it in a light fitting, behind a wall, or secreted somewhere outdoors. Not places that you’d want to squeeze a cable repeatedly into while debugging.

[2BitOrNot2Bit] decided this simply wouldn’t do, and decided to program the Arduinos over the air instead.

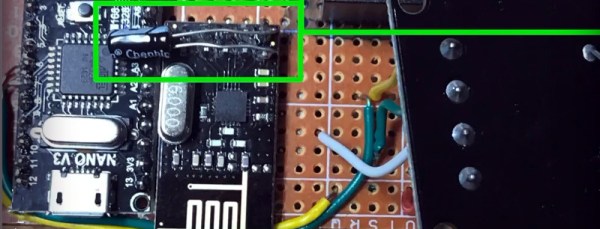
Using the NRF24L01 chip with the Arduino is a popular choice to add wireless communications to a small project. By installing one of these radios on both the remote hardware and a local Arduino connected to the programming computer, it’s possible to remotely flash the Arduino without any physical contact whatsoever using Optiboot.

The writeup is comprehensive and covers both the required hardware setup for both ends of the operation as well as how to install the relevant bootloaders. If you’re already using the NRF24L01 in your projects, this could be the ideal solution to your programming woes. Perhaps you’re using a different platform though – like an Arduino on WiFi? Don’t worry – you can do OTA updates that way, too.