Slim Sypherdeck Skips The Keyboard, Packs X86 CPU

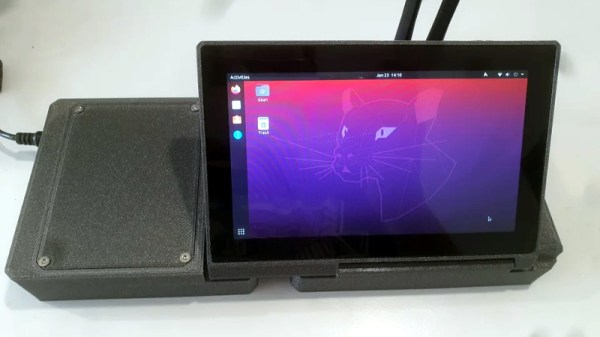
There are few hard and fast rules in the world of custom cyberdecks, but many of these bespoke machines do share a certain level of commonality. They generally use a low-power ARM board such as the Raspberry Pi that doesn’t consume much power or require any exotic thermal management, and a large mechanical keyboard is almost a given. But at a glance, it’s clear that [Daan Gerits] wasn’t concerned with the status quo when designing the Sypherdeck.

Now to be fair, dropping the ARM single-board computer for x86 isn’t completely unheard of. But those builds tend to be considerably bulkier than the Sypherdeck. The secret here seems to be that the 3D printed enclosure doesn’t hold much else than the LattePanda and a seven inch LCD touch screen. The hatch on the side covers the rear of the power, USB, and HDMI bulkhead connectors, but it looks like there’s enough room in there to squeeze in a bit of custom electronics should you wish. There’s no obvious place to install any batteries, so if you wanted to take the show on the road, you’ll need to use an external pack.

Continue reading “Slim Sypherdeck Skips The Keyboard, Packs X86 CPU”

Laser Galvos And An ESP32 Recreate Old-School Asteroids

Playing Asteroids now isn’t quite what it used to be when it came out 40 years ago. At the time, the vector-scan display was part of the charm; making do with an emulator running on a traditional raster display just doesn’t quite do it for purists. But if you manage to build your own laser-projector version of the game like [Chris G] did, you’re getting close to capturing some of the original magic of the game.

There’s a lot to unpack about this project, and the video below does a good job explaining it. Where the original game used a beam of electrons flashing inside a CRT to trace out each object in the game, [Chris] substituted an off-the-shelf two-axis galvanometer from eBay and a 5-mW laser LED. This can project a gamefield on a wall up to two meters on a side, far bigger than any version of the machine ever built. The galvos are driven by op-amp drivers and an SPI DAC on a custom PCB. And in comparison to the discrete logic chips and 6502 running the original game, [Chris] opted for an ESP32.

As interesting as the hardware for this is, the real story is in the software. [Chris] does an excellent job running through his design, making the bulk of the video feel like a master class in game programming. His software is from scratch — no emulations here. As such it doesn’t perfectly reproduce the original games — no flying saucers and no spaceship explosion animations (yet) — but when coupled with the laser vector display, it certainly captures the feel of the original.

Being devoted Asteroids fans from back in the day, this one really pushes our buttons. We’ve seen laser-based recreations of the game before, but this one makes us think we can finally afford to recapture the glory of our misspent youth.

Continue reading “Laser Galvos And An ESP32 Recreate Old-School Asteroids”

Dynamic Macro Keyboard Controls All The Things

Keyboard shortcuts are great. Even so, a person can only be expected to remember so many shortcuts and hit them accurately while giving a presentation over Zoom. [Sebastian] needed a good set of of shortcuts for OBS and decided to make a macro keyboard to help out. By the time he was finished, [Sebastian] had macro’d all the things and built a beautiful and smart peripheral that anyone with a pulse would likely love to have gracing their desk.

The design started with OBS, but this slick little keyboard turned into a system-wide assistant. It assigns the eight keys dynamically based on the program that has focus, and even updates the icon to show changes like the microphone status.

This is done with a Python script on the PC that monitors the running programs and updates the macro keeb accordingly using a serial protocol that [Sebastian] wrote. Thanks to the flexibility of this design, [Sebastian] can even use it to control the office light over MQTT and make the CO2 monitor send a color-coded warning to the jog wheel when there’s trouble in the air.

This project is wide open with fabulous documentation, and [Sebastian] is eager to see what improvements and alternative enclosure materials people come up with. Be sure to check out the walk-through/build video after the break.

Inspired to make your own, but want to start smaller? There are plenty to admire around here.

Continue reading “Dynamic Macro Keyboard Controls All The Things”

A Brief History Of Optical Communication

We live in the information age where access to the internet is considered a fundamental human right. Exercising this right does largely rely on the technological advances made in optical communication. Using light to send information has a long history: from ancient Greece, through Claude Chappe’s semaphore towers and Alexander Graham Bell’s photophone, to fiber optic networks and future satellite internet constellations currently developed by tech giants.

Let’s dive a little bit deeper into the technologies that were used to spread information with the help of light throughout history. Continue reading “A Brief History Of Optical Communication”

Coding A Dynamic Menu For Character LCDs On Arduino

These days, there’s a huge variety of screens on the market for use with microcontrollers. OLEDs and graphic LCDs abound, while e-ink devices tempt the user with their clean look and low energy consumption. However, for many purposes, the humble HD44780 character LCD does the job just fine. If you’re using such a device, you might want to implement a simple menu system, and in that case, [MyHomeThings] has you covered.

The menu code is simple to modify and implement. It allows the user to define a certain number of menu items, along with button labels and functions to be executed with button presses. By default, it’s set up to work with  left and right function buttons, with up and down buttons to toggle through the menu’s various entries. This suits the commonly available Arduino shields which combine a 16×2 character LCD with a set of four tactile buttons in a cross formation. However, modifying the code to use an alternate button scheme would be simple for those eager to tweak things to their liking.

For the absolute beginner to programming, it’s a great way to put together a simple interface for your microcontroller projects. It’s the sort of thing you might use if you’d built a do-everything Arduino handheld device, as we’ve seen built before. If you find text menus too archaic for your purposes, though, be sure to sound off with your favourite solutions in the comments.

NASA Selects SpaceX To Launch Lunar Gateway

While not a Cabinet position, the NASA Administrator is nominated by the president of the United States and tasked with enacting their overall space policy. As such, a new occupant in the White House has historically resulted in a different long-term directive for the agency. Some presidents have wanted bold programs of exploration, while others have directed NASA to follow a more reserved and economical path, with the largest shifts traditionally happening when the administration changes hands between the parties.

So it’s no surprise that the fate of Artemis, a bold program initiated by the previous administration that aims to establish a sustainable human presence on the Moon, has been considered uncertain since the November election. But the recent announcement that SpaceX has been awarded a $331.8 million contract to launch the first two modules of the lunar Gateway station, an orbital outpost that will serve as a rallying point for astronauts coming and going to the Moon’s surface, should help quell some concerns. While the components still aren’t slated to fly until 2024 at the earliest, it’s a step in the right direction and strong indicator that the new administration plans on seeing Artemis through.

Continue reading “NASA Selects SpaceX To Launch Lunar Gateway”

Custom 3D Printed Vitamins Are Just A Few Clicks Away

It’s recently come to our attention that a company by the name of Nourished has carved out a niche for themselves by offering made-to-order gummy vitamins produced with their own custom designed 3D printers. Customers can either select from an array of pre-configured “stacks”, or dial in their own seven layers of gelatinous goodness for a completely bespoke supplement.

Now we can’t vouch for whether or not taking a custom supplement like this is any better than just popping a traditional multi-vitamin, but we’ll admit the hardware Nourished has developed is pretty interesting. As briefly seen in the video after the break, large syringes are filled with the seven different vitamin suspensions, and then loaded into what appears to be a heated chamber for extrusion. This is not unlike other food-grade 3D printers we’ve seen, such as the Cocoa Press.

It looks like all of the syringes are being depressed simultaneously with a plate and a pair of beefy lead screws, so it seems the order in which the layers are placed down must be different for each nozzle. A blog post on the company’s site from early last year shows a wildly different machine being used to produce the vitamins, so either their core technology is changing rapidly, or perhaps the printer being used depends on whether they’re running off the customized stacks versus the standard formulations.

Interestingly, this is very similar to a concept floated by the U.S. Army’s Combat Feeding Directorate (CFD) back in 2014. They reasoned that a 3D printer could be used to produce meal bars that were customized for each soldier’s personal nutritional needs. Being largely impractical for the battlefield, the program didn’t get very far. But thanks to consumers who are willing to pay the premium that Nourished is charging for this service, it seems the idea has turned into a lucrative business model.

Continue reading “Custom 3D Printed Vitamins Are Just A Few Clicks Away”