[Call Me Swal] wanted to experiment with large 3D prints. So he took a Hornet 3D printer and designed a lot of 3D parts to convert it into an “infinite” conveyor belt printer. It looks like — as you can see in the video below — that all the parts are 3D printed but you will still need to buy material for the actual belt.
Of course, you may not have a Hornet, but the idea would be applicable to just about any similar printer. You’d have to, of course, adapt or redesign the parts.
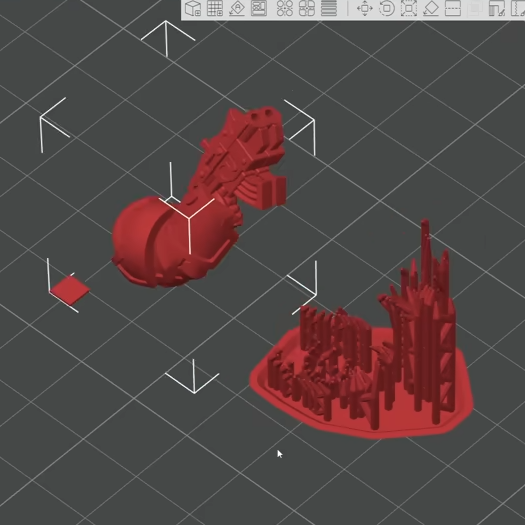
Do you like high-detail 3D models intended for resin printing, but wish you could more easily print them on a filament-based FDM printer? Good news, because [Jacob] of Painted4Combat shared a tool he created to make 3D models meant for resin printers — the kind popular with tabletop gamers — easier to port to FDM. It comes in the form of a Blender add-on called Resin2FDM. Intrigued, but wary of your own lack of experience with Blender? No problem, because he also made a video that walks you through the whole thing step-by-step.
Resin2FDM separates the model from the support structure, then converts the support structure to be FDM-friendly.
3D models intended for resin printing aren’t actually any different, format-wise, from models intended for FDM printers. The differences all come down to the features of the model and how well the printer can execute them. Resin printing is very different from FDM, so printing a model on the “wrong” type of printer will often have disappointing results. Let’s look at why that is, to better understand what makes [Jacob]’s tool so useful.
Rafts and a forest of thin tree-like supports are common in resin printing. In the tabletop gaming scene, many models come pre-supported for convenience. A fair bit of work goes into optimizing the orientation of everything for best printed results, but the benefits don’t carry directly over to FDM.
For one thing, supports for resin prints are usually too small for an FDM printer to properly execute — they tend to be very thin and very tall, which is probably the least favorable shape for FDM printing. In addition, contact points where each support tapers down to a small point that connects to the model are especially troublesome; FDM slicer software will often simply consider those features too small to bother trying to print. Supports that work on a resin printer tend to be too small or too weak to be effective on FDM, even with a 0.2 mm nozzle.
To solve this, [Jacob]’s tool allows one to separate the model itself from the support structure. Once that is done, the tool further allows one to tweak the nest of supports, thickening them up just enough to successfully print on an FDM printer, while leaving the main model unchanged. The result is a support structure that prints well via FDM, allowing the model itself to come out nicely, with a minimum of alterations to the original.
Resin2FDM is available in two versions, the Lite version is free and an advanced version with more features is available to [Jacob]’s Patreon subscribers. The video (embedded below) covers everything from installation to use, and includes some general tips for best results. Check it out if you’re interested in how [Jacob] solved this problem, and keep it in mind for the next time you run across a pre-supported model intended for resin printing that you wish you could print with FDM.
Just about any 3D printer can be satisfying to watch as it works, but delta-style printers are especially hypnotic. There’s just something about the way that three linear motions add up to all kinds of complex shapes; it’s mesmerizing. Deltas aren’t without their problems, though, which led [Bruno Schwander] to undertake a trio of interesting mods on his Anycubic Kossel.
First up was an effort to reduce the mass of the business end of the printer, which can help positional accuracy and repeatability. This started with replacing the stock hot-end with a smaller, lighter MQ Mozzie, but that led to cooling problems that [Bruno] addressed with a ridiculously overpowered brushless hairdryer fan. The fan expects a 0 to 5-VDC signal for the BLDC controller, which meant he had to build an adapter to allow Marlin’s 12-volt PWM signal to control the fan.
Once the beast of a fan was tamed, [Bruno] came up with a clever remote mount for it. A 3D-printed shroud allowed him to mount the fan and adapter to the frame of the printer, with a flexible duct connecting it to the hot-end. The duct is made from lightweight nylon fabric with elastic material sewn into it to keep it from taut as the printhead moves around, looking a bit like an elephant’s trunk.
Finally, to solve his pet peeve of setting up and using the stock Z-probe, [Bruno] turned the entire print bed into a strain-gauge sensor. This took some doing, which the blog post details nicely, but it required building a composite spacer ring for the glass print bed to mount twelve strain gauges that are read by the venerable HX711 amplifier and an Arduino, which sends a signal to Marlin when the head touches the bed. The video below shows it and the remote fan in action.
Anyone who has left their car windows open during a rainstorm will tell you the best way to dry the upholstery is to crank the AC and close the windows. A couple of hours later, presto — dry seats. The same can be said for 3D printer filament, and it’s pretty much what [Ben Krejci] is doing with this solid-state filament dryer.
The running gear for this build is nothing fancy; it’s just a standard thermoelectric cooling module and a fan. The trick was getting the airflow over the module right. [Ben] uses two air inlets on his printed enclosure to pull air from the cold side of the Peltier, which allows the air enough time in contact with the cold to condense out the water. It also allows sufficient airflow to keep the hot side of the module from overheating.
Water collection was a challenge, too. Water always finds a way to leak, and [Ben] came up with a clever case design incorporating a funnel to direct water away. The module is also periodically run in reverse to defrost the cold side heatsink.
The dehumidifier lives in a large tool cabinet with plenty of room for filament rolls and is run by an ESP32-C3 with temperature and humidity sensors, which allowed [Ben] to farm most of the control and monitoring out to ESPHome. The setup seems to work well, keeping the relative humidity inside the cabinet in the low 20s — good enough for PETG and TPU.
It’s an impressively complete build using off-the-shelf parts. For a different approach to solid-state filament drying, check out [Stefan]’s take on the problem.
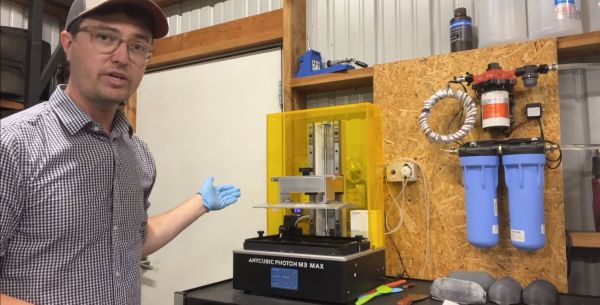
Two essential parts to producing successful resin 3D prints: keeping resin at its optimal temperature and lots and lots of IPA to clean the printed parts with after printing. Unfortunately, most consumer MSLA printers do not come with a resin tray heater, and tossing out IPA after every cleaning session because of some resin contamination is both wasteful and somewhat expensive. These are two things that can be fixed in a number of ways, with [Nick Wilson] going for the ‘crank it to 11’ option, using a high-tech, fully integrated solution for both problems.
The vat with IPA is kept clean through the use of a diaphragm pump that circulates the alcohol through two filter stages, one for larger — up to 5 micrometer — particulates and one for smaller 0.5-micrometer junk. A 405 nm LED lighting section before the filters is intended to cure any resin in the IPA, theoretically leaving the IPA squeaky clean by the time it’s returned to the vat.
For the resin tray heater, a more straightforward 12V 150 Watt silicone heater strip is stuck to the outside edge of the metal resin tray, along with a temperature-controlled relay that toggles the heater strip on and off until the resin reaches the desired temperature. None of these are necessarily expensive solutions, but they can be incredibly useful if you do a fair amount of resin printing.
We’re not aware of any authoritative metrics on such things, but it’s safe to say that the Ender 3 is among the most hackable commercial 3D printers. There’s just something about the machine that lends itself to hacks, most of which are obviously aimed at making it better at 3D printing. Some, though, are aimed in a totally different direction.
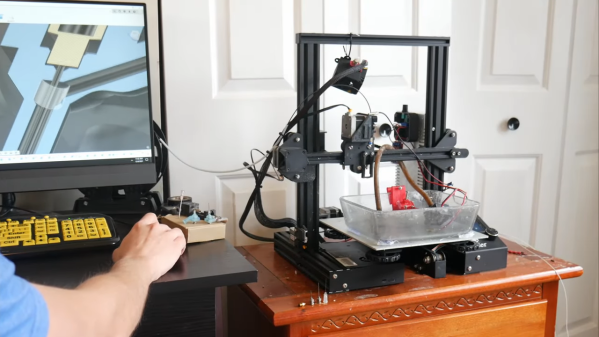
As proof of that, check out this Ender 3 modified for electrochemical machining. ECM is a machining process that uses electrolysis to remove metal from a workpiece. It’s somewhat related to electric discharge machining, but isn’t anywhere near as energetic. [Cooper Zurad] has been exploring ECM with his Ender, which he lightly modified by replacing the extruder with a hypodermic needle electrode. The electrode is connected to a small pump that circulates electrolyte from a bath on the build platform, while a power supply connects to the needle and the workpiece. As the tool traces over the workpiece, material is electrolytically removed.
The video below is a refinement of the basic ECM process, which [Cooper] dubs “wire ECM.” The tool is modified so that electrolyte flows down the outside of the needle, which allows it to enter the workpiece from the edge. Initial results are encouraging; the machine was able to cut through 6 mm thick stainless steel neatly and quickly. There does appear to be a bit of “flare” to the cut near the bottom of thicker stock, which we’d imagine might be mitigated with a faster electrolyte flow rate.
If you want to build your own Ender ECM, [Cooper] has graciously made the plans available for download, which is great since we’d love to see wire ECM take off. We’ve covered ECM before, but more for simpler etching jobs. Being able to silently and cleanly cut steel on the desktop would be a game-changer.
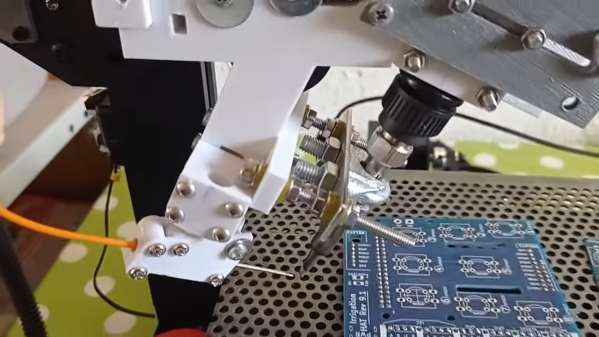
Surface-mount technology has been a fantastic force multiplier for electronics in general and for hobbyists in particular. But sometimes you’ve got no choice but to use through-hole components, meaning that even if you can take advantage of SMDs for most of the design, you still might need to spend a little time with soldering iron in hand. Or not, if you’ve got a spare 3D printer lying around.
All we’ve got here is a fairly brief video from [hydrosys4], so there aren’t a lot of build details. But it’s pretty clear what’s going on here. Starting with what looks like a Longer LK4 printer, [hydrosys4] added a bracket to hold a soldering iron, and a guide for solder wire. The solder is handled by a more-or-less standard extruder, which feeds it into the joint once it’s heated by the iron. The secret sauce here is probably the fixturing, with 3D-printed jigs that hold the through-hole connectors in a pins-up orientation on the bed of the printer. With the PCB sitting on top of the connectors, it’s just a matter of teaching the X-Y-Z position of each joint, applying heat, and advancing the solder with the extruder.
The video below shows it in action at high speed; we slowed it down to 25% to get an idea of how it is in reality, and while it might not be fast, it’s precise and it doesn’t get tired. It may not have much application for one-off boards, but if you’re manufacturing small PCB runs, it’s a genius solution. We’ve seen similar solder bots before, but hats off to [hydrosys4] for keeping this one simple.