Building Penny’s Computer Watch From Inspector Gadget

When you help your bumbling Uncle Gadget with all kinds of missions, you definitely need a watch that can do it all. Penny’s video watch from Inspector Gadget has a ton of features including video communication with Brain and Chief Quimby, a laser, a magnet, a flashlight, a sonar signal, and much more.

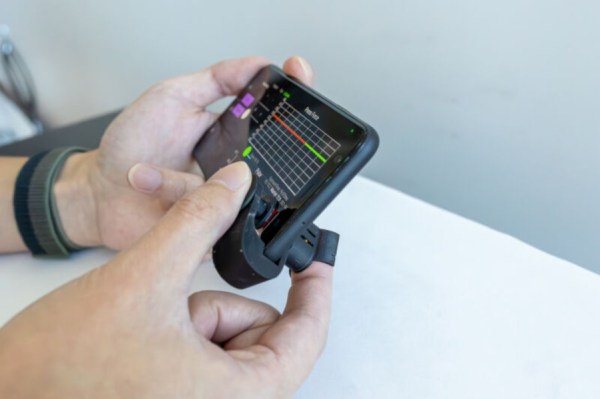
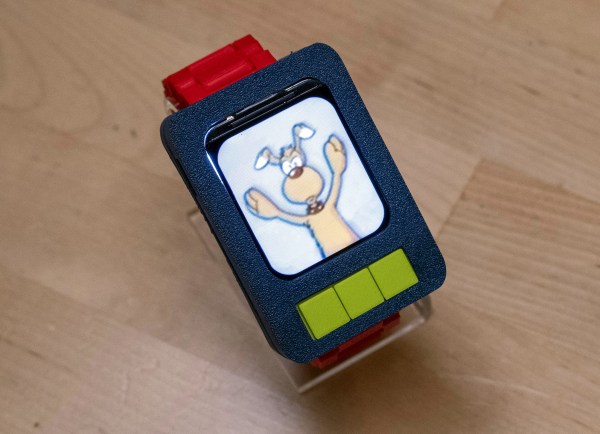
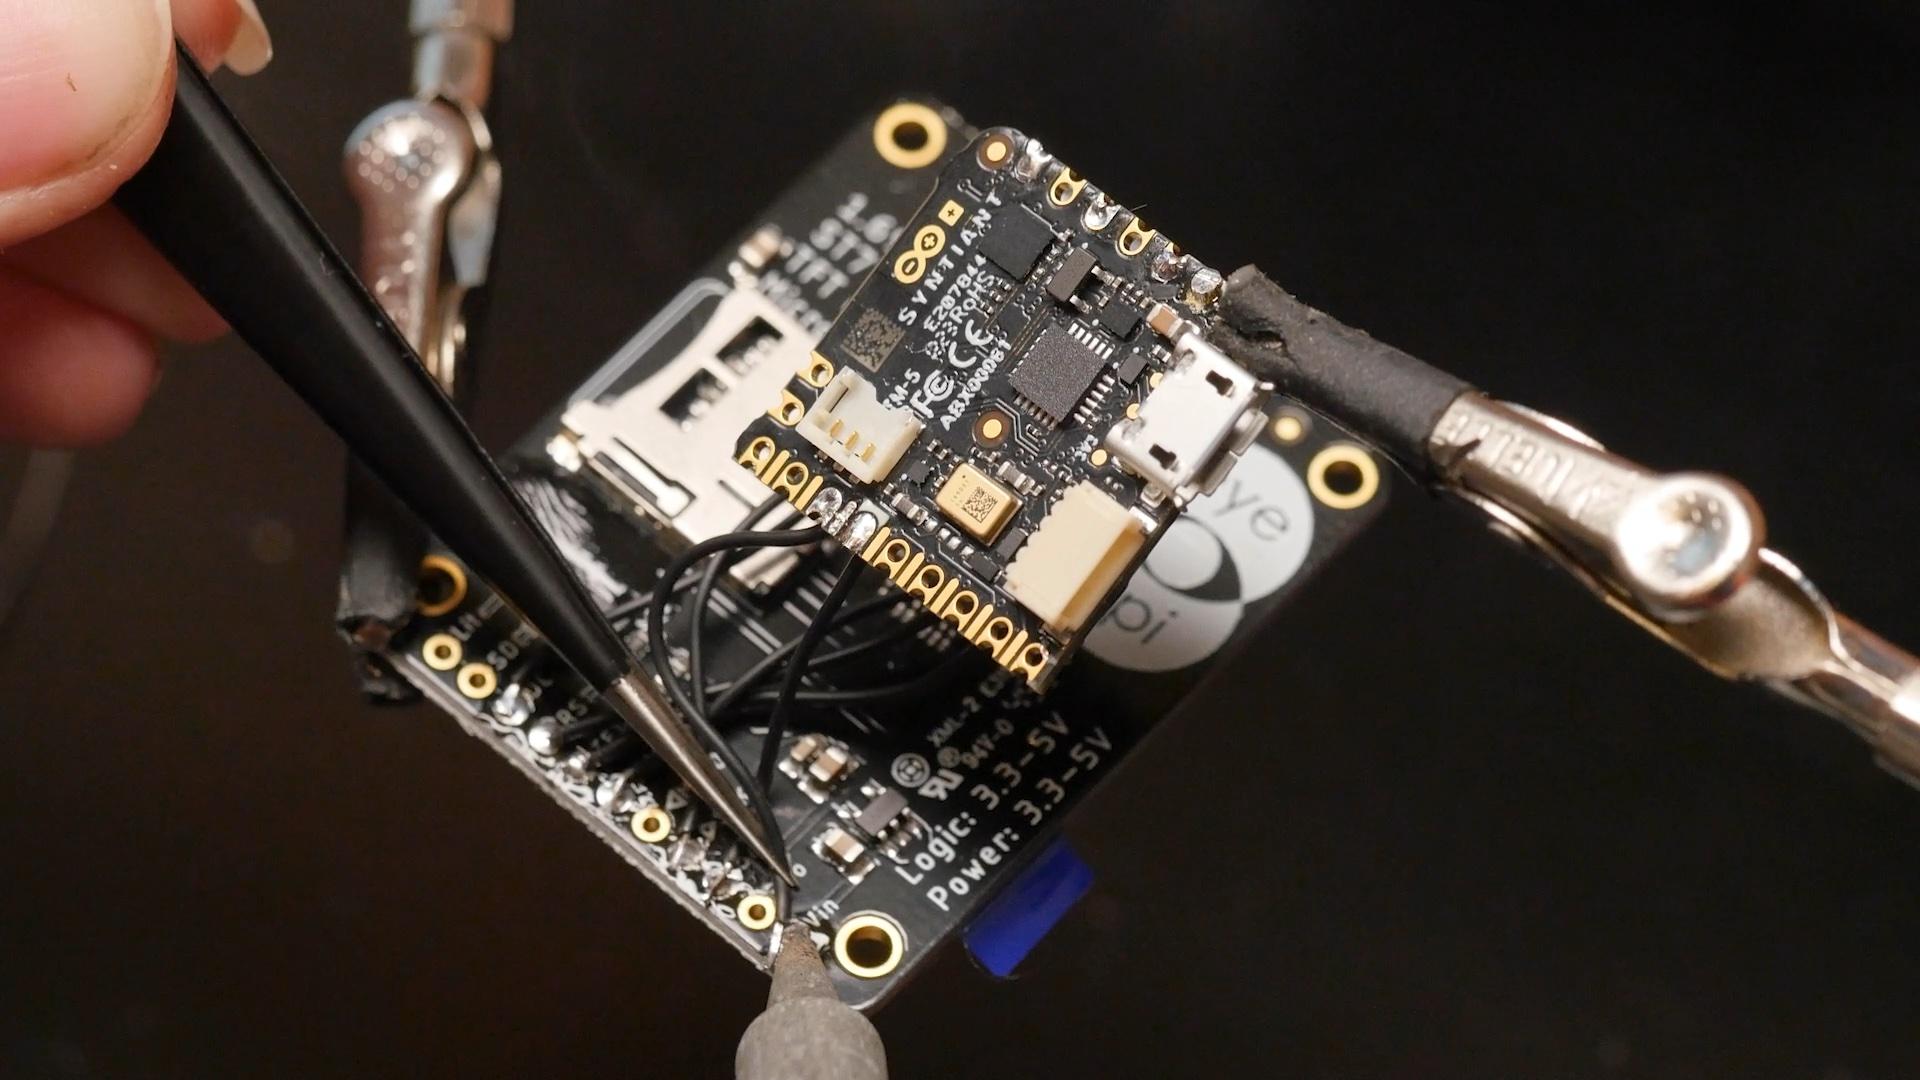
To round out her Penny costume, [Becky Stern] has created a 3D printed version of Penny’s incredibly smart watch. It listens for Penny’s iconic phrase — come in, Brain! — and then loads a new picture of Brain on the rounded rectangle TFT display. Inside the watch is an Arduino Nicla Voice, which has to be one of the tinier machine learning-capable boards out there.

[Becky] created the watch case in Tinkercad and modified a watch band from Printables to fit her wrist. With such a small enclosure to work with, [Becky] ended up using that really flexible 30 AWG silicone-jacketed wire for all the fiddly connections between the Arduino and the screen.

After getting it all wired up to test, she found that the screen was broken, either from pressing it into the enclosure, or having a too-close encounter with a helping hands. Let that be a lesson to you, and check out the build video after the break.

More interested in Uncle Gadget’s goodies? Check out these go-go-Gadget shoes and this propeller backpack for skiers.

Continue reading “Building Penny’s Computer Watch From Inspector Gadget

Cyberdeck on a table

2023 Cyberdeck Challenge: Modular Cyberdeck Creation Kit

We were fortunate to run into [Sp4m] at DEFCON31 and see his Modular Cyberdeck Creation Kit in person. In fact, he was wearing it around the hallways like a rogue decker in search of fellow runners. Holding the unit feels like a serious tool because of its weight, mainly from the battery. Everything hangs from a single-point sling on a metal handle, probably from the cabinetry aisle, and we could move silently and comfortably. The sling is firearm-rated, which is appropriate since he has a printed Weaver rail on top. It just needs a flashlight/laser combo.

[Sp4m] aims to create printable parts that combine any on-hand materials into a usable cyberdeck. In this iteration, he uses a wired Apple keyboard and trackpad he found in the trash, so we have to assume he works in IT. Most of the trackpad is covered, but enough is accessible to scroll and maneuver the mouse, saving almost six inches. The Steam deck is the current head but is removable so that this hardware collection can work for many USB-C tablets without fuss.

The eye-catching white/orange is no accident and may earn it a top spot in the Icebreaker category of the 2023 Cyberdeck Contest. The judges are currently deliberating, so keep an eye out for an announcement about the winners shortly.

Dielectric Mirror Shines Bright

We knew the mirrors in our house were not really very good mirrors, optically speaking. Your mirror eats up 20 to 40 percent of the light that hits it. High-quality first-surface mirrors are better, but [Action Lab] has a video (see below) of something really different: a polymer dielectric mirror with 99.5% reflectivity. In addition, it has no Brewster angle — light that hits it from any angle will reflect.

Turns out something that thin and reflective can be hard to find. It also makes a little flashlight if you roll a tube of the material and pinch the back end together. The light that would have exited the rear of the tube now bounces around until it exits from the front, making it noticeably bright. The film comes from 3M, and apparently, they were surprised about the optical properties, too.

Continue reading “Dielectric Mirror Shines Bright”

An LM386 Oscillator Thanks To Tungsten Under Glass

Once ubiquitous, the incandescent light bulb has become something of a lucerna non grata lately. Banned from home lighting, long gone from flashlights, and laughed out of existence by automotive engineers, you have to go a long way these days to find something that still uses a tungsten filament.

Strangely enough, this lamp-stabilized LM386 Wien bridge oscillator is one place where an incandescent bulb makes an appearance. The Wien bridge itself goes back to the 1890s when it was developed for impedance measurements, and its use in the feedback circuits of vacuum tube oscillators dates back to the 1930s. The incandescent bulb is used in the negative feedback path as an automatic gain control; the tungsten filament’s initial low resistance makes for high gain to kick off oscillation, after which it heats up and lowers the resistance to stabilize the oscillation.

For [Grug Huler], this was one of those “just for funsies” projects stemming from a data sheet example circuit showing a bulb-stabilized LM386 audio oscillator. He actually found it difficult to source the specified lamp — there’s that anti-tungsten bias again — but still managed to cobble together a working audio oscillator. The first pass actually came in pretty close to spec — 1.18 kHz compared to the predicted 1.07 kHz — and the scope showed a very nice-looking sine wave. We were honestly a bit surprised that the FFT analysis showed as many harmonics as it did, but all things considered, the oscillator performed pretty well, especially after a little more tweaking. And no, the light bulb never actually lights up.

Thanks to [Grug] for going down this particular rabbit hole and sharing what he learned. We love builds like this that unearth seemingly obsolete circuits and bring them back to life with modern components. OK, calling the LM386 a modern component might be stretching things a bit, but it is [Elliot]’s favorite chip for a reason.

Continue reading “An LM386 Oscillator Thanks To Tungsten Under Glass”

Got Fireflies? Try Talking To Them With A Green LED

[ChrisMentrek] shares a design for a simple green LED signal light intended for experiments in “talking” to fireflies. The device uses simple components like PVC piping and connectors to make something that resembles a signal flashlight with a momentary switch — a device simple enough to make in time for a little weekend experimenting.

Observe and repeat flashing patterns, and see if any fireflies get curious enough to investigate.

Did you know that fireflies, a type of beetle whose lower abdomen can light up thanks to a chemical reaction, flash in patterns? Many creatures, fireflies included, are quite curious under the right circumstances. The idea is to observe some fireflies and attempt to flash the same patterns (or different ones!) with a green LED to see if any come and investigate.

[ChrisMentrek] recommends using a green LED that outputs 565 nm, because that is very close to the colors emitted by most fireflies in North America. There’s also a handy link about firefly flashing patterns from the Massachusetts Audubon society’s Firefly Watch program, which is a great resource for budding scientists.

If staying up and learning more about nocturnal nightlife is your thing, then in between trying to talk to fireflies we recommend listening for bats as another fun activity, although it requires a bit more than just a green LED. Intrigued? Good news, because we can tell you all about the different kinds of bat detectors and what you can expect from them.

Blood Pressure Monitor For Under $1

Medical equipment is not generally known for being inexpensive, with various imaging systems usually weighing in at over a million dollars, and even relatively simpler pieces of technology like digital thermometers, stethoscopes, and pulse oximeters coming in somewhere around $50. As the general pace of technological improvement continues on we expect marginal decreases in costs, but every now and then a revolutionary piece of technology will drop the cost of something like a blood pressure monitor by over an order of magnitude.

Typically a blood pressure monitor involves a cuff that pressurizes against a patient’s arm, and measures the physical pressure of the blood as the heart forces blood through the area restricted by the cuff. But there are some ways to measure blood pressure by proxy, instead of directly. This device, a small piece of plastic with a cost of less than a dollar, attaches to a smartphone near the camera sensor and flashlight. By pressing a finger onto the device, the smartphone uses the flashlight and the camera in tandem to measure subtle changes in the skin, which can be processed in an app to approximate blood pressure.

The developers of this technology note that it’s not a one-to-one substitute for a traditional blood pressure monitor, but it is extremely helpful for those who might not be able to afford a normal monitor and who might otherwise go undiagnosed for high blood pressure. Almost half of adults in the US alone have issues relating to blood pressure, so just getting information at all is the hurdle this device is attempting to overcome. And, we’ll count it as a win any time medical technology becomes more accessible, more inexpensive, or more open-source.

Converting A B&W Enlarger For Colour Analog Photo Printing

[Koraks tinkers] was gifted a gargantuan photographic enlarger, a Durst Laborator 138 s, which is a unit designed specifically for black and white usage only. This was not good enough for [Koraks] so down the rabbit hole of conversion to colour we go! The moral of the story is this: if you can’t find it, build it. The hacker mentality. After wasting time and effort trying to source a period colour head for the thing, [Koraks] did the decent thing and converted what was already in front of them.

A hacked Chinese-sourced COB array. This is no use.

Now, if you’re thinking this process is simply a matter of ripping out the tungsten bulb and sticking a high-power RGB array in there, then you’re going to be disappointed! You see, colour photography of the era — specifically the RA4 process in this case — requires careful colour calibration and is heavily biased towards the red end of the visible spectrum, due to the colour curve of those tungsten bulbs we touched upon earlier.

Attempt 2: With a heavy bias towards the red end of the spectrum

The first attempt at using an off-the-shelf COB array was a bust — it simply wasn’t bright enough once the light had passed through the diffuser plate, and the light path losses were too high to expose the RA4 paper sufficiently, especially at the red end of the spectrum. Quite simply this is due to the reduced energy of red photons (compared to blue) making the desired chemical reaction rate too low. The solution is more power.

Another issue that quickly raised itself was that 8-bits of PWM control of the RGB components was inadequate since the ratio of blue to red required was so skewed, that only a few effective bits of blue channel control were usable, and that was far too granular to get the necessary accuracy.

[Koraks’] approach was to custom build an LED array with twenty red 3W LEDs and eight each of the green and blue devices. 12-bits of PWM resolution was delivered via a PCA9685 PWM controller, that also handily controlled the cooling fans. The whole thing was hooked up to an Arduino Nano, with an MCP23016 expander board performing the duty of interfacing the rotary encoders and trigger footswitch. In fact, several iterations of the LED array have been constructed and this four-part blog series (Part1, Part2, Part3, Part4) lays out the whole story in all its gory detail for your entertainment. Enjoy!

COB LED arrays are pretty nifty, checkout turning them into 7-segment displays, just because. If all you want is raw power, we reckon that 100W “should be enough for anyone…”

Thanks [macsimski] for the tip!

Update: Corrected the article header from ‘exposer head’ to ‘enlarger’ for clarity at the request of the project author.