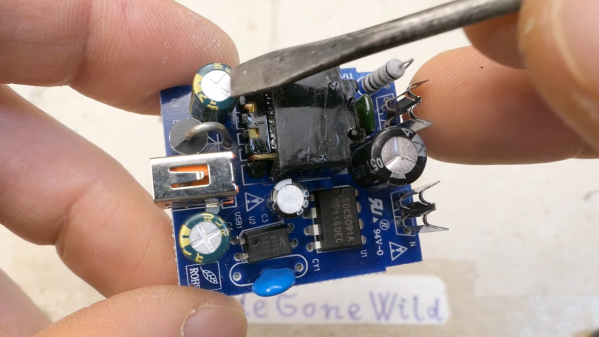
Hackaday Links Column Banner

Hackaday Links: March 26, 2023

Sad news in the tech world this week as Intel co-founder Gordon Moore passed away in Hawaii at the age of 94. Along with Robert Noyce in 1968, Moore founded NM Electronics, the company that would later go on to become Intel Corporation and give the world the first commercially available microprocessor, the 4004, in 1971. The four-bit microprocessor would be joined a few years later by the 8008 and 8080, chips that paved the way for the PC revolution to come. Surprisingly, Moore was not an electrical engineer but a chemist, earning his Ph.D. from the California Institute of Technology in 1954 before his postdoctoral research at the prestigious Applied Physics Lab at Johns Hopkins. He briefly worked alongside Nobel laureate and transistor co-inventor William Shockley before jumping ship with Noyce and others to found Fairchild Semiconductor, which is where he made the observation that integrated circuit component density doubled roughly every two years. This calculation would go on to be known as “Moore’s Law.”

Continue reading “Hackaday Links: March 26, 2023”

Recreating The ZX Spectrum Unboxing Experience By Manufacturing A New Boxed One

Why scour the internet for a rare-as-hen’s-teeth new in box ZX Spectrum computer when you can instead order up some parts, assemble a basically all new ZX Spectrum along with the box, instruction manuals and more?

That seems to have been the reasoning behind [Lost Retro Tapes] when they decided to do exactly that. Along with the announcement of the completion on Reddit, the website details the BOM and sourcing the components.

For the mainboard, an existing, redrawn ZX Spectrum 48 Issue 3B PCB was found and ordered from PCBWay. As a UK-based entity, many of the other components were sourced from retro computing shops around the UK, but with all but the LM1889N IC being available for new or with currently produced alternative, it should be viable to source them locally.

Perhaps most impressive was the creation of the box (unfortunately not detailed on the website at this point), and having the manuals (system and BASIC) professionally printed and bound. Along with a few other bits and pieces, including a tape recorder and fresh Horizons tape, the total price tag came to around £412.

Thanks to [Lee Hodgson] for the tip.

IBIS Models Explained

If you’ve worked with circuit simulation, you may have run into IBIS models. The acronym is input/output buffer information, and while you can do a lot without having to deal with IBIS, knowing about it can help you have a successful simulation.

IBIS is an industry-standard format that uses ASCII text to describe voltage versus current and voltage versus time about some device’s digital input and output pins. This allows precise simulation without revealing the device’s internals, which is important to some vendors. The first post of this two-part series talks about what IBIS is and how it got started. The second part explains creating and using LTSpice to create your own IBIS models. It also covers why you might want to do that.

Of course, if you don’t care about revealing the internals of a device, you could just create a Spice simulation. However, many tools will accept both models, so it is useful to know how to produce either kind of model. In fact, to create an IBIS model, you’ll want to use a Spice model to generate the data for the IBIS model, so it is a good bet you’ll have both, even if you choose to only publish the IBIS models.

If you need a refresher on Spice, we have a series. If you prefer using something different, try Micro-Cap 12, which was commercial, but went free a few years ago.

Screenshot of the SDR software in action, with decoded data in a terminal, and a map that shows the location received from the decoded data

Loudmouth DJI Drones Tell Everyone Where You Are

Back when commercial quadcopters started appearing in the news on the regular, public safety was a talking point. How, for example, do we keep them away from airports? Well, large drone companies didn’t want the negative PR, so some voluntarily added geofencing and tracking mechanisms to their own drones.

When it comes to DJI, one such mechanism is DroneID: a beacon on the drone itself, sending out a trove of data, including its operator’s GPS location. DJI also, of course, sells the Aeroscope device that receives and decodes DroneID data, declared to be for government use. As it often is with privacy-compromising technology, turns out it’s been a bigger compromise than we expected.

Questions started popping up last year, as off-the-shelf quadcopters (including those made by DJI) started to play a part in the Russo-Ukrainian War. It didn’t take long for Ukrainian forces to notice that launching a DJI drone led to its operators being swiftly attacked, and intel was that Russia got some Aeroscopes from Syria. DJI’s response was that their products were not meant to be used this way, and shortly thereafter cut sales to both Russia and Ukraine.

But security researchers have recently discovered the situation was actually worse than we expected. Back in 2022, DJI claimed that the DroneID data was encrypted, but [Kevin Finisterre]’s research proved that to be a lie — with the company finally admitting to it after Verge pushed them on the question. It wouldn’t even be hard to implement a worse-than-nothing encryption that holds up mathematically. However, it seems, DroneID doesn’t even try: here’s a GitHub repository with a DroneID decoder you can use if you have an SDR dongle.

Sadly, the days of companies like DJI standing up against the anti-copter talking points seem to be over, Now they’re setting an example on how devices can subvert their owners’ privacy without reservation. Looks like it’s up to hackers on the frontlines to learn how to excise DroneID, just like we’ve done with the un-nuanced RF power limitations, or the DJI battery DRM, or transplanting firmware between hardware-identical DJI flight controller models.

Continue reading “Loudmouth DJI Drones Tell Everyone Where You Are”

A 1960s Copal flip clock

Classic 1960s Flip Clock Gets NTP Makeover

Many of the clocks we feature here on Hackaday are entirely built from scratch, or perhaps reuse an unusual display type. But sometimes, an old clock is just perfect as it is, and only needs a bit of an upgrade to help it fit into the modern world. One such example is the lovely 1960s Copal flip clock (in German, Google Translate link) that [Wolfgang Jung] has been working with — he managed to bring it squarely into the 21st century without changing its appearance one bit.

Like most flip clocks from the 60s and 70s, the Copal clock uses a small synchronous AC motor to advance the digits. Because this motor runs in step with the mains frequency, it also acts as the clock’s timing reference. However the original motor had died, and a direct replacement was impossible to find. So [Wolfgang] decided to replace it with a modern stepper motor. He designed a small PCB that fit the original housing, on which he placed a Trinamic TMC2225 stepper motor driver, a Wemos D1 Mini and a small 5 V power supply.

A flip clock mechanism with a PCB attached to itThanks to its WiFi connection, the D1 can find out the correct time by contacting a Network Time Protocol (NTP) server. Displaying that time would be tricky with the original hardware though, because there is no indication of which numbers are displayed at any time. [Wolfgang] cleverly solved this problem by placing an IR proximity sensor near the lowest digit, allowing the D1 to count the number of digits that have flipped over and thereby deduce the current state of the display.

There’s plenty of fun to be had with classic flip clocks like this, and with a bit of hacking any old split-flap display should be usable for your own clock project. If none are available at your local thrift store or yard sales, you can always roll your own.

Showing the dock PCB with a Pi Zero attached and wired up onto it

Is Your USB-C Dock Out To Hack You?

In today’s installment of Betteridge’s law enforcement, here’s an evil USB-C dock proof-of-concept by [Lachlan Davidson] from [Aura Division]. We’ve seen malicious USB devices aplenty, from cables and chargers to flash drives and even suspicious USB fans. But a dock, however, is new. The gist is simple — you take a stock dock, find a Pi Zero W and wire it up to a USB 2.0 port tapped somewhere inside the dock. Finding a Pi Zero is unquestionably the hardest part in this endeavor — on the software side, everything is ready for you, just flash an SD card with a pre-cooked malicious image and go!

On the surface level, this might seem like a cookie-cutter malicious USB attack. However, there’s a non-technical element to it; USB-C docks are becoming more and more popular, and with the unique level of convenience they provide, the “plug it in” temptation is much higher than with other devices. For instance, in shared workspaces, having a USB-C cable with charging and sometimes even a second monitor is becoming a norm. If you use USB-C day-to-day, the convenience of just plugging a USB-C cable into your laptop becomes too good to pass up on.

This hack doesn’t exactly use any USB-C specific technical features, like Power Delivery (PD) – it’s more about exploiting the convenience factor of USB-C that incentivizes you to plug a USB-C cable in, amplifying an old attack. Now, BadUSB with its keystroke injection is no longer the limit — with a Thunderbolt-capable USB-C dock, you can connect a PCIe device to it internally and even get access to a laptop’s RAM contents. Of course, fearing USB-C cables is not a viable approach, so perhaps it’s time for us to start protecting from BadUSB attacks on the software side.

Recreating One Of History’s Best Known Spy Gadgets

[Machining and Microwaves] got an interesting request. The BBC asked him to duplicate the Great Seal Bug — the device the Russians used to listen covertly to the US ambassador for seven years in 1945. Turns out they’re filming a documentary on the legendary surveillance device and wanted to demonstrate how it worked.

The strange thing about the bug is that it wasn’t directly powered. It was actually a resonant cavity that only worked when it was irradiated with an external RF energy. Most of the video is background about the bug, with quite a few details revealed. We particularly liked the story of using a software defined radio (SDR) to actually make the bug work.

As you might expect, things didn’t go smoothly. Did they ever get results on camera? Watch the video, and you can find out. This is just the first of six videos he plans to make on the topic, and we can’t wait for future videos that cover the machining and more technical details.

We’ve examined the Theremin bug before. There’s a definite cat-and-mouse dynamic between creating bugging devices and detecting them.

Continue reading “Recreating One Of History’s Best Known Spy Gadgets”