An illustration of a key sitting on an ID card. The key is light grey and the ID card is a darker grey gradient. The ID card says ID-1 Card 85.60 by 53.98 mm

All Your Keys Are Belong To KeyDecoder

Physical security is often considered simpler than digital security since safes are heavy and physical keys take more effort to duplicate than those of the digital persuasion. [Maxime Beasse and Quentin Clement] have developed a smartphone app that can duplicate a key from a photo making key copying much easier.

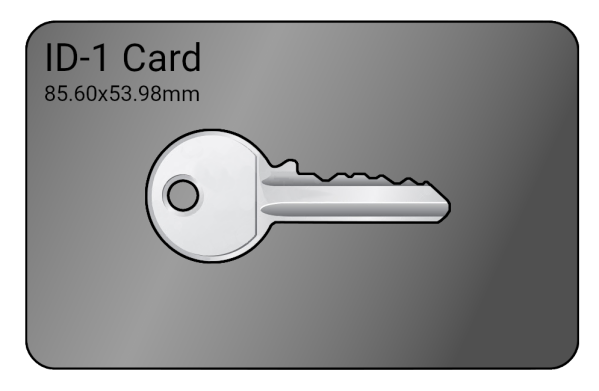
KeyDecoder is an open source Android app that can generate all the necessary bitting info to duplicate a key from just an image. Luckily for the paranoid among us, the image must be taken with the key laying flat without a keyring on an ISO/CEI 7810 ID-1 ID or credit card. A passerby can’t just snap a photo of your keys across the room and go liberate your home furnishings, but it still would be wise to keep a closer eye on your keys now that this particular cat hack is out of the bag.

The project’s GitHub page is awash in warnings that this tool is designed solely for “pentesters and security enthusiasts” to warn their friends and clients about the dangers of leaving their keys exposed. After learning about this tool, we wouldn’t be surprised if some in the audience start rethinking how they carry and store their physical keys from now on.

If you want to see some more hacks to duplicate keys, checkout Copying High Security Keys With OpenSCAD And Light and Methods Of Copying High Security Keys.

Floppy Photog: Making An IR Filter From A 3.5″ Disk

Sony used to sell digital cameras that recorded on actual floppy disks. We’ve come a long way, but [Mathieu] put a floppy in a digital camera recently for an entirely different reason. First, though, he had to modify the camera to work on the full spectrum, something he covered in an earlier video. You can see both videos, below.

As you might expect, he didn’t actually put an entire floppy inside the camera. He used the internal disk portion as an infrared filter to obtain some striking photos. In all honestly, the results were not as nice as what you get from a very expensive professional filter. But the pictures looked great and the difference was not as much as you’d expect compared to the cost difference.

The real work, though, is converting the camera to full spectrum as seen in the second video. A normal camera has an IR filter to prevent the sensor from seeing IR light. This prevents the image sensor from capturing things your eyes don’t see. The modification replaces the filter with a clear filter.

We’ve covered this kind of conversion before. You can even do it with a Raspberry Pi, if you like.

Continue reading “Floppy Photog: Making An IR Filter From A 3.5″ Disk”

open hardware textile spinning machine constructed from aluminium extrusions, arduino electronics and 3D printed parts

An Open Hardware Automatic Spinning Machine

The team at the Berlin-based Studio HILO has been working on ideas and tools around developing a more open approach to small-scale textile production environments. Leveraging open-source platforms and tools, the team has come up with a simple open hardware spinning machine that can be used for interactive yarn production, right on the desktop. The frame is built with 3030 profile aluminium extrusions, with a handful of 3D printed, and a smidge of laser cut parts. Motion is thanks to, you guessed it, NEMA 17 stepper motors and the once ubiquitous Arduino Mega 2560 plus RAMPS 1.4 combination that many people will be very familiar with.

The project really shines on the documentation side of things, with the project GitLab positively dripping with well-organised information. One minor niggle is that you’ll need access to a polyjet or very accurate multi-material 3D printer to run off the drive wheel and the associated trailing wheel. We’re sure there’s a simple enough way to do it without those tools, for those sufficiently motivated.

We liked the use of Arduino for the firmware, keeping things simple, and in the same vein, Processing for the user interface. That makes sending values from the on-screen slider controls over the USB a piece of cake. Processing doesn’t seem to pop up on these pages too often, which is a shame as it’s a great tool to have at one’s disposal. On the subject of the user interface, it looks like for now only basic parameters can be tweaked on the fly, with some more subtle parameters needing fixing at firmware compilation time. With a bit more time, we’re sure the project will flesh out a bit more, and that area will be improved.

Of course, if you only have raw fibers, that are not appropriately aligned, you need a carder, like this one maybe?

Continue reading “An Open Hardware Automatic Spinning Machine”

Robot Collects Ping Pong Balls For You

If you’ve ever played ping pong, table tennis, or beer pong, you know that it’s a struggle to hang on to the balls. [MaximeMonsieur] has designed a robot to handle picking them up so you don’t have to.

The robot is specifically designed to pick up ultra-light ping pong balls. To that end, it has a large spinning paddle that simply wafts the balls into its collector basket at the rear. The robot gets around with a simple two-motor drive system, relying on skid-steering with a castor wheel at the rear. An Arduino Uno runs the show, and navigates the robot around with the aid of ultrasonic sensors to avoid crashing into walls.

Overall, the robot shows the benefits of designing for a specific purpose. Such a design would likely be far less successful with other types of heavier balls, but for ping pong balls, the spinning paddle collector works great. We can imagine the robot being put to good use between sets to pick up all the lost balls around a table tennis court.

We’ve seen other ball collecting robots before, too.

Continue reading “Robot Collects Ping Pong Balls For You”

Irreproducible, Accumulative Hacks

Last weekend, I made an incredibly accurate CNC pen-plotter bot in just 20 minutes, for a total expenditure of $0. How did I pull this off? Hacks accumulate.

In particular, the main ingredients were a CNC router, some 3D-printed mounts that I’d designed and built for it, and a sweet used linear rail that I picked up on eBay as part of a set a few years back because it was just too good of a deal. If you had to replicate this build exactly, it would probably take a month or two of labor and cost maybe $2,000 on top of that. Heck, just tuning up the Chinese 6040 CNC machine alone took me four good weekends and involved replacing the stepper motors. Continue reading “Irreproducible, Accumulative Hacks”

Beehive In A Bottle

One of the most common types of beekeeping hive is based around the Langstroth hive, first patented in the United States in 1852. While it does have some nice features like movable frames, the march of history has progressed considerably while this core of beekeeping practices has changed very little. But that really just means that beekeeping as a hobby is rife with opportunities for innovation, and [Advoko] is pioneering his own modern style of beehive.

In nature, bees like to live inside of things like hollowed-out tree trunks, so he has modeled his hive design after that by basing it around large inverted plastic bottles. Bees can enter in the opening at the bottle and build their comb inside from the top down. The bottles can be closed and moved easily without contacting the bees, and he even creates honey supers out of smaller bottles which allows honey to be harvested without disturbing the core beehive.There are a number of strategies to improve the bees’ stay in the bottles as well, such as giving them wooden skewers in the bottle to build their comb on and closing the bottles in insulation to help the hives regulate their temperature more evenly and to keep them dark.

He hopes this idea will help inspire those with an interest in the hobby who wouldn’t otherwise have the large amount of money it takes to set up even a few Langstroth-type hives. Even if you don’t live in a part of the world where the Langstroth hive is common, this system still should be possible to get up and running with a minimum of financial investment. Once you’ve started, though, take a look at some other builds which augment the hive with some monitoring technology.

Continue reading “Beehive In A Bottle”

RC Car Gets F1-Style DRS Rear Wing

DRS, or the Drag Reduction System, has become a key part of Formula 1 in the past decade. [Engineering After Hours] decided to implement the same system on an RC car instead.

The DRS system was implemented in Formula 1 to increase passing in the series. By moving a flap in the rear wing of the race cars, drag could be reduced, allowing a car to attain a higher top speed on the straights. The racing series limited the activation of the DRS wing to only cars following closely behind another. This artificially enabled them to gain a speed boost over the car in front to aid passing.

[Engineering After Hours] wanted to see if a tiny wing on a small RC car could work the same way. It would fundamentally come down to whether moving a tiny wing element would appreciably change the car’s drag or not. Naturally, on such a small scale, attaining high speeds would be necessary to detect much difference. At lower speeds, the difference in drag would likely be too negligible to notice.

The RC-scale DRS system fundamentally does work. With DRS engaged, flattening out the rear wing elements noticably reduced downforce at the rear. With the DRS not engaged, though, the rear wing on the car was creating so much downforce that the car was squatting at the rear and occasionally flipping end over end. [Engineering After Hours] didn’t get any top speed measurements, but estimated that the wing could potentially increase top speed by up to 7 mph with the DRS enabled.

We’ve seen [Engineering After Hours] bring other fun motorsport tech to RC cars before, too, like this amazing fan car build.

Continue reading “RC Car Gets F1-Style DRS Rear Wing”