It’s Almost A New Raspberry Pi Compute Module 4. But Not Quite

We know that readers are familiar with the global chip shortage and its effects on product availability. The Raspberry Pi folks haven’t escaped its shadow, for even though they’ve managed to preserve availability of their RP2040 microcontroller, it’s fair to say that some of their flagship Linux-capable boards have been hard to find. All of this has had an unlikely effect in the form of a new Raspberry Pi, but unexpectedly it’s one which few end users are likely to get their hands on.

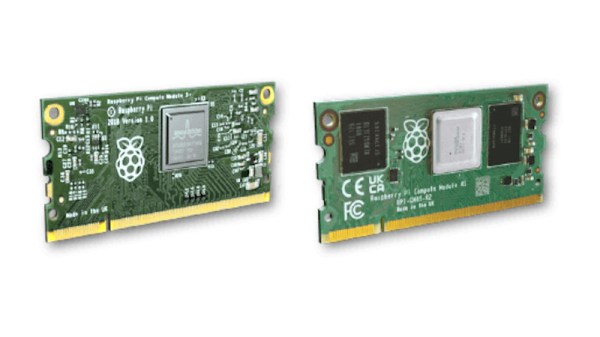
The Raspberry Pi Compute Module has been part of the range since the early days, and in its earlier versions took a SODIMM form factor. The last SODIMM Compute Module had a Pi 3 processor, and this unexpected new model is reported as having a very similar hardware specification but featuring the Pi 4 processor. It seems that the chip shortage has affected supplies of the earlier SoC, and to keep their many industrial customers for the SODIMM Compute Modules in business they’ve had to produce this upgrade. As yet it’s not surfaced for sale on its own and there’s a possibility it will stay only in the realm of industrial boards, but as the story develops there’s a Raspberry Pi forum topic about it for the latest and you can find the pertinent info in the video below the break.

Of course, the Compute Module of the moment remains the CM4 in its newer form factor, which we see as possibly the most exciting of all the Pi products of the moment. Meanwhile this is not the first custom industrial Raspberry Pi to be seen in the wild.

Continue reading “It’s Almost A New Raspberry Pi Compute Module 4. But Not Quite”

Raspberry Pi Test Stand Tells You Which Glues To Use

Not all glues are created equal; or rather, not every glue is good for every application. But how is one to know which glue to use in which kinds of joints? The answer to that is not always clear, but solid numbers on the comparative strength of different glues are a great place to start.

To quantify what can ordinarily be a somewhat subjective process, there’s probably no one better than woodworker and hacker [Matthias Wandel], equipped as he is with his DIY strength-tester. Using its stepper-driven power to blast apart glued lap joints, [Matthias] measured the yield point of the various adhesives using a strain gauge connected to a Raspberry Pi.

His first round of tests had some interesting results, including the usually vaunted construction adhesive ending up in a distant last place. Also performing poorly, at least relative to its reputation and the mess it can cause, was the polyurethane-based Gorilla Glue. A surprise standout in overall strength was hot glue, although that seemed to have a sort of plastic yield mode. Ever the careful empiricist, [Matthias] repeated his tests using hardwoods, with remarkably different results; it seems that glues really perform better with denser wood. He also repeated a few tests to make sure every adhesive got a fair shake. Check out the video below for the final results.

It’s always good to see experiments like this that put what we often take for granted to the test. [John] over at the Project Farm channel on YouTube does this kind of stuff too, and even did a head-to-head test of epoxy adhesives.

Continue reading “Raspberry Pi Test Stand Tells You Which Glues To Use”

A Power Button For Raspberry Pi, Courtesy Of Device Tree Overlays

As a standard feature of the Linux kernel, device tree overlays (DTOs) allow for easy enabling and configuration of features and drivers, such as those contained within the standard firmware of a Raspberry Pi system. Using these DTOs it’s trivial to set up features like as a soft power-off button, triggering an external power supply and enable drivers for everything from an external real-time clock (RTC) to various displays, sensors and audio devices, all without modifying the operating system or using custom scripts.

It’s also possible to add your own DTOs to create a custom overlay that combines multiple DTO commands into a single one, or create a custom device tree binary (DTB) for the target hardware. Essentially this DTB is loaded by the Linux kernel on boot to let it know which devices are connected and their configuration settings, very similar to what the BIOS component with x86-based architectures handles automatically.

Ultimately, the DTB concept and the use of overlays allow for easy configuration of such optional devices and GPIO pin settings, especially when made configurable through a simple text file as on the Raspberry Pi SBC platform.

Continue reading “A Power Button For Raspberry Pi, Courtesy Of Device Tree Overlays”

Compaq 286 Laptop Gets Raspberry Transfusion

We know, we know. A lot of you don’t like projects that consist of gutting a vintage computer (or anything else, for that matter) and replacing its internals with modern electronics. But can you really look at the clunky Compaq LTE 286 laptop that [Dmitry Brant] hacked a Raspberry Pi into and honestly say it’s a machine worthy of historical preservation? The 30+ year old laptop had all the design cues of a saltine cracker, and the performance to match. At least now with a Pi under the hood, you can play some newer games on the thing.

Besides, [Dmitry] says the machine was damaged beyond the point of economical repair anyway. The only stock hardware that’s left beyond the case itself is the keyboard, which he was able to get talking USB thanks to a Teensy microcontroller. It’s not immediately clear if any attempt has been made to get the switches above the keyboard working, but we imagine it wouldn’t be too hard to tie them into some spare GPIO pins on the MCU for a bit of added authenticity.

The bottom half of the machine was cleared out to the point of it literally being a husk of its former self, which gave him plenty of room to hold the Pi 3B and the HDMI driver board that controls the new 9-inch TFT display. Speaking of which, the new panel was a close enough match to the original’s aspect ratio that only minor bezel modifications were required to get it to fit. The modern LCD makes for a massive improvement over the original, without looking too conspicuous.

While there’s still plenty of available space inside the Compaq, [Dmitry] has opted not to include an onboard battery at this time. Instead, power is provided to the Pi and associated hardware through a bulkhead mount USB connector on the side of the machine. It looks like it wouldn’t be too much trouble to add support for an off-the-shelf USB battery bank, as we recently saw with a particularly well engineered retro-futuristic folding cyberdeck, but far from us to tell a hacker what they should do with their bespoke computer.

Raspberry Pi Creates Melody

For those who are not into prog rock in the 70s or old radio shows from the 40s, the Theremin may be an unfamiliar musical instrument. As a purely electronic device, it’s well outside the realm of conventional musical instruments. Two radio antennas detect the position of the musician’s hands to make a unique sound traditionally associated with eeriness or science fiction.

Normally a set of filters and amplifiers are used to build this instrument but this build instead replaces almost everything with a Raspberry Pi Zero 2, and instead of radio antennas to detect the position of the musician’s hands a set of two HC-SR04 distance sensors are used instead. With the processing power available from the Pi, the modernized instrument is able to output MIDI as well which makes this instrument easily able to interface with programs like GarageBand or any other MIDI-capable software.

The project build is split into two videos, the second of which is linked below. The project code is also available on the project’s GitHub page, so anyone with the Pi and other equipment available can easily start experimenting with this esoteric and often overlooked musical instrument. It’s been around for over 100 years now, and its offshoots (including this build) are as varied as the sounds they can produce.

Continue reading “Raspberry Pi Creates Melody”

Get GitHub Tickets IRL With A Raspberry Pi And A Receipt Printer

Thermal receipt printers are finding their way into all sorts of projects that are well beyond the point-of-sale environment that they normally inhabit. And while we applaud all the creative and artistic uses hackers have found for these little gems, this GitHub physical ticket printer has to be the best use for one yet.

According to [Andrew Schmelyun], seeing a fast-food order pop up on a thermal printer was the inspiration for this build. Maintaining over one hundred GitHub repos as he does, it’s easy for the details of any one bug report or feature request to get lost in the swarm of sticky notes that [Andrew] previously used to keep track of his work. To make it happen, he teamed an Epson thermal printer up to a Raspberry Pi Zero W and worked out the details of sending data to the printer using PHP. Luckily, there’s a library for that — the beauty of GitHub.

With the “Hello, World!” bit out of the way, [Andrew] turned his attention to connecting to GitHub. He set up some webhooks on the GitHub side to send a POST request every time an issue is reported on one of his repos. The POSTs are sent via ngrok to a PHP web server running on the Pi, which formats the data and sends the text to the printer. There’s a short video in the tweet below.

Between the sound of the printer working and the actual dead-tree ticket, it’ll be hard for [Andrew] to miss issues now. We’ve seen thermal printers stuffed into cameras, used to send pictures to Grannie, and even watched them commit suicide slowly, but we say hats off to [Andrew] for his solid work ethic and a fun new way to put a receipt printer to use.

Continue reading “Get GitHub Tickets IRL With A Raspberry Pi And A Receipt Printer”

Raspberry Pi And The Story Of SD Card Corruption

Tales of Raspberry Pi SD card corruption are available online by the fistful, and are definitely a constant in Pi-adjacent communities. It’s apparent that some kind of problems tend to arise when a Raspberry Pi meets an SD card – which sounds quite ironic, since an SD card is the official and recommended way of booting a Pi. What is up with all of that?

I can start with a history lesson. Back when Raspberry Pi launched in 2012 – which is now 10 years ago – there were SD card controller driver problems, which makes sense given the wide variety of SD cards available out there. They were verifiably fixed one by one at some point in time, as debugging goes, their impact decreased and bugs with individual cards got smoothed over. This is how the “Pi SD card corruption” meme was originally born; however, if the problems were to end there, so would the meme. Yet, tales of broken SD cards plague us to this day – way less severe than they were in the beginning, but pronounced enough that you’ll see people encounter them every now and then.

Over the years, a devoted base of Pi SD card haters has grown. Their demand has been simple – Raspberry Pi has to get an ability to boot from something else, in large part because of corruption reasons, but also undeniably because of speed and capacity/cost limitations of SD cards. Thanks to their demands and work, we’ve seen a series of projects grow from unofficial efforts and hacks into officially supported Raspberry Pi abilities – USB boot being initially more of a workaround but now something you can enable out of the box, SSD-equipped Pi enclosures becoming more of a norm, and now, NVMe boot appearing on the horizon. Every few years, we get a new way to boot a Pi. Continue reading “Raspberry Pi And The Story Of SD Card Corruption”