A Universal, Non-planar Slicer For 3D Printing Is Worth Thinking About

One may think that when it comes to 3D printing, slicing software is pretty much a solved problem. Take a 3D model, slice it into flat layers equal to layer height, and make a toolpath so the nozzle can create those layers one at a time. However, as 3D printing becomes more complex and capable, this “flat planar slicing” approach will eventually become a limitation because a series of flat slices won’t necessarily the best way to treat all objects (nor all materials or toolheads, for that matter.)

How a 20 mm cube looks when sliced in a cone-shaped plane.

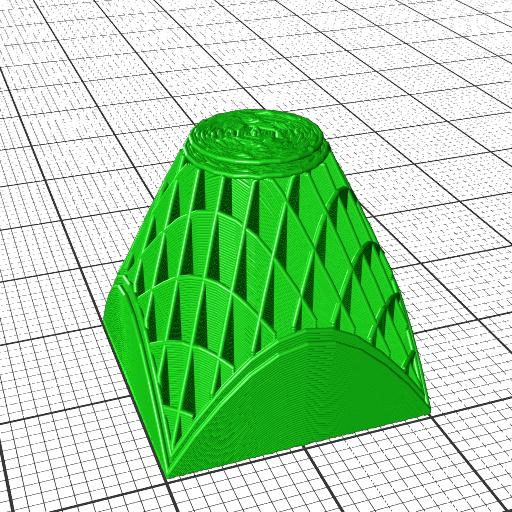
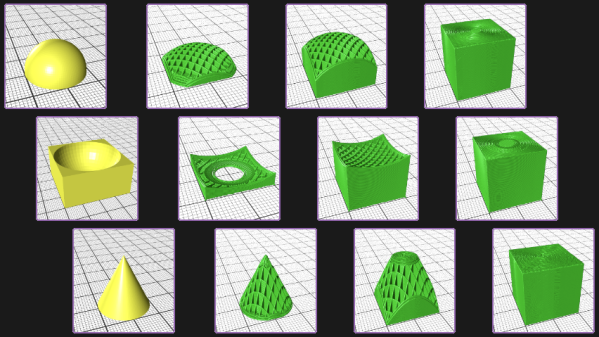
[René K. Müller] works to re-imagine slicing itself, and shows off the results of slicing 3D models using non-planar geometries. There are loads of pictures of a 20 mm cube being sliced with a variety of different geometries, so be sure to give it a look. There’s a video embedded below the page break that covers the main points.

It’s all forward-thinking stuff, and [René] certainly makes some compelling points in favor of a need for universal slicing; a system capable of handling any geometry, with the freedom to process along any path or direction. This is a concept that raises other interesting questions, too. For example, when slicing a 20 mm cube with non-planar geometries, the resulting slices often look strange. What’s the best way to create a toolpath for such a slice? After all, some slicing geometries are clearly better for the object, but can’t be accommodated by normal hot ends (that’s where a rotating, tilted nozzle comes in.)

Such worries may not be an issue for most users at the moment, but it’s worth trying to get ahead of the curve on something like this. And lest anyone think that non-planar slicing has no practical purpose, we previously covered [René]’s demonstration of how non-planar slicing can reliably create 90° overhangs with no supports.

Continue reading “A Universal, Non-planar Slicer For 3D Printing Is Worth Thinking About”

Research: It’s Like Cheating, But Fair

My niece’s two favorite classes in high school this year are “Intro to AI” and “Ethical Hacking”. (She goes to a much cooler high school than I did!) In “Hacking”, she had an assignment to figure out some bug in some body of code. She was staring and staring, figuring and figuring. She went to her teacher and said she couldn’t figure it out, and he asked her if she’d tried to search for the right keywords on the Internet.

My niece responded “this is homework, and that’d be cheating”, a line she surely must have learned in her previous not-so-cool high school. When the teacher responded with “but doing research is how you learn to do stuff”, my niece was hooked. The class wasn’t abstract or academic any more; it became real. No arbitrary rules. Game on!

But I know how she feels. Whether it’s stubborn independence, or a feeling that I’m cheating, I sometimes don’t do my research first. But attend any hacker talk, where they talk about how they broke some obscure system or pulled off an epic trick. What is the first step? “I looked all over the Internet for the datasheet.” (Video) “I found the SDK and that made it possible.” (Video) “Would you believe this protocol is already documented?” In any serious hack, there’s always ample room for your creativity and curiosity later on. If others have laid the groundwork for you, get on it.

If you have trouble overcoming your pride, or NIH syndrome, or whatever, bear this in mind: the reason we share information with other hackers is to give them a leg up. Whoever documented that protocol did it to help you. Not only is there no shame in cribbing from them, you’re essentially morally obliged to do so. And to say thanks along the way!

Omnibot Shows Off Over A Decade Of CNC Prowess

At first glance, you might think the Omnibot v3 wasn’t anything more than a basic 3D printed robotics platform, but you’d be wrong on both counts. There’s actually no 3D printed parts on the build, and while you could describe the platform as simplistic, calling it basic certainly doesn’t do the clever design justice. In the video after the break, creator [Michal] takes us through the process of designing and building this high quality bot.

The build starts with huge amounts of time and effort in a CAD program designing the Omnibot v3 with its four wheel steering and ability to do fancy things like spin in place. With the CAD and 3D renders out of the way, the process of transforming the digital into the physical began with a CNC router.

Rather than routing the individual components out of a suitable material, [Michal] cut forms. Those forms were made only for the creation of silicone molds. Those silicon molds where then used to pour the actual parts with polyurethane resin. It is these resin parts that make up the actual Omnibot v3, which is manually demonstrated at the end of the video.

All in all, it’s a neat project with a neat process. If we were to stop here, things would be mostly complete and you’d click on to the next great Hackaday article. But there’s more to be had here. You see, [Michal] is also fellow behind the Guerrilla guide to CNC and resin casting. In his own words: “CNC machining and resin casting are an underappreciated method for producing engineering-grade parts, but the process is fast, predictable, and garage-friendly.” After seeing the results, we can’t help but to agree.

By the way, before anybody in the comments can yell “DUPE!”, we already know. You see, we featured the Guerrilla guide to CNC and resin casting once before, almost exactly 11.5 years agoIt’s been updated since then, and appears to be an absolute gold mine of information for anybody wanting to walk in [Michal]’s shoes.

Continue reading “Omnibot Shows Off Over A Decade Of CNC Prowess”

High Temp Heat Engine Achieves 40% Efficiency

People generate lots of waste heat. It makes sense that there is a desire to convert that heat into usable energy. The problem is one of efficiency. Researchers from MIT and the National Renewable Energy Lab have announced a new heat converter that they claim has 40% efficiency. Of course, there’s a catch. The temperature range for the devices starts at 1,900 °C .

The thermophotovoltaic cells are tandem devices with two cells mated on one substrate. Each cell is multiple layers of very thin and somewhat exotic materials. So this probably isn’t something you will cobble up in your basement anytime soon unless you’re already manufacturing ICs down there. It appears that the secret is in the multiple layers including a reflective one that sends any missed photons back through the stack.

The paper is pretty dense, but there’s a Sunday-supplement summary over on the MIT site. Using heat storage leads to the ability to make heat batteries, more or less, and harness what would otherwise be waste energy.

We’ve noticed a lot of interest in drawing power from hot pipes lately. All of them techniques we’ve seen rely on some kind of exotic materials.

Meet The RouterPi, A Compute Module 4 Based GbE Router

[Zak Kemble] likes to build things, and for several years has been pining over various Raspberry Pi products with an eye on putting them into service as a router. Sadly, none of them so far provided what he was looking for with regard to the raw throughput of the Gigabit Ethernet ports. His hopes were renewed when the Compute Module 4 came on scene, and [Zak] set out to turn the CM4 module into a full Gigabit Ethernet router. The project is documented on his excellent website, and sources are provided via a link to GitHub.

A view underneath shows off the RTC, power supply, and more.

Of course the Compute Module 4 is just a module- it’s designed to be built into another product, and this is one of the many things differentiating it from a traditional Raspberry Pi. [Zak] designed a simple two layer PCB that breaks out the CM4’s main features. But a router with just one Ethernet port, even if it’s GbE, isn’t really a router. [Zak] added a Realtek RTL8111HS GbE controller to the PCIe bus, ensuring that he’d be able to get the full bandwidth of the device.

The list of fancy addons is fairly long, but it includes such neat hacks as the ability to power other network devices by passing through the 12 V power supply, having a poweroff button and a hard reset button, and even including an environmental sensor (although he doesn’t go into why… but why not, right?).

Testing the RouterPi uncovered some performance bottlenecks that were solved with some clever tweaks to the software that assigned different ports an tasks to different CPU cores. Overall, it’s a great looking device and has been successfully server [Zak] as a router, a DNS resolver, and more- what more can you ask for from an experimental project?

This CM4 based project is a wonderful contrast to Cisco’s first network product, which in itself was innovative at the the time, but definitely didn’t have Gigabit Ethernet. Thanks to [Adrian] for the tip!

6 panel diagram of process

Add Conductive Traces On Vacuum Formed Plastic With 3D Printing

Surface conductors on vacuum formed parts appear in many hacks, from cosplay armor to 3D touch pads and smart objects. But making them has always been painful. Either they had to be hand painted after forming, which looked sloppy and was labor intensive, or they had to be printed with some difficult to use stretchable ink tech. [Freddie Hong] and his group have another solution, using tech most hackers already have – a 3D printer and a vacuum former.

plastic tray with electrodes to sense foil wrapped chocolates
Smart tray created by this method.

They 3D print the traces with conductive PLA filament directly onto a base plastic sheet, and then vacuum form the whole thing. The filament is happy to deform when heated – it’s printer filament.

We like this process.  We’ve found conductive filament isn’t reliably resistive across vertical layers, but is reliable in the XY plane. Their method only requires one layer. Also, they suggest 3D printing a layer of non conductive PLA atop most of the conductor, like a PCB solder mask.

Conductive filament has a fair bulk resistance. They suggest electroplating it before applying the top mask layer. They also are exploring 3D printing logos, stripes, and such with colored filament, or even making surface detail like rivets on model parts or adding thickness where the plastic thins during vacuum forming.

Designing the 3D print requires guessing what bit of plastic sheet ends up where in the vacuum formed final part.  His group used a commercial program, t-sim,  to do the prediction and Grasshopper to import the result into Rhino3D. This seems a lot for a home hacker. Drawing lines on a test sheet and vacuum forming seems simpler.

We’ve looked at vacuum forming before. We did a piece on 3D printing bucks , and covered [Ted Brull]’s Kevo vacuum former back in 2015.

Thanks to [howielowe] for the tip.

Hard(er) Drives: Impractical, Slow, Amazing, And Incredible

Computer memory is a problem that has been solved for many years. But early on, it was more than just a small problem. We’ve many of the different kinds at Hackaday over the years, and we’ll link to some of them later on. But one of the original types of memory was called Delay Line memory, which worked by waiting for a signal to propagate slow enough through a device that it was essentially stored in the device. This was highly inefficient, but still a neat concept- one that [Tom7] has taken to entirely new levels of amazing and impractical as seen in the video below the break.

Such factors as “harm to society” are artfully considered

Starting with a demonstration of orbiting chainsaws, he then moves on to explaining how radio propagation waves could be used to temporarily store data while it’s in transit. He missed the opportunity to call it cloud storage, but we’ll forgive him. Extrapolating that further, he decided to use the Entire Internet to store data without its permission, utilizing large ICMP packets and even making it available as block storage in Linux.

Not content to use the entire Internet to store a few kb of data, he moved on to several thousand virtualized NES game systems which are all playing “an inventory management survival horror game” commonly known as Tetris. [Tom7] deconstructs Tetris, analyzing its Random Number Generator, gaming the system to store data in virtual NES consoles by the thousands. What data did he store? The source code to Tetris for the NES. And what did he do with it? Well, he mounted it and ran the program, of course!

The last Harder Drive we’ll leave for those who want to watch the video, because it’s a bit on the “ewww gross!” side of things but is also a bit less successful due to some magic smoke being released.

If none of these things we’ve mentioned were enough, then watch the video for an excellent breakdown of the cost, efficiency, and even the harm to society. For fun, he also tosses blockchain into the mix to see how it fares against the Harder Drives. There’s also at least one easter egg in the video, and the whimsical discussion of engineering is both entertaining and inspiring. How would you implement a Harder Drive?

[Tom7] also gives you the opportunity to follow along with the fun and mayhem by making much of the code available for your perusal. For more fun reading, check out this walk down computer memory lane that we covered last year, as well as a look into Acoustic Delay Line memory.

Continue reading “Hard(er) Drives: Impractical, Slow, Amazing, And Incredible”