Identifying Malware By Sniffing Its EM Signature

The phrase “extraordinary claims require extraordinary evidence” is most often attributed to Carl Sagan, specifically from his television series Cosmos. Sagan was probably not the first person to put forward such a hypothesis, and the show certainly didn’t claim he was. But that’s the power of TV for you; the term has since come to be known as the “Sagan Standard” and is a handy aphorism that nicely encapsulates the importance of skepticism and critical thinking when dealing with unproven theories.

It also happens to be the first phrase that came to mind when we heard about Obfuscation Revealed: Leveraging Electromagnetic Signals for Obfuscated Malware Classification, a paper presented during the 2021 Annual Computer Security Applications Conference (ACSAC). As described in the mainstream press, the paper detailed a method by which researchers were able to detect viruses and malware running on an Internet of Things (IoT) device simply by listening to the electromagnetic waves being emanated from it. One needed only to pass a probe over a troubled gadget, and the technique could identify what ailed it with near 100% accuracy.

Those certainly sound like extraordinary claims to us. But what about the evidence? Well, it turns out that digging a bit deeper into the story uncovered plenty of it. Not only has the paper been made available for free thanks to the sponsors of the ACSAC, but the team behind it has released all of code and documentation necessary to recreate their findings on GitHub.

Unfortunately we seem to have temporarily misplaced the $10,000 1 GHz Picoscope 6407 USB oscilloscope that their software is written to support, so we’re unable to recreate the experiment in full. If you happen to come across it, please drop us a line. But in the meantime we can still walk through the process and try to separate fact from fiction in classic Sagan style.

Continue reading “Identifying Malware By Sniffing Its EM Signature”

Arduino Meets Quantum Computer

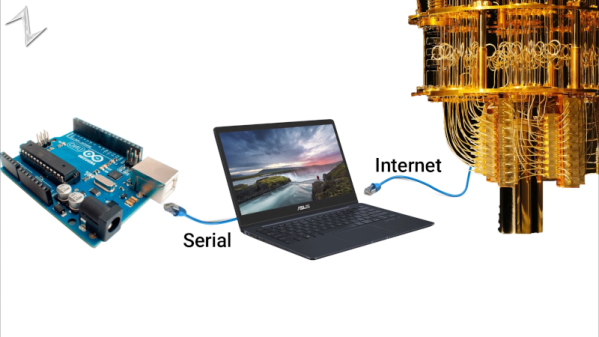
Quantum computers aren’t quite ready for the home lab, but since there are ways to connect to some over the Internet, you can experiment with them more easily than you might think. [Norbert] decided to interface a giant quantum computer to an ordinary Arduino. Why? Well, that isn’t necessarily clear, but then again, why not? He explains basic quantum computing and shows his setup in the video below.

Using the IBM quantum computer and the open source Qiskit makes it relatively easy, with the Python code he’s using on the PC acting as a link between the Arduino and the IBM computer. Of course, you can also use simulation instead of using the real hardware, and for such a simple project it probably doesn’t matter.

Granted, the demo is pretty trivial, lighting an LED with the state of qubit. But the technique might be useful if you wanted to, say, gather information from the real world into a quantum computer. You have to start somewhere.

We’ve looked at quantum computers before. They tell us it is the next big thing, so we want to be prepared. Qiskit is one of several options available today to make it easier.

Continue reading “Arduino Meets Quantum Computer”

Adding WiFi Remote Control To Home Electronics? Be Prepared To Troubleshoot

[Alex] recently gave a Marantz audio amplifier the ability to be remotely-controlled via WiFi by interfacing an ESP32 board to a handy port, but the process highlights how interfacing to existing hardware often runs into little, unforeseeable problems that can sink the project unless solved.

At its core, the project uses an ESP32 and the ESPAsyncWebServer project to create a handy web interface that is accessible over WiFi. Then, to actually control the amplifier, [Alex] decoded the IR-based remote signals by watching the unit’s REMOTE ports, which are intended as a pass-through and repeater for IR signals to other Marantz units. This functionality can be exploited; by sending the right signals to the REMOTE IN port, the unit can be controlled by the ESP32. With the ESP32 itself accessible by just about any WiFi device, [Alex] gains the freedom to control his amplifier with much greater flexibility than just the IR remote would offer.

Sounds fairly straightforward, but as usual when interfacing to an existing piece of electronics, there were a few glitches. The first was that high and inconsistent latency (from 10 ms to 100 ms) made controlling the amplifier a sometimes frustrating experience, but that was solved by disabling power saving on the WiFi interface. Another issue was that sending signals by connecting a GPIO pin to the REMOTE IN port of the amplifier worked, but had the side effect of causing the amplifier to no longer listen to the IR remote. Apparently, current flowing from the REMOTE port to the ESP32’s GPIO pin was to blame, because adding a diode in between fixed the problem.

The GitHub repository holds the design files and code. This kind of project can be pretty complex, because the existing hardware doesn’t always play nice, and useful boards like a modern ESP32 aren’t always available. Adding a wireless interface to vintage audio equipment has in the past involved etching circuit boards and considerably more parts.

Learning The Ropes With A Raspberry Pi Mandelbrot Cluster

You’ve probably heard it said that clustering a bunch of Raspberry Pis up to make a “supercomputer” doesn’t make much sense, as even a middle-of-the-road desktop could blow it away in terms of performance. While that may be true, the reason most people make Pi clusters isn’t for raw power, it’s so they can build experience with parallel computing without breaking the bank.

So while there was probably a “better” way to produce the Mandelbrot video seen below, creator [Michael Kohn] still learned a lot about putting together a robust parallel processing environment using industry standard tools like Kubernetes and Docker. Luckily for us, he was kind enough to document the whole process for anyone else who might be interested in following in his footsteps. Whatever your parallel task is, and whatever platform it happens to be running on, some of the notes here are likely to help you get it going.

It’s not the biggest Raspberry Pi cluster we’ve ever seen, but the four Pi 4s and the RGB LED festooned enclosure they live in make for an affordable and space-saving cluster to hone your skills on. Whether you’re practicing for the future of software development and deployment, or just looking for something new to play around with, building one of these small-scale clusters is a great way to get in on the action.

Continue reading “Learning The Ropes With A Raspberry Pi Mandelbrot Cluster”

Woodworking, Blinkenlites, And FFT’s Dance To The Music

We all have that one project on our minds that we’d love to build if we could just find the right combination of time, energy, and knowledge to dive right in. For [Jonathan], that project was a sound sculpture that’s finally made it from concept to complete. [Jonathan] describes the sound sculpture as the culmination of a decade of learning, and in a moment you’ll understand why.

The sculpture itself is a beautiful display of woodwork mixed with what appear to be individually addressable LED’s. The varying length of the individual enclosures evokes the idea that the sculpture is somehow involved in the sound production, which is a nice touch.

An Adafruit microphone module feeds detected audio into a PSoC 5 microcontroller. You’d expect that [Jonathan] just used one of the FFT libraries that are available. But you’ll recall that this was the culmination of a decade of learning- why so? Because [Jonathan] went through the process of procuring his own grey hairs by writing his own FFT function. A homebrew FFT function and blinkenlites? What’s not to love!

You may also enjoy this discussion of Sine Waves, Square Waves, and FFT’s with our own Bil Herd.

Continue reading “Woodworking, Blinkenlites, And FFT’s Dance To The Music”

A DIY CAD Mouse You Can Actually Build

When you spend a lot of time on the computer doing certain more specialised tasks (no, we’re not talking about browsing cat memes on twitter) you start to think that your basic trackpad or mouse is, let’s say, lacking a certain something. We think that something may be called ‘usability’ or maybe ease-of-use? Any which way, lots of heavy CAD users gush over their favourite mouse stand-ins, and one particularly interesting class of input devices is the Space Mouse, which is essentially patented up-to-the-hilt and available only from 3DConnexion. But what about open source alternatives you can build yourselves? Enter stage left, the Orbion created by [FaqT0tum.] This simple little build combines an analog joystick with a rotary knob, with a rear button and OLED display on the front completing the user interface.

The idea is pretty straightforward; you setup the firmware with the application you want to use it with, and it emits HID events to the connected PC, replacing the mouse or keyboard input. Since your machine will take input from multiple sources, it doesn’t replace your mouse, it augments it. It may not be very accurate for detailed PCB layout work, but for moving around in a 3D view, or dialling in a video edit, this could be a very useful addition to your workstation, so why not give it a try? The wiring is simple, the parts easily found and cheap, and it’s only a few printed parts! This scribe is already printing the plastics right now, if you listen carefully you might be able to make out the sound of the Lulzbot in background.

There are many other takes on this idea, with varying levels of complexity, like this incredible build from [Ahmsville] that sadly doesn’t make the PCBs available openly, and here’s one we covered earlier mashing the expensive 3DConnexion spacemouse into a keeb.

Continue reading “A DIY CAD Mouse You Can Actually Build”

Ultra Cheap PCB Wrenches Make Perfect Kit Accessory

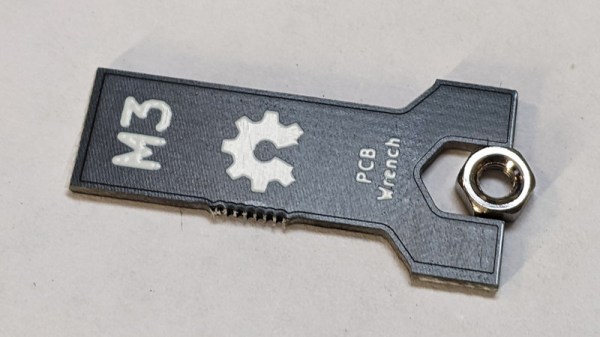
Let’s make one thing abundantly clear. We do not, under any circumstances, recommend you replace your existing collection of wrenches with ones made out of PCBs. However, as creator [Ben Nyx] explains, they do make for an extremely cheap and lightweight temporary tool that would be perfect for distributing with DIY kits.

This clever open hardware project was spawned by [Ben]’s desire to pack an M3 wrench in with the kits for an ESP32-based kiln controller he’s developing. He was able to find dirt cheap screwdrivers from the usual import sites, but nobody seemed to stock a similarly affordable wrench. He experimented with 3D printing them, but in the end, found the plastic just wasn’t up to the task. Then he wondered how well a tiny wrench cut from a PCB would fare.

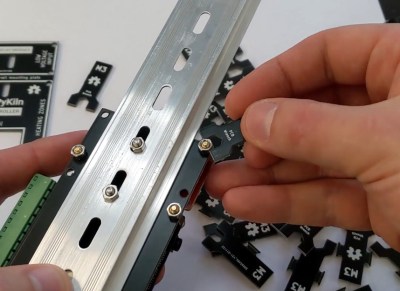
The answer, somewhat surprisingly, is pretty well. We wouldn’t advise you try to crank your lug nuts down with one, but for snugging up a couple nuts that hold down a control board, they work a treat. [Ben] came up with a panelized design in KiCad that allows 18 of the little wrenches to get packed into a 100 x 100 mm PCB suitable for production from popular online board houses. Manufactured from standard 1.6 mm FR4, they come out to approximately 10 cents a pop.

Since [Ben] has been kind enough to release his design under the MIT license, you’re free to spin up some of these wrenches either for your own kits or just to toss in the tool bag for emergencies. We’d love to see somebody adapt the design for additional sizes of nuts, or maybe figure out some way to nest them to sneak out a couple extra wrenches per board.

We’ve seen plenty of folks make cheap tools for themselves in the past, but projects that can produce cheap tools in mass quantities is uniquely exciting for a community like ours.

Continue reading “Ultra Cheap PCB Wrenches Make Perfect Kit Accessory”