Portrait Of A Digital Weapon

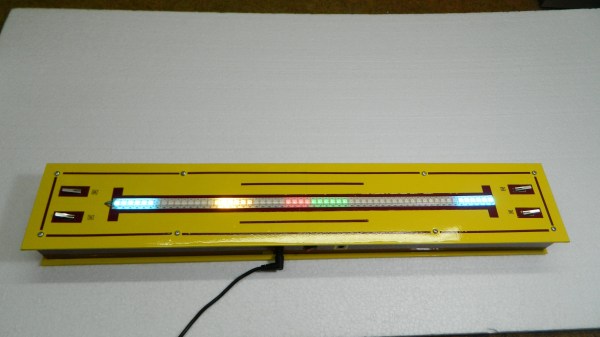
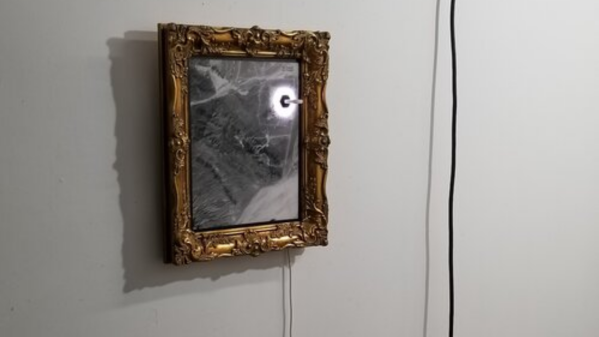
Over the years, artists have been creating art depicting weapons of mass destruction, war and human conflict. But the weapons of war, and the theatres of operation are changing in the 21st century. The outcome of many future conflicts will surely depend on digital warriors, huddled over their computer screens, punching on their keyboards and maneuvering joysticks, or using devious methods to infect computers to disable or destroy infrastructure. How does an artist give physical form to an unseen, virtual digital weapon? That is the question which inspired [Mac Pierce] to create his latest Portrait of a Digital Weapon.

[Mac]’s art piece is a physical depiction of a virtual digital weapon, a nation-state cyber attack. When activated, this piece displays the full code of the Stuxnet virus, a worm that partially disabled Iran’s nuclear fuel production facility at Natanz around 2008. Continue reading “Portrait Of A Digital Weapon”

Cassette Lamp Is A Throwback To The Pencil-Winding Glory Days

The audio cassette was the first music format that truly championed portability. It was robust, compact, and let people take music on the go to soundtrack their very lives. It was later supplanted by the higher-quality CD and then further digital technologies, but the format remains a nostalgic highlight for many. It also inspired this excellent lamp build from [Fab].

The lamp consists of 8 clear cassettes assembled into a rough cube-like shape on a 3D printed frame. The cassettes are edge-lit from below by a set of WS2812B LEDs, letting them glow in full-color splendour. The real magic of the lamp is the interface, however. A pencil can be inserted to turn the tape reels, just like rewinding a real cassette. However, in this case, they’re attached to a pair of rotary encoders, which are used to vary the color of the LEDs. As a bonus, the entire lamp runs off a Wemos D1, making it possible to update the lamp remotely over the Internet.

It’s a stylish build that would make an excellent conversation piece in any hip maker’s loungeroom. It’s a great nod to the creator of the compact cassette, [Lou Ottens], who passed away earlier this month. Video after the break.

Continue reading “Cassette Lamp Is A Throwback To The Pencil-Winding Glory Days”

Networked Nightlights Glow Together

Nightlights are a great way to calm children who may be afraid of the dark, as well as to avoid stubbing your toe on furniture in the hallway. However, in this day and age of connected everything, they can do so much more. [Andy] came up with a great way to do just that, creating an advanced networked solution to suit his needs.

[Andy’s] nightlight serves not just in the usual fashion, but also as an indicator for his children. Depending on the time of day, the colour changes, indicating whether it’s time for bed, or also, if it’s too early to get out of bed in the morning and start watching cartoons. Each nightlight around the house runs on an ESP8266, which lights up using a set of WS2812B LEDs. The ESP8266 decides on colour values based on commands from a basic webserver running on a Raspberry Pi, updated every minute. This gives [Andy] the flexibility to make changes in one place, that then automatically roll out across the Nightlight Network (TM).

It’s a fun way of teaching the kids not to ruin a good Saturday sleep in, as well as serving as a fun colourful nightlight, too. Of course, luxury smart nightlights are becoming a thing, as this teardown of a Bluetooth unit shows. If you’ve built your own, be sure to drop us a line!

Simple 3D Printed Seven-Segment Displays

7-segment LED displays were revolutionary, finally providing a clear, readable and low-power numerical display solution. We’ve got plenty of other cheap display options now, but sometimes you just need the old nought-through-nine, and in a big, visible package, to boot. For those circumstances, consider whipping up a set of these 3D-printed seven-segment displays.

The build consists of a 3D printed frame, with each segment containing two WS2812B addressable LEDs. Each 7-segment assembly is then wired so they can be daisy chained, passing on data to the next digit in the chain. Paper is used to diffuse the LEDs for a smoother look, and a white 3D printed cover is printed for each digit to further spread the light and give a clean finish.

Being based on the WS2812Bs, it’s easy to drive such displays with just about any microcontroller or GPIO-equipped Linux board out there. We love big, beautiful displays – and the more artistic, the better. Video after the break.

Continue reading “Simple 3D Printed Seven-Segment Displays”

Linear Pong Loses A Dimension But Remains Challenging

When Pong hit the scene in the early 70s, there was something about the simplicity of the 2D monochrome tennis game that made it engaging enough that enthusiastic proto-gamers shorted-out machines by stuffing their coin boxes to overflowing.  But even with the simplicity of Pong’s 2D gameplay, the question becomes: could it by made simpler and still be playable?

Surprisingly, if this one-dimensional Pong game is any indication, it actually seems like it can. Where the original Pong made you line up your paddle with the incoming ball, with the main variable being the angle of the carom from your opponent, [mircemk]’s version, limited to a linear game field, makes the ball’s speed the variable. Players take control of the game with a pair of buttons at the far ends of a 60-LED strip of WS2812s. The ball travels back and forth along the strip, bouncing off a player’s paddle only if they push their button at the exact moment the ball arrives. Each reflection back to the opponent occurs at a random speed, making it hard to get into a rhythm. To add some variety, each player has a “Boost” button to put a little spice on their shot, and score is kept by LEDs in the center of the play field. Video of the game play plus build info is below the break.

With just a Neopixel strip, an Arduino Nano, and a small handful of common parts, it should be easy enough to whip up your own copy of this surprisingly engaging game. But if the 2D-version is still more your speed, maybe you should check out the story of its inventor, [Ted Dabney]. Or, perhaps building a clock that plays Pong with itself to idle the days away is more your speed.

Continue reading “Linear Pong Loses A Dimension But Remains Challenging”

Raspberry Pi Enters Microcontroller Game With $4 Pico

Raspberry Pi was synonymous with single-board Linux computers. No longer. The $4 Raspberry Pi Pico board is their attempt to break into the crowded microcontroller module market.

The microcontroller in question, the RP2040, is also Raspberry Pi’s first foray into custom silicon, and it’s got a dual-core Cortex M0+ with luxurious amounts of SRAM and some very interesting custom I/O peripheral hardware that will likely mean that you never have to bit-bang again. But a bare microcontroller is no fun without a dev board, and the Raspberry Pi Pico adds 2 MB of flash, USB connectivity, and nice power management.

As with the Raspberry Pi Linux machines, the emphasis is on getting you up and running quickly, and there is copious documentation: from “Getting Started” type guides for both the C/C++ and MicroPython SDKs with code examples, to serious datasheets for the Pico and the RP2040 itself, to hardware design notes and KiCAD breakout boards, and even the contents of the on-board Boot ROM. The Pico seems designed to make a friendly introduction to microcontrollers using MicroPython, but there’s enough guidance available for you to go as deep down the rabbit hole as you’d like.

Our quick take: the RP2040 is a very well thought-out microcontroller, with myriad nice design touches throughout, enough power to get most jobs done, and an innovative and very hacker-friendly software-defined hardware I/O peripheral. It’s backed by good documentation and many working examples, and at the end of the day it runs a pair of familiar ARM MO+ CPU cores. If this hits the shelves at the proposed $4 price, we can see it becoming the go-to board for many projects that don’t require wireless connectivity.

But you want more detail, right? Read on.

Continue reading “Raspberry Pi Enters Microcontroller Game With $4 Pico”

RGB Glasses Built From PCBs

Shutter shades were cool once upon a time, but if you really want to stand out, it’s hard to go past aggressively bright LEDs right in the middle of your face. A great way to achieve that is by building a pair of RGB glasses, as [Arnov Sharma] did.

The design intelligently makes use of PCBs to form the entire structure of the glasses. One PCB makes up the left arm of the glasses, carrying an ESP12F microcontroller and the requisite support circuitry. It’s fitted to the front PCB through a slot, and soldered in place. The V+, GND, and DATA connections for the WS2812B LEDs also serve as the mechanical connection. The right arm of the glasses is held on in the same way, being the same as the left arm PCB but simply left unpopulated. A little glue is also used to stiffen up the connection.

It’s a tidy build, and one that can be easily controlled from a smartphone as the ESP12F runs a basic webserver which allows the color of the glasses to be changed. It’s not the first time we’ve seen a flashy pair of LED shades either! Video after the break.

Continue reading “RGB Glasses Built From PCBs”