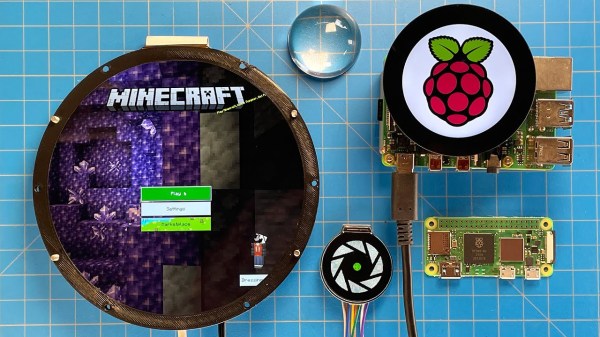
3D Printing Espresso Parts

Virtually any hobby has an endless series of rabbit holes to fall into, with new details to learn around every corner. This is true for beekeeping, microcontrollers, bicycles, and gardening (just to name a few), but those involved in the intricate world of coffee roasting and brewing turn this detail dial up to the max. There are countless methods of making coffee, all with devout followers and detractors alike, and each with its unique set of equipment. To explore one of those methods and brew a perfect espresso, [Eric] turned to his trusted 3D printer and some compressed gas cylinders.

An espresso machine uses high pressure to force hot water through finely ground coffee. This pressure is often developed with an electric pump, but there are manual espresso machines as well. These require expensive parts which can withstand high forces, so rather than build a heavy-duty machine with levers, [Eric] turned to compressed CO2 to deliver the high pressure needed.

To build the pressure/brew chamber, he 3D printed most of the parts with the exception of the metal basked which holds the coffee. The 3D printed cap needs to withstand around nine atmospheres of pressure so it’s reasonably thick, held down with four large bolts, and holds a small CO2 canister, relief valve, and pressure gauge.

To [Eric]’s fine tastes, the contraption makes an excellent cup of coffee at minimal cost compared to a traditional espresso machine. The expendable CO2 cartridges only add $0.15 to the total cost of the cup and for it’s simplicity and small size this is an excellent trade-off. He plans to improve on the design over time, and we can’t wait to see what he discovers. In the meantime, we’ll focus on making sure that our beans are of the highest quality so they’re ready for that next espresso.

Continue reading “3D Printing Espresso Parts”

Reverse-Engineering An Unknown Microcontroller In E Ink Displays

For a monochrome display where refresh rate isn’t particularly important, there’s almost no better option than an E Ink display. They’re available in plenty of sizes and at various price points, but there’s almost no option cheaper than repurposing something mass-produced and widely available like an E Ink (sometime also called eInk or ePaper) price tag. At least, once all of the reverse engineering is complete.

[Dmitry Grinberg] has been making his way through a ton of different E Ink modules, unlocking their secrets as he goes. In this case he set about reverse engineering the unknown microcontroller on the small, cheap display show here. Initial research showed an obscure chip from the ZBS24x family, packaged with a SSD1623L2 E Ink controller. From there, he was able to solder to the communications wires and start talking to the device over ISP.

This endeavor is an impressive deep dive into the world of microcontrollers, from probing various registers to unlocking features one by one. It’s running an 8051 core so [Dmitry] gives a bit of background to help us all follow along, though it’s still a pretty impressive slog to fully take control of the system.

If you happen to have one of these price tags on hand it’s an invaluable resource to have to reprogram it, but it’s a great read in general as well. On the other hand, if you’re more interested in reverse-engineering various displays, take a look at this art installation which spans 50 years of working display technologies.

Should I Automate This?

The short answer to the question posed in the headline: yes.

For the long answer, you have to do a little math. How much total time you will save by automating, over some reasonable horizon? It’s a simple product of how much time per occurrence, times how many times per day it happens, times the number of days in your horizon. Or skip out on the math because there’s an XKCD for that.

What’s fun about this table is that it’s kind of a Rorschach test that gives you insight into how much you suffer from automatitis. I always thought that Randall was trying to convince himself not to undertake (fun) automation projects, because that was my condition at the time. Looking at it from my current perspective, it’s a little bit shocking that something that’ll save you five seconds, five times a day, is worth spending twelve hours on. I’ve got some automating to do.

To whit: I use pass as my password manager because it’s ultimately flexible, simple, and failsafe. It stores passwords on my hard drive, and my backup server, encrypted with a GPG key that I have printed out on paper in a fireproof safe. Because I practice good cookie hygiene, I end up re-entering my passwords daily. Because I keep my passwords separate from my browser, that means entering username and password by cut-and-paste. There’s your five seconds, five times per day. Maybe two seconds, ten times, but it’s all the same. It shouldn’t take me even as long as twenty minutes to whip up a script that puts username and password into selection and clipboard for one-click pasting. Why haven’t I done this yet? I’m going to get on it as soon as I’m done with this newsletter.

But the this begs the question. If you spend up to twelve hours on every possible 25-second-per-day savings, when will you ever get your real work done? Again, math gives us the answer. One eight-hour workday * 25 seconds * 12 hours (pessimistically) of labor = 1.58 years before everything that needs automating will be. Next week’s newsletter might be a little bit delayed.

What do you see in the XKCD “Is it worth the time” table? Automate more, or step back from the cliff edge?

Putting 3D Printed Chain Through Its Paces

One of the more frustrating things facing makers in decades past was the problem of power transmission. Finding things like belts, pulleys, sprockets, and chain for your projects could be difficult, particularly if you lived far from the shipping radius of suppliers like McMaster-Carr. These days, there’s no need to fuss, because you can simply 3D print whatever you need,  as [Let’s Print] demonstrates by whipping up some chains.

The chains are a mixed design, combining plastic inner and outer links with bolts and nuts to fasten them together. [Let’s Print] tries out several combinations of ABS, PLA, and PETG, running them on 3D printed sprockets and determining that they are all functional, albeit at minimum load. The chains are also put through tensile testing by attaching a heavy brake disc to a length of chain and dropping the weight to see at which point the chains snap.

We’d love to see more 3D-printed chains; all-plastic snap-together designs, or even those that print pre-assembled are particularly tantalizing ideas. We’d also enjoy more testing done with the chain under some proper torque loads, rather than just spinning freely.

We’ve seen work from [Let’s Print] before, too – in the case of this awesome water pump. Video after the break.

Continue reading “Putting 3D Printed Chain Through Its Paces”

Using Ikea Guts To Add Sonos Compatibility To A Vintage Speaker

We’re in a fortunate position when it comes to audio gear, because advances in amplifier and signal processing technology have delivered us budget devices that produce a sound that’s excellent in comparison to those of a few years ago. That said, a decent quality device is good whichever decade it was manufactured in, and a speaker from the 1960s can be coaxed into life and sound excellent with a modern amplifier. It’s something [Sebastius] has explored, as he picked up an attractive-looking set of Swedish speakers from the 1960s. Wanting to bring them into the 21st century, he’s upgraded them for Sonos compatibility by hacking in the guts of an IKEA Symfonisk bookshelf speaker.

The speakers themselves looked good enough, but on closer examination they proved to bear the scars of many decades. After testing new wiring and drivers they still had a good sound to them. Their passive crossover meant that hooking them up to a single amplifier is as straightforward as it was decades ago, but a Symfonisk has an active crossover and two amplifiers. Fortunately there’s a neat hack by which those two amplifiers can be combined as one, and this is what he’s done with the resulting Symfonisk electronic package mounted on the reverse of the speaker.

The fate of the original speaker’s broken mid-range and tweeter drivers was a common enough one back in the day as speakers were ill-matched to amplifiers. Too small an amp would need turning up in volume to get a good sound resulting in distortion that would burn out the top end drivers, while too much power would result in the bass drivers being overloaded and failing. It’s unclear whether the drivers in a vintage speaker would be well-matched to an amplifier such as the Symfonisk, but we’re guessing they are safe while run at sensible volumes. Perhaps of more interest is whatever on-board DSP a Symfonisk contains, because while vintage speakers were designed for as flat a response as possible, modern compact speakers use DSP to equalise the frequency and phase responses of otherwise not-very-good-sounding enclosures. If the Symfonisk does this then those adjustments will appear as distortion in the sound of a different cabinet, but the question remains whether that distortion will be significant enough to be detectable by ear.

If the Symfonisk catches your attention, we’ve covered a teardown of it in the past.

Spacewar! On PDP-11 Restoration

If you want to play the original Spacewar! but you don’t have a PDP-1 nearby, then you’re in luck — assuming you have a PDP-11, that is. [Mattis Lind] has successfully restored a PDP-11 port of the game from PDF scans of the source code, which was thought to have been lost to the trash bins of DECUS (Digital Equipment Computer Users’ Society). Fortunately, [Mattis] learned that [Bill Seiler], one of the original authors, had saved a printout of the assembly language. Using a combination of OCR and manual transcription to retrieve the code, [Mattis] took a deep dive into cleaning up the errors and solving a whole lot of system library and linking issues. Adding to the difficulty is that his PDP-11 is slightly different from the one used in 1974 when this port was written.

The project was not all software — [Mattis] also needed to make a pair of joysticks, which he made from a handful of items found on AliExpress. As you can see in the video below, he indeed got it all working. [Mattis] is no stranger to the PDP-11 world. We wrote about his PDP-11 restoration project back in 2015, a quest that took over 18 months.

Continue reading “Spacewar! On PDP-11 Restoration”

Random Robot Makes Random Art

For the price of a toothbrush and a small motor with an offset weight, a bristlebot is essentially the cheapest robot that can be built. The motor shakes the toothbrush and the bristle pattern allows the robot to move, albeit in a completely random pattern. While this might not seem like a true robot that can interact with its environment in any meaningful way, [scanlime] shows just how versatile this robot – which appears to only move randomly – can actually be used to make art in non-random ways.

Instead of using a single bristlebot for the project, three of them are built into one 3D printed flexible case where each are offset by 120°, and which can hold a pen in the opening in the center. This allows them to have some control on the robot’s direction of movement. From there, custom software attempts to wrangle the randomness of the bristlebot to produce a given image. Of course, as a bristlebot it is easily subjected to the whims of its external environment such as the leveling of the table and even the small force exerted by the power/communications tether.

With some iterations of the design such as modifying the arms and control systems, she has an interesting art-producing robot that is fairly reliable for its inherently random movements. For those who want to give something like this a try, the code for running the robot and CAD files for 3D printing the parts are all available on the project’s GitHub page. If you’re looking for other bristlebot-style robots that do more than wander around a desktop, be sure to take a look at this line-following bristlebot too.

Thanks to [johnowhitaker] for the tip!

Continue reading “Random Robot Makes Random Art”