The drive train of this bicycle starts with a brushless DC motor from a washing machine. It has been slightly modified to run on 48 volts, and is installed inside the triangle of the bike’s frame. It has a chain driving the bike’s crank, retaining the original chain and gearing setup (unlike many electric bike hacks that utilize hub motors). The crank has also been specially modified to include a freewheel, a necessary feature so that the motor can operate without spinning the pedals. Everything except the motor has been custom fabricated including the mounts and the electronics.
[jimminecraftguy] reports speeds of 110 kph which is a little crazy for a 20-year-old aluminum frame bike, and we’d guess it’s not street legal in many jurisdictions, but we can’t really find much fault with this build in general based on the amount of innovation required to get this working at all. A few more improvements for the build are in the works, including improved batteries and a cover for the sides to keep the local law enforcement from getting too suspicious. We can’t wait to see the final version. Continue reading “The Spin Cycle: Washing Machine Motor Converts 10-Speed To E-Bike”→
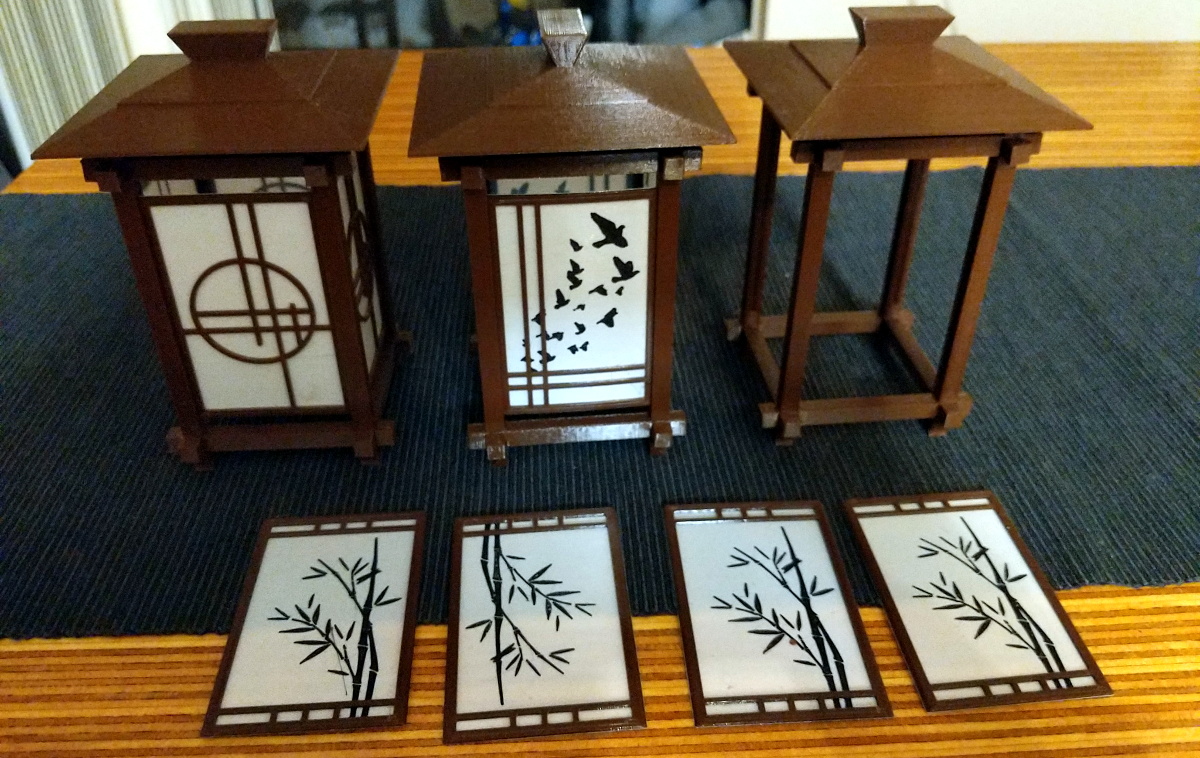
The gorgeous Shoji-style lamps you’re seeing here aren’t made of wood or paper. Beyond the LEDs illuminating them from within, the lamps are completely 3D printed. There aren’t any fasteners or glue holding them together either, as creator [Dheera Venkatraman] used authentic Japanese wood joinery techniques to make their components fit together like a puzzle.
While we’re usually more taken with the electronic components of the projects that get sent our way, we have to admit that in this case, the enclosure is really the star of the show. [Dheera] has included a versatile mounting point where you could put anything from a cheap LED candle to a few WS2812B modules, but otherwise leaves the integration of electronic components as an exercise for the reader.
All of the components were designed in OpenSCAD, which means it should be relatively easy to add your own designs to the list of included panel types. Despite the colorful details, you won’t need a multi-material printer to run them off either. Everything you see here was printed on a Prusa i3 MK3S in PETG. Filament swaps and careful design were used to achieve the multiple colors visible on some of the more intricate panels.
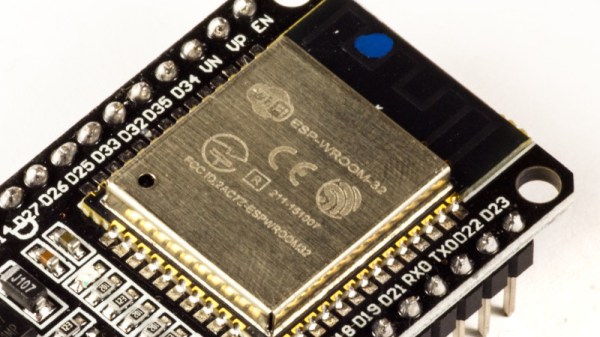
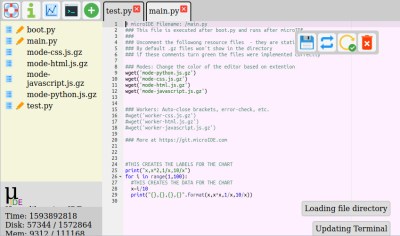
What if your microcontroller IDE was running on the microcontroller itself and not hosted on the computer you use to do the programming? The greatest legacy of Arduino in all its forms has arguably been a software one, in that it replaced annoying proprietary development environments with one that installed easily on a range of operating systems, was easy to use, and above all, worked. The next level of portability is to get rid of any specialize computer-side software. [Ronny Neufeld] wrote MicroIDE for ESP32 as an IDE accessible through a web browser, which interestingly is hosted on the target device itself.
Using the IDE is easy enough, install a binary, connect to the ESP with a web browser, start writing MicroPython code. There is a choice of connecting directly to the chip as a hotspot, or connecting via another WiFi network. The interface is looking pretty slick but he’s at pains to remind us that it’s a work in progress. Sadly there is no source code yet as it’s a binary distribution that is free for non-commercial use, we’d hope that an open-source release might one day happen. It’s not for everyone, but the convenience of accessing the same interface from almost any modern device should help attract a healthy community.
This appears to be the first web-based on-chip ESP IDE we’ve shown you. But it’s not the first on-chip coding example, as this BASIC interpreter shows.
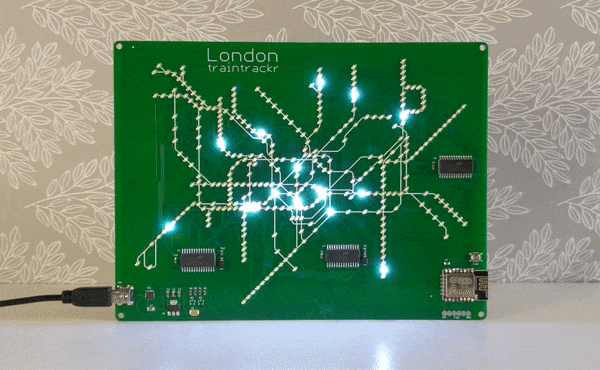
If you’re a frequent traveler on a public transit system, it can be helpful to know when the trains or buses are arriving and if there are any delays. We might reach for a tablet to mount on the wall, but that relies on keeping the OS, the software, and its library dependancies up to date. For true reliability you’ll need to build directly in hardware, which is exactly what this map of the London tube system uses.
The base map is printed directly on PCB, with LEDs along each of the major routes to indicate the current location of the trains. A few small chips handle the WiFi connection — it appears to our eye to be an ESP8266 — and pulling the information about the trains from the London Underground API (it would be virtually impossible to build everything for this project in hardware). The hardware can be easily reprogrammed, and with the PCB layout this could be adapted for other public transit fairly easily.
Even apart from the philosophical differences on design between hardware and software approaches, we still appreciate the aesthetic of LEDs on PCB. In fact, we’ve seen a whole host of artwork on PCBs ever since the price came down dramatically in the past two decades.
Remember all the hubbub over Betelgeuse back in February? For that matter, do you even remember February? If you do, you might recall that the red giant in Orion was steadily dimming, which some took as a portent of an impending supernova. That obviously didn’t happen, but we now seem to have an explanation for the periodic dimming: an enormous dark spot on the star. “Enormous” doesn’t begin to describe this thing, which covers 70% of the face of a star that would extend past Jupiter if it replaced the sun. The dimming was originally thought to be dust being blown off the star as it goes through its death throes, but no evidence could be found for that, while direct observations in the terahertz range showed what amounted to a reduction in surface temperature caused by the enormous star spot. We just think it’s incredibly cool that Betelgeuse is so big that we can actually observe it as a disk rather than a pinpoint of light. At least for now.
F-15c cockpitF-15a cockpit
If you think you’ve seen some challenging user interfaces, wait till you get a load of the cockpit of an F-15C Eagle. As part of a new series on human interfaces, Ars Technica invited Col. Andrea Themely (USAF-ret.) to give a tour of the fighter she has over 1,100 hours on. Bearing in mind that the Eagle entered service in 1976 and has been continually updated with the latest avionics — compare the video with the steam gauges of the cockpit of an F-15A — its cockpit is still a pretty busy place. As much as possible has been done to reduce pilot load, with controls being grouped by function and the use of color-coding — don’t touch the yellow and black stuff! — and the use of tactile feedback. It’s a fascinating deep dive into a workplace that few of us ever get to see, and we’re looking forward to the rest of the series.
Sad news from Seattle, where the Living Computers: Museum + Labs is closing up shop. The announcement only says they’re closing “for now”, so there’s at least some hope that the museum will be back once the COVID-19 downturn has run its course. We hope they do bounce back; it really was a great museum with a lot of amazing hardware on display. The Vintage Computer Festival PNW was held there in its inaugural year, an event we covered and had high hopes for in the future. We hope for the best for these educational and cultural institutions, but we can’t help but fear a little for their future.
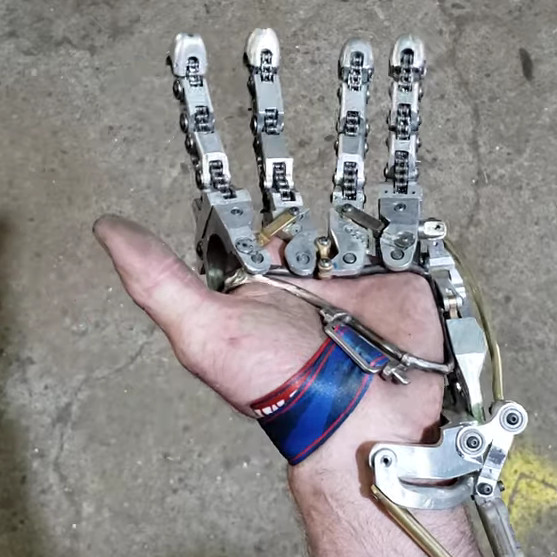
So you suffer a partial amputation of your left hand, leaving you with only your thumb and your palm. That raises an interesting conundrum: you haven’t lost enough to replace the hand with a prosthetic one, but you still don’t have any fingers. That appears to be what happened to Ian Davis, and so he built his own partial prosthetic to replace his fingers. There’s not much backstory on his YouTube channel, but from what we can gather he has gone through several designs, most of which are myomechanical rather than myoelectric. Through a series of complex linkages, he’s able to control not only the opening and closing of the fingers, but also to splay them apart. It’s all in the wrist, as it were — his input gestures all come from flexing and extending his hand relative to his forearm, where the prosthesis is anchored. This results in a pretty powerful grip — much stronger than a myoelectric hand in a head-to-head test. And the coolness factor of his work is just off the scale. We’re looking forward to more from Ian, and hopefully enough background information for a full story on what he has accomplished.
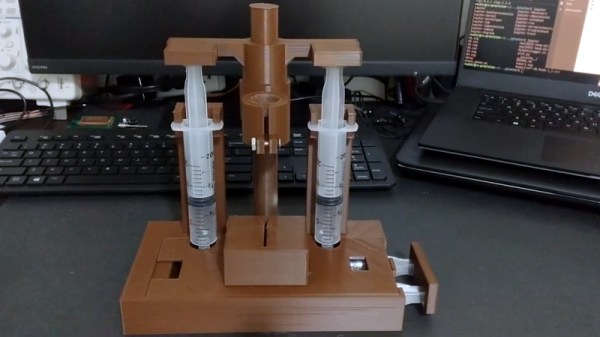
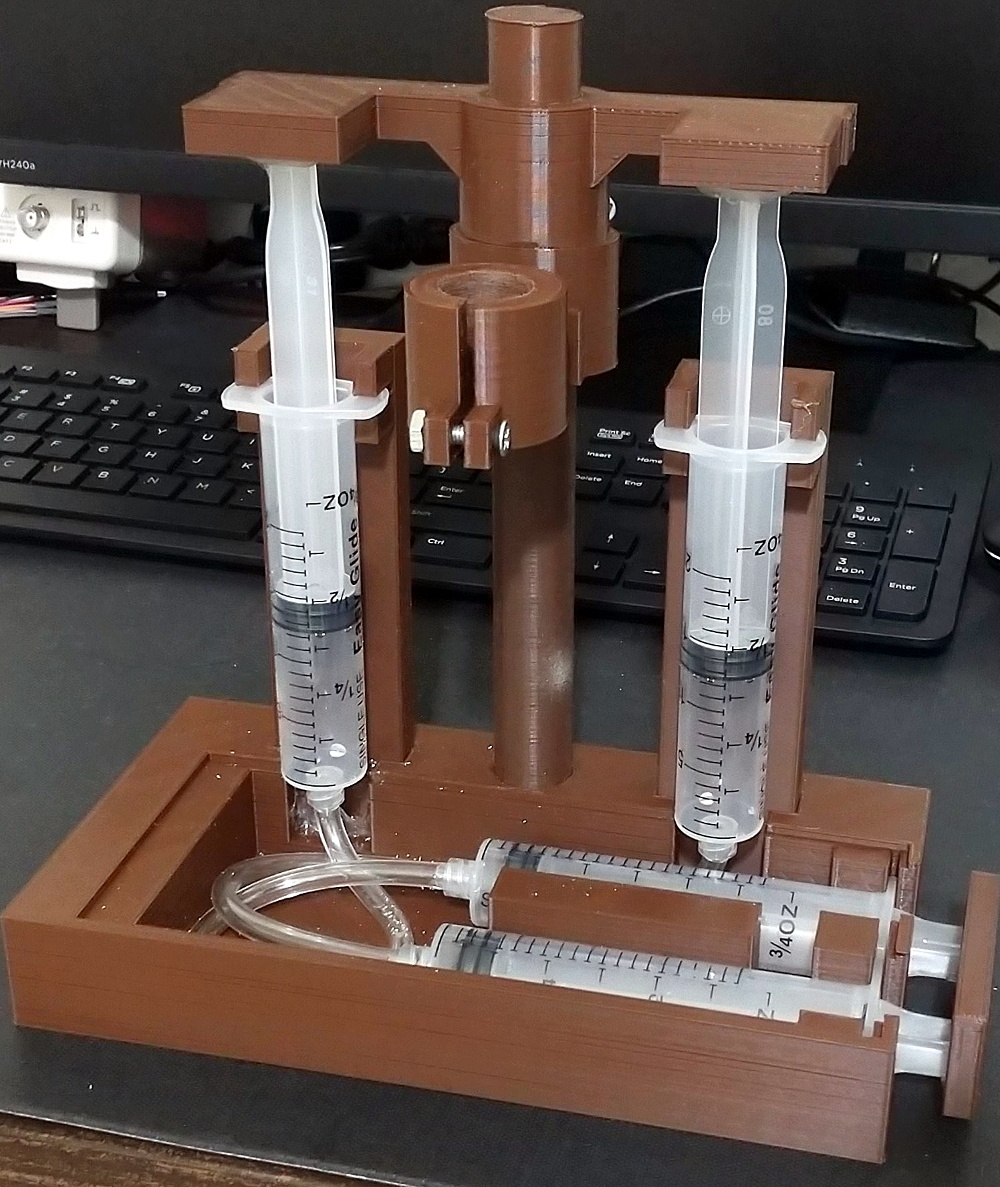
If you’re making your own PCBs for through-hole projects at home, getting the board etched is only half the battle; you’ve still got to drill all those little holes. It’s a tedious process, and if you’ve got a lot of them, doing them freehand with a drill just isn’t going to cut it. Which is why [Ruchir Chauhan] built this tiny 3D printed drill press.
This design is actually interesting for a number of reasons. The fact that it’s primarily 3D printed is a big one, though of course it’s not the first time we’ve seen that. We also like the minimal part count and low-cost, which is sure to appeal to those looking to produce PCBs on a budget. But the most impressive feature has to the hydraulic system [Ruchir] has come up with to actually do the drilling.
Rather than pulling an arm to lower the bit towards the work piece, a system utilizing four syringes, some water, and a bit of tubing is used to pull the tool down. This might seem extravagant, but if you’ve got a lot of holes to drill, this design is really going to save your arms. This method should also give you more consistent and accurate results, as you won’t be putting any torque on the structure as you would with a manually operated press.
[Ruchir] doesn’t offer much in the way of instructions on the project’s Hackaday.io page, but once you print out all of the provided STLs and get your syringes ready to go, the rest should be fairly self explanatory. Personally we might have added a smooth steel rod in there to make sure the movement is nice and straight, but we can see the appeal of doing it with a printed part to keep things cheap.
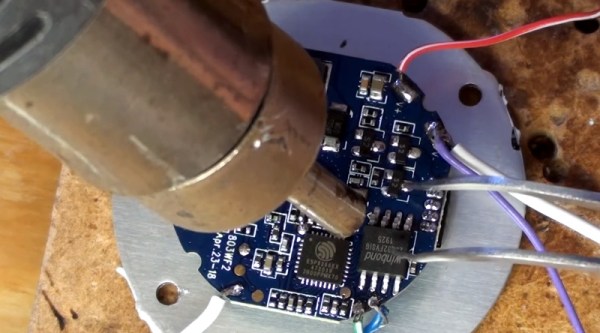
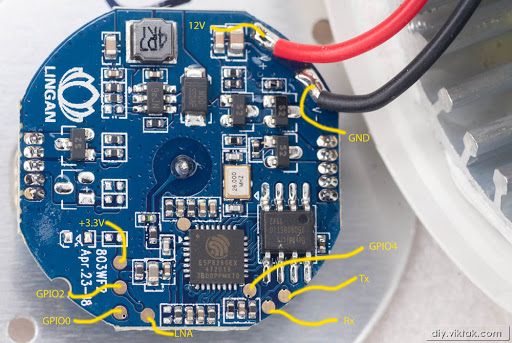
There are some incredibly cheap WiFi smart bulbs on the market these days, but as is often the case, you tend to get what you pay for. When [Viktor] took delivery of his latest bargain basement bulb, the thing didn’t even work. So much for Quality Assurance. On the plus side, it was a great excuse to pop it open and replace the firmware.
For anyone wondering, [Viktor] never actually figured out why the bulb didn’t work. Its ESP8266-based control board was getting power, and data was getting spit out of the serial port when he connected it to the computer (although he never got the communications settings right to actually see what it was saying). But he also didn’t care much; once he confirmed that the hardware was good, he just uploaded the custom firmware he’d previously developed for another ESP8266 bulb.
Of course, it wasn’t quite that easy. The chances that both bulbs would have used the same GPIO pins to control the red, green, blue, and white LEDs were pretty slim. But after some testing and modifications to the code, he was able to fire them up. The other issue was a bit trickier, as it turned out the bulb’s flash chip was too small to hold his firmware’s web configuration pages. So he had to break out the hot air gun and replace the SPI flash chip with something a bit roomier. We suppose he could have just made smaller web pages… but where’s the fun in that?


 Using the IDE is easy enough, install a binary, connect to the ESP with a web browser, start writing MicroPython code. There is a choice of connecting directly to the chip as a hotspot, or connecting via another WiFi network. The interface is looking pretty slick but he’s at pains to remind us that it’s a work in progress. Sadly there is no source code yet as it’s a binary distribution that is free for non-commercial use, we’d hope that an open-source release might one day happen. It’s not for everyone, but the convenience of accessing the same interface from almost any modern device should help attract a healthy community.