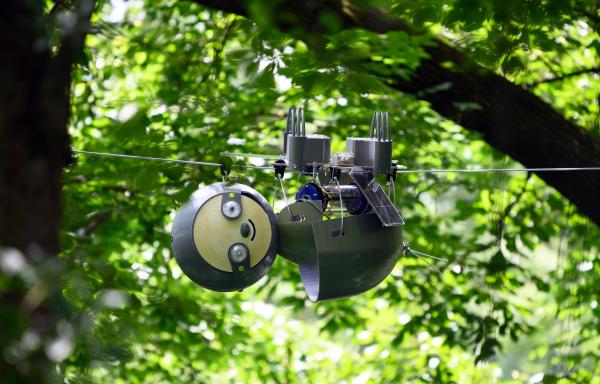
A More Open Raspberry Pi Camera Stack With Libcamera

As open as the Raspberry Pi Foundation has been about their beloved products, they would be the first to admit there’s always more work to be done: Getting a Pi up and running still requires many closed proprietary components. But the foundation works to chip away at it bit by bit, and one of the latest steps is the release of a camera stack built on libcamera.

Most Linux applications interact with the camera via V4L2 or a similar API. These established interfaces were designed back when camera control was limited and consisted of a few simple hardware settings. Today we have far more sophisticated computational techniques for digital photography and video. Algorithms have outgrown dedicated hardware, transforming into software modules that take advantage of CPU and/or GPU processing. In practice, this trend meant bigger and bigger opaque monolithic pieces of proprietary code. Every one a mix of “secret sauce” algorithms commingling with common overhead code wastefully duplicated for each new blob.

We expect camera makers will continue to devise proprietary specialties as they seek a competitive advantage. Fortunately, some of them see benefit in an open-source framework to help break up those monoliths into more manageable pieces, letting them focus on just their own specialized parts. Leveraging something like libcamera for the remainder can reduce their software development workload, leading to faster time to market, lower support cost, and associated benefits to the bottom line that motivates adoption by corporations.

But like every new interface design borne of a grandiose vision, there’s a chicken-and-egg problem. Application developers won’t consume it if there’s no hardware, and hardware manufacturers won’t implement it if no applications use it. For the consumer side, libcamera has modules to interop with V4L2 and other popular interfaces. For the hardware side, it would be useful to have a company with wide reach who believes it is useful to open what they can and isolate the pieces they can’t. This is where the Raspberry Pi foundation found a fit.

The initial release doesn’t support their new High-Quality Camera Module though that is promised soon. In the short term, there is still a lot of work to be done, but we are excited about the long term possibilities. If libcamera can indeed lower the barrier to entry, it would encourage innovation and expanding the set of cameras beyond the officially supported list. We certainly have no shortage of offbeat camera sensor ideas around here, from a 1-kilopixel camera sensor to a decapped DRAM chip.

[via Hackster.io]

Making A Gorgeously-Twisty Sculpture, Using Only Flat Pieces

Closeup of unique pieces that make up the final scuplture.

The sculpture shown here is called Puzzle Cell Complex and was created by [Nervous System] as an art piece intended to be collaboratively constructed by conference attendees. The sculpture consists of sixty-nine unique flat panel pieces, each made from wood, which are then connected together without the need for tools by using plastic rivets. Everything fits into a suitcase and assembly documentation is a single page of simple instructions. The result is the wonderfully-curved gyroid pattern you see here.

The sculpture has numerous layers of design, not the least of which was determining how to make such an organically-curved shape using only flat panels. The five-foot assembled sculpture has a compelling shape, which results from the sixty-nine individual panels and how they fit together. These individual panel shapes have each been designed using a technique called variational surface cutting to minimize distortion, resulting in their meandering, puzzle-piece-like outlines. Each panel also has its own unique pattern of cutouts within itself, which makes the panels lighter and easier to bend without sacrificing strength. The short video embedded below shows the finished sculpture in all its glory.

Continue reading “Making A Gorgeously-Twisty Sculpture, Using Only Flat Pieces”

Iron Pipe Makes A Great Workbench

It’s a frequently encountered problem in any workshop; how do you make a bench? And once you’ve made a bench, how do you put it on wheels to move it about? [Eric Strebel] needed a cart for his laser cutter, so he designed his own in an unexpected material: malleable iron pipe.

The attraction of iron pipe is its ready availability and ease of assembly. [Eric] created a sturdy table complete with a worktop made from a solid door in a very short time. T pieces and joiners were used, along with a hefty set of flanges for the tabletop itself. The casters are the expanding stem variety, with a compressed rubber insert expanding to hold them securely in place.

The result as can be seen in the video below is a really neat trolley for the cutter, followed quickly by another workbench. It would be interesting to know more about this material, parameters such as its wall thickness and lateral strength, because in a table without any cross-bracing it becomes important to avoid an untimely collapse.

The most common material for benches seems still to be wood, indicating that for such a technophile community we can be surprisingly conservative in our choices. Sometimes though, benches are made from the most surprising things.

Continue reading “Iron Pipe Makes A Great Workbench”

Lowering The Boom On Yagi Element Isolation

Antenna design can be confusing, to say the least. There’s so much black magic that goes into antennas that newbies often look at designs and are left wondering exactly how the thing could ever work. Slight changes in length or the angle between two elements result in a vastly different resonant frequency or a significant change in the antenna’s impedance. It can drive one to distraction.

Particularly concerning are the frequent appearances of what seem to be dead shorts between the two conductors of a feedline, which [andrew mcneil] explored with a pair of WiFi Yagi antennas. These highly directional antennas have a driven element and a number of parasitic elements, specifically a reflector behind the driven element and one or more directors in front of it. Constructive and destructive interference based on the spacing of the elements and capacitive or inductive coupling based on their length determine the characteristics of the antenna. [Andrew]’s test antennas have their twelve directors either isolated from the boom or shorted together to the shield of the feedline. In side-by-side tests with a known signal source, both antennas performed exactly the same, meaning that if you choose to build a Yagi, you’ve got a lot of flexibility in what materials you choose and how you attach elements to the boom.

If you want to dive a little deeper into how the Yagi works, and to learn why it’s more properly known as the Yagi-Uda antenna, check out our story on their history and operational theory. And hats off to [andrew] for reminding us that antenna design is often an exercise in practicality; after all, an umbrella and some tin cans or even a rusty nail will do under the right circumstances.

Continue reading “Lowering The Boom On Yagi Element Isolation”

Clear Some Space And Build A Cosmo Clock

Like many of us, [Artistikk] is inspired by astronauts and space travel in general. To keep the inspiration coming, he made the Cosmo Clock — a sleek little clock that changes color whenever an astronaut is launched into space.

As awesome as space is, we’re inspired by the amount of Earth-saving reuse going on in this project. The actual time-telling is coming from a recycled wristwatch movement. [Artistikk] cut a bigger set of hands for it out of a plastic container, and used the lid from another container for the clock’s body.

The launch inquiries are handled by an ESP8266, which uses a Blynk app and some IFTTT magic to get notified whenever NASA yeets an astronaut into space. Then the ESP generates random RGB values and sends them to a single RGB LED. The clock body is small enough that a single LED is bright enough to light up all the parts that aren’t blacked out with thick paper. In case you’re wondering, the pattern around the edge isn’t random, it’s Morse code for ‘sky’, but you probably already knew that, right? Make a dash past the break to take the tour.

Clocks that wind up in space are much more complicated. Check out this tear-down of the clock from a late-90s Soyuz spacecraft.

Continue reading “Clear Some Space And Build A Cosmo Clock”

Hackaday Links Column Banner

Hackaday Links: May 10, 2020

It’s a meme come true: DEF CON is canceled. Or at least canceled as the large, IRL conference that the hacker gathering has grown into. Rather than risk drawing people from all over the world and stuffing them into a Las Vegas convention hall in August, Dark Tangent has taken the prudent step of switching DEF CON 28 to a virtual meeting. If you’re interested in his reasoning behind the switch, check out his blog post on the decision. For more details on participating in DEF CON 28 in “Safe Mode”, see the FAQ.

Think that wearing a mask in public protects you from the surveillance state? Think again. Facial recognition software concern Rank One has announced new algorithms that only need to see your face from the mask up to make a match. It would seem to us that the limited number of mappable features in the periocular space would increase the error rate, and according to Rank One’s published data, that seems to be the case. But the relative error rate is still low, so expect to see this and similar periocular algorithms deployed widely. Your only defense may be to adopt the tactical shemagh as everyday wear. If only they made an N95 version.

The tech news this week was abuzz with descriptions of a new “non-fossil fuel jet engine” that could soon be powering aircraft devoid of paying passengers across our skies and perhaps directly into space using only battery power. Those reports were a bit overwrought since the experiment in question was a laboratory-scale setup using a magnetron that could have come from a smallish microwave to generate a plasma-air stream with 11 Newtons of thrust. That corresponds to an efficiency that beats that of current electric airplane engines, like those used on the Airbus E-Fan, if the extrapolation holds. So the technology is promising, but it still has a long way to go.

In what’s perhaps the longest beta in history, Inkscape 1.0 was officially released this week.

Something big — literally — is going on at Dalibor Farný’s Nixie tube factory. He dropped a video this week teasing the production of enormous Nixies for a large display installation. Each tube in the 11 by 11 tube display will be 150 mm in diameter, making them the largest Nixies ever made. Dalibor has already done much of the design work and has even started on the glasswork; the resulting tube looks a bit like the old iconoscope tubes from early TV cameras. We expect that scaling up a Nixie and producing 121 of them will present some interesting challenges, and we look forward to watching his progress.

If you’re part of a hackerspace, you should probably look at Vancouver Hackspace’s virtual tour. Not only does it show off what appears to be a great hackerspace, the video style is a great lesson in building up the excitement needed to recruit new members. There are also some great ideas in there about space layout and organization that you can leverage for your own hackerspace or even your home shop.

And finally, it’s Mother’s Day here in the US and almost 100 other countries, and circumstances may sadly keep many of us from being with Mom today. So here’s to the women who tolerated the often messy hobbies many of us pursued in our youths, who were always attentive audiences as we showed off our latest blinkenlights, and perhaps even inspired us to follow in their footsteps. Thanks, Mom!

No More Floppy Drives For This Agilent Scope

When [kiwih] picked up an Agilent 54621A scope, he was amused that it had a floppy disk. At one time, it was high-tech to use a disk to transfer scope data to your computer. Today, not so much. However, on the back was a serial port. Surely it was possible to read data from there. It is, and what results is a nice walkthrough of finding the port’s info and interfacing with it using Python.

Normally, you’d use the included BenchLinkXL software to grab data from the port, but that software is so old it would not run under Windows 10 or Wine. Searching didn’t turn up much on the serial port, but it did locate a manual for a similar Agilent scope. That manual wasn’t too helpful since it assumed you were connecting via a LAN or USB. However, it did make reference to an older model that was also similar and that was the key to finding a manual that did explain the serial port protocol.

The command set looks suspiciously like SCPI — Standard Commands for Programmable Instruments — which is a layer on top of the GPIB protocol. Many scopes speak that language, so that’s not surprising. That also means if you are in the mood to communicate with an SCPI scope, you might find the code useful, even if you don’t use a serial port or have this exact Agilent model.

SCPI has a lot of uses. For example, try talking to your scope. The cheap Rigol and similar scopes usually have SCPI and you can control and read them using the same kind of techniques.