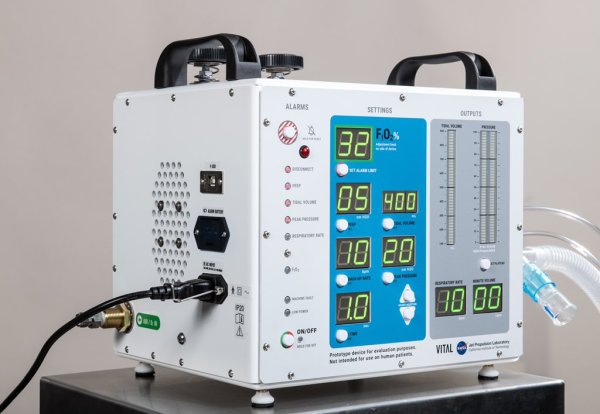
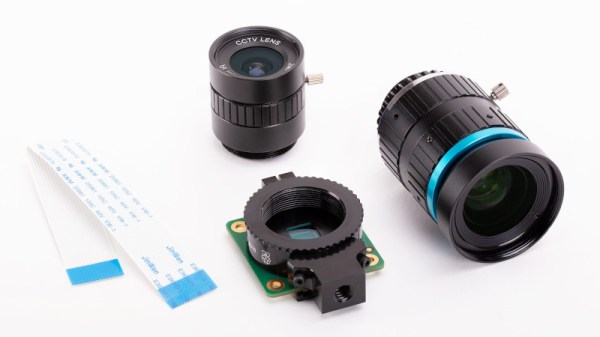
Nixiewatch Looks Stylish In Aluminium

Nixie tubes are a perennial favorite, with their burnt orange glow bringing a smile to the face of even the most jaded maker. Due to their power requirements they’re usually seen in desktop clocks, but [RemcoK3] decided to whip up a Nixiewatch, with stylish results.

Packing twin Nixie tubes, the watch displays hours first, then minutes. An accelerometer is fitted, switching the tubes on when the user checks the watch. There’s also Bluetooth and WiFi connectivity, which can be used to set the time as well as check the remaining battery life. Standby time is estimated to be 350 hours, thanks to a low-power microcontroller and keeping the tubes off most of the time.

The presentation is where this watch really shines, sporting as it does an RGB LED for backlighting and an attractive aluminium case. The design is simple, helping to highlight the industrial beauty of the Nixie tubes themselves. The housing was first mocked up with 3D printed parts, before the final piece was CNC milled. [RemcoK3] is contemplating anodizing the watch, but we think that the brushed aluminium already looks perfect.

If you’ve grown tired of the Nixie aesthetic, fear not – numitron watches are also a thing!

Desk-Sized CNC Engraver Does The Job

CNC machine tools are highly useful for when you want to take a CAD design and make real parts as quickly and as easily as possible. Typically, they’re employed in large-scale industrial settings, but CNC machines come in all shapes and sizes. It’s possible to build a useful machine that’s just right to sit on your desk, as [More Than User] demonstrates.

The holes pictured were made with a 0.5mm tool, showing off the precision and accuracy of the machine.

The build consists of an aluminium-framed CNC engraver, designed primarily for the production of PCBs. However, it can also handle plastic jobs, and aluminium if run slowly enough. Like most garage CNC projects, it runs with a combination of stepper motors and an Arduino. The cutting area is 16 cm x 16cm – more than enough for most hobby PCBs.

There are plenty of interesting details, such as the T-slot bed made from U-section steel bolted together, and the simple probe made from a microswitch. Perhaps most impressive though is the tight precision of the cuts. This is particularly important for PCB work, where otherwise minor issues could cause short or open circuits and make the resulting parts useless.

It’s a project that we’re sure will come in handy for [More Than User]’s future projects, and there’s nothing quite like making your own tools. If you’re new to CNC as a whole, consider picking up some design tips before you get started.

Probability-Based Drummer Leaves The Beats Up To Chance

Drum machines may seem like one of the many rites of passage for hardware makers, they’re a concept you can implement simply or take into the extreme making it as complex as you want. [Matt’s] DrumKid is one of them, and its long development history is wonderfully documented in the project logs.

[Matt’s] original intention was to use the automatic drummer as part of his band, wanting “the expressiveness of a good drummer but without the robotic tendencies of a simple drum machine”. For that, he created the first iteration of the DrumKid, a web-based project using the Web Audio API. The interface consisted of bars showing levels for different settings which could be intuitively tweaked, changing the probability of a drum sound being played. This gave the “drummer” its unpredictability, setting itself apart from any regular old drum machine.

Fast forward a few years, and [Matt] now wants to recreate his DrumKid as a proper piece of musical gear, porting the concept into a standalone hardware drum machine you can plug into your mixer. He decided to go with the Arduino framework for his project rather than the Teensy platform in order to make it cheaper to build. The controls are simplified down to a few buttons and potentiometers, and the whole thing runs off of three AAA batteries. Also, targeting the project for hardware like this allowed for new features to be added, such as a bit-crush filter.

We already saw the first prototype here on Hackaday when it was featured in a Hackaday Prize mentor session, and it’s nice to see how the project evolved since. After a number of revisions, the new prototype takes design cues from Teenage Engineering’s “Pocket Operator” drum machine, using the main PCB as its own faceplate rather than a 3D printed case in a familiar way we’ve seen before. Unfortunately, the latest board is non-functional due to a routing mistake, but you can see the previous working prototypes in his project logs.

The Great Moon Hoax — No Not That One!

Humans first walked on the moon 50 years ago, yet there are some people who don’t think it happened. This story is not about them. It turns out there was another great conspiracy theory involving a well-known astronomer, unicorns, and humanoids with bat wings. This one came 134 years before the words “We chose to go to the moon” were uttered.

The 1835 affair — known as the Great Moon Hoax — took the form of six articles published in The Sun, a newspaper in New York City. Think of it like “War of the Worlds” but in newspaper form — reported as if true but completely made up. Although well-known astronomer John Herschel was named in the story, he wasn’t actually involved in the hoax. Richard Adams Locke was the reporter who invented the story. His main goal seemed to be to sell newspapers, but he also may have been poking fun at some of the more outlandish scientific claims of the day.

Continue reading “The Great Moon Hoax — No Not That One!”

DIY Teensy Looper Multiplies Music

If you’re into electronic music, chances are good that you like to roll your own. While step one is usually to build something, anything that makes sound, a natural step two is to build a looping device to extend and play with those sounds.

[Cutlasses] has finished version one of his Teensy-based Eurorack-style looper. He plugs in a thing, records some tunes, and the resulting loop gets divvied up into eight equal pieces. He can cut the loop together live using the eight buttons to jump around between sections. It supports unlimited overdubs, although too many will cause clipping. But hey, that just means free derivative sounds.

The looper records its audio to an SD card. Since this is typically a slow endeavor, [Cutlasses] used two circular buffers. One reads audio, and the other writes it. This took a lot of trial and error, which he may have to repeat with future SD cards.

[Cutlasses]’ plans for future versions include a separate audio CODEC for better sound, CV control, and a pedal option for hands-free operation. We’d love to hear some sweet Theremin loopage, wouldn’t you? Jog past the break to watch [Cutlasses] demo his looper with a kalimba and a DIY noise box that uses a string bow to make metal tines sing.

Feeling out of the music-making loop? There are (slightly) easier ways. Check out this LEGO looper or this multiplayer Pi-ano.

Continue reading “DIY Teensy Looper Multiplies Music”

The V Programming Language: Vain Or Virtuous?

If you stay up to date with niche software news, your ears may recently have twitched at the release of a new programming language: V. New hobby-project programming languages are released all the time, you would correctly argue; what makes this one special? The answer is a number of design choices which promote speed and safety: V is tiny and very fast. It’s also in a self-proclaimed alpha state, and though it’s already been used to build some interesting projects, is still at an early stage.

Continue reading “The V Programming Language: Vain Or Virtuous?”

I Love The Smell Of ABS Plastic In The Morning

One lesson we can learn from the Vietnam War documentary Apocalypse Now is that only crazy people like terrible smells just for fun. Surely Lt. Col. Kilgore would appreciate the smell of 3D printers as well, but for those among us who are a little less insane, we might want a way to eliminate the weird (and not particularly healthy) smell of melting ABS plastic.

While a simple solution would be a large fume hood or a filter to prevent inhaling the fumes, there are more elegant solutions to this problem. [Mark]’s latest project uses an electrostatic precipitator (ESP) to remove the volatile plastic particles from the air. Essentially it is a wire with a strong voltage applied to it enclosed in a vessel of some sort. The voltage charges particles, which then travel to a collecting electrode. Commercial offerings also include an X-ray generator to help clean the air, but [Mark] found this to be prohibitively expensive.

The ESP is built into a small tube through with the air can flow, and the entire device itself is housed in the printing enclosure. The pictures show the corona discharge in the device, and [Mark] plans to test it over the next few months to determine its effectiveness. He does note, however, that the electrostatic discharge creates ozone, which has its own set of problems, so he recommends against building one on your own. Ozone at least still smells like victory.