A Simple Guide To Bit Banged I2C On The 6502

We covered [Anders Nielsen]’s 65duino project a short while ago, and now he’s back with an update video showing some more details of bit-banging I2C using plain old 6502 assembly language.

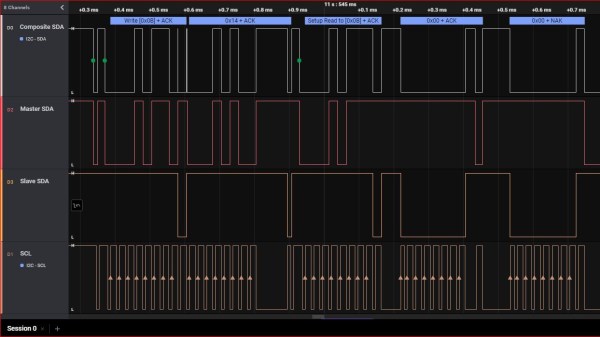
Obviously, with such a simple system, there is no dedicated I2C interface hardware, so the programmer must take care of all the details of the I2C protocol in software, bit-banging it out to the peripheral and reading back the response one bit at a time.

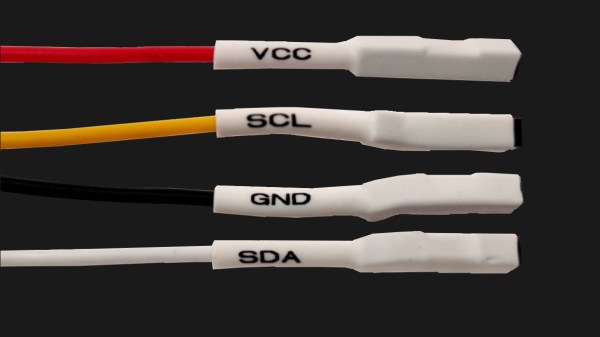
The first detail to concern us will be the I2C addresses of the devices being connected to the bus and how low-level bit manipulation is used to turn the 7-bit I2C address into the byte being bit-banged. As [Anders] shows, setting a bit is simply a logical-OR operation, and resetting a bit is a simple logical-AND operation using the inversion (or one’s complement) bit to reset to form a bitmask. As many will already know, this process is necessary to code for a read or a write I2C operation. A further detail is that I2C uses an open-collector connection scheme, which means that no device on the bus may drive the bus to logical high; instead, they must release the drive by going to the high impedance state, and an external pull-up resistor will pull the bus high. The 6532 RIOT chip (used for I/O on the 65unio) does not have tristate control but instead uses a data direction register (DDR) to allow a pin to be an input. This will do the job just fine, albeit with slightly odd-looking code, until you know what’s going on.

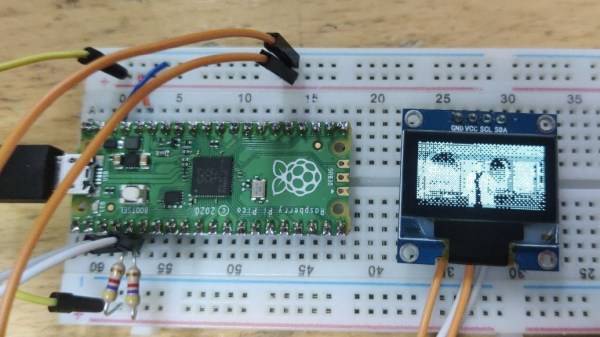
From there, it’s a straightforward matter to write subroutines that generate the I2C start, stop, and NACK conditions that are required to write to the SSD1306-based OLED to get it to do something we can observe. From these basic roots, through higher-level subroutines, a complete OLED library in assembly can be constructed. We shall sit tight and await where [Anders] goes next with this!

We see I2C-connected things all the time, like this neat ATtiny85-based I2C peripheral, and whilst we’re talking about the SSD1306 OLED display controller, here’s a hack that shows just how much you can push your luck with the I2C spec and get some crazy frame rates.

Continue reading “A Simple Guide To Bit Banged I2C On The 6502”

A Pi Pico plugged into a breadboard, with an I2C OLED display connected to it

Need An USB-I2C Adapter? Use Your Pico!

Given its abundance and simplicity, the RP2040 has no doubt become a favourite for USB peripheral building – in particular, USB-connected tools for electronics experiments. Today, we see one more addition to our Pico-based tool arsenal – a USB-I2C adapter firmware for RP2040 by [Renze Nicolai]. This is a reimplementation of the ATTiny-based I2C-Tiny-USB project and complies to the same protocol – thus, it’s compatible with the i2c-tiny-usb driver that’s been in the Linux kernel for ages. Just drag&drop the .uf2, run a script on your Linux system, and you will get a /dev/i2c-X device you can work with from userspace code, or attach other kernel drivers to.

The software will work with any RP2040 devboard – just connect your I2C devices to the defined pins and you’ll have them show up in i2cdetect output on your Linux workstation. As a demo, [Renze] has written a userspace Python driver for one of these SSD1306 128×64 OLEDs, and gives us a commandline that has the driver accept output of an ffmpeg command capturing your main display’s contents, duplicating your screen on the OLED – in a similar fashion that we’ve seen with the “HDMI” I2C-driven display a few months back. Everything you might need is available on the GitHub page, including usage instructions and examples, and the few scripts you can use if you want to add an udev rule or change the I2C clock frequency.

Just to name a few purposes, you can use a Pi Pico as a tool for SWD, JTAG, CAN, a logic analyser with both digital and analog channels, or even as a small EMP-driven chip glitching tool. The now-omnipresent $3 Pi Pico boards, it seems, are a serious contender to fondly remembered hacker tools of the past, such as the legendary BusPirate.

Continue reading “Need An USB-I2C Adapter? Use Your Pico!”

Bare-Metal STM32: Using The I2C Bus In Master-Transceiver Mode

As one of the most popular buses today for on- and inter-board communication within systems, there’s a good chance you’ll end up using it with an embedded system. I2C offers a variety of speeds while requiring only two wires (clock and data), which makes it significantly easier to handle than alternatives, such as SPI. Within the STM32 family of MCUs, you will find at least one I2C peripheral on each device.

As a shared, half-duplex medium, I2C uses a rather straightforward call-and-response design, where one device controls the clock, and other devices simply wait and listen until their fixed address is sent on the I2C bus. While configuring an STM32 I2C peripheral entails a few steps, it is quite painless to use afterwards, as we will see in this article. Continue reading “Bare-Metal STM32: Using The I2C Bus In Master-Transceiver Mode”

Four jumper wires with white heatshrink on them, labelled VCC, SCL, SDA and GND

The Connector Zoo: I2C Ecosystems

I2C is a wonderful interface. With four wires and only two GPIOs, you can connect a whole lot of sensors and devices – in parallel, at that! You will see I2C used basically everywhere, in every phone, laptop, desktop, and any device with more than a few ICs inside of it – and most microcontrollers have I2C support baked into their hardware. As a result, there’s a myriad of interesting and useful devices you can use I2C with. Occasionally, maker-facing companies create plug-and-play interfaces for the I2C device breakouts they produce, with standardized pinouts and connectors.

Following a standard pinout is way better than inventing your own, and your experience with inconsistent pin header pinouts on generic I2C modules from China will surely reflect that. Wouldn’t it be wonderful if you could just plug a single I2C-carrying connector into an MPU9050, MLX90614 or HMC5883L breakout you bought for a few dollars, as opposed to the usual hurdle of looking at the module’s silkscreen, soldering pin headers onto it and carefully arranging female headers onto the correct pins?

As with any standard, when it comes to I2C-on-a-connector conventions, you would correctly guess that there’s more than one, and they all have their pros and cons. There aren’t quite fifteen, but there’s definitely six-and-a-half! They’re mostly inter-compatible, and making use of them means that you can access some pretty powerful peripherals easily. Let’s start with the two ecosystems that only have minor differences, and that you’ll encounter the most! Continue reading “The Connector Zoo: I2C Ecosystems”

Screenshot of a logic analyzer software, showing the SDA channel being split into three separate traces

I2C Tap Helps Assign Blame For SDA Conflicts

If you’ve ever debugged a misbehaving I2C circuit, you probably know how frustrating it can be. Thankfully [Jim] over at Hackaday.io, has a proto-boardable circuit that can help!

Inter-integrated circuit bus (aka I2C) uses open collector outputs on a two wire interface. Open collector means a device connected to the I2C bus can only pull the bus down to ground. Chips never drive a logic “HIGH” on the wires. When nothing is driving the lines low, a weak resistor pulls the lines up to VCC. This is a good thing, because I2C is also a multidrop bus — meaning many devices can be connected to the bus at the time. Without open collector outputs, one chip could drive a high, while another drives a low – which would create a short circuit, possibly damaging both devices.

Even with all this protection, there can be problems. The SCL and SDA lines in the I2C communication protocol are bidirectional, which means either a controller or a peripheral can pull it low. Sometimes, when tracing I2C communications you’ll need to figure out which part is holding the line low. With many devices sharing the same bus, that can become nigh-impossible. Some folks have tricks with resistors and analog sampling, but the tried and true method of de-soldering and physically lifting chip pins off the bus often comes into play.

[Jim’s] circuit splits SDA signal into controller-side and peripheral-side, helping you make it clear who is to blame for hiccups and stray noise. To do that, he’s using 6N137 optoisolators and LMV393 comparators. [Jim] shared a NapkinCAD schematic with us, meant to be replicate-able in times of dire need. With this design, you can split your I2C bus into four separate channels – controller-side SDA, peripheral-side SDA, combined SDA and SCL. 4 Channels might be a lot for a scope, but this is no problem for today’s cheap logic analyzers.

Continue reading “I2C Tap Helps Assign Blame For SDA Conflicts”

A Gaggle Of Boards Makes For An I2C Playground

It’s not much of a stretch to assume that the majority of Hackaday readers are at least familiar with I2C. In fact, there’s an excellent chance that anyone who’s ever done more with an Arduino than blink the onboard LED has at one time or another used the serial communication protocol to talk to a sensor, display, or other external gadget. Of course, just because most of us have used it in a few projects doesn’t mean we truly understand it.

If you’re looking to brush up on your I2C knowledge, you could do worse than to follow the guide [András Tevesz] recently wrote up. With a title like Hardware Hacking 101: E01 I2C Sniffing, How to Listen to Your Arduino’s I2C Bus, you know you’re in for a good time. While the document is arguably geared more towards security researchers than electronic hobbyists, the concepts presented can be useful even if you’re just trying to debug your own projects. Continue reading “A Gaggle Of Boards Makes For An I2C Playground”

A vintage pocket calculator with extra exposed circuitry added

I2C Breathes New Life Into Casio Pocket Calculator

When is a pocket calculator more than just a calculator? [Andrew Menadue] has been pushing the limits of his 1970s Casio FX-502P by adding all sorts of modern functionality via the calculator’s expansion port.

Several older Casio calculators included an expansion port for connecting cassette tape storage and printing functionality. Data on the FX-502P could be saved on cassette tape using the well-known Kansas City standard, however this signal was produced by Casio’s FA-1 calculator cradle, not the FX-502P itself. To interact with the calculator itself would require an understanding of whatever protocol Casio designed for this particular model.

It turns out that the protocol is a little quirky compared to its contemporaries, with variable length data packets and inverted data logic, (zero volts is ‘1’ and three volts is ‘0’). Once the protocol was untangled, it was ‘simply’ a matter of connecting the calculator to the GPIO interface on the STM32, and using some software wizardry to start shooting data packets back and forth.

This hack can be used to send and receive data from an SD card (via a RAM buffer), however it’s the other expansion capabilities that really make us wonder. [Andrew] has demonstrated how easy it is to add a real-time clock or thermal printer. Using the I2C capabilities of the STM32, it’s likely that all sorts of gadgets and sensors could be coupled with this vintage calculator, and many others like it.

You can find even more details about this hack over here, including some follow up videos to the original hack. No stranger to vintage calculators, we last featured [Andrew] after he retrofitted a modern LCD display to an old Casio. It’s charming to see how these calculators are far from obsolete.

Continue reading “I2C Breathes New Life Into Casio Pocket Calculator”