This Vintage Op-Amp Opens A Fascinating Window Into Semiconductor History

We have covered enough of the work of [Ken Shirriff] on these pages to know that when he publishes something, it will be a fascinating read and work of the highest quality. And so it is with his latest, a very unusual op-amp on which he performs his usual reverse engineering. Not only does it lead us directly to some of the seminal figures in the early years of the semiconductor industry, it turns out to have been a component manufactured to a NASA specification and of which there is an example on the Moon.

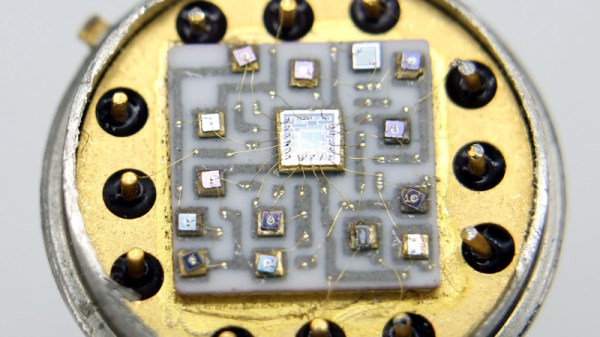
The metal can revealed a hybrid circuit when the lid was removed, one in which individual transistors were wired together with a single block containing a group of thin-film resistors. At the start of the 1960s the height of consumer electronics would have been your domestic TV which would have been an all-tube affair, so while it sounds archaic this would truly have been a space-age piece of technology. The designer is revealed as the legendary [Bob Pease], and the transistors take us back to the semiconductor physicist [Jean Hoerni], inventor of the planar transistor and one of the famous eight defectors from Shockley Semiconductor in the 1950s who kick-started the semiconductor boom.

The op-amp itself is a relatively simple design without the compensation capacitor you might expect in a modern device, but what makes it unusual for its time is the use of [Hoerni]’s planar JFETs at its input. [Ken]’s analysis is as usual extremely thorough, and the bit of Silicon Valley history it gives us is the icing on the cake.

If you have a thirst for ancient op-amps, you might like our look at the first commercially available fully-integrated design, the Fairchild μA702.

Programmable Ruler Keeps 1970’s Computing Alive

A ruler seems like a pretty simple device; just a nice straight piece of material with some marks on it. There are some improvements out there to the basic design, like making it out of something flexible or printing a few useful crib notes and formulas on it so you have a handy reference. But for the most part, we can all agree that ruler technology has pretty much plateaued.

Well, not if [Brad] has anything to say about it. His latest creation, the Digirule2, is essentially an 8-bit computer like those of the 1970’s that just so happens to be a functional ruler as well. Forget lugging out the Altair 8800 next time you’re in the mood for some old school software development, now you can get the same experience with a piece of hardware that lives in your pencil cup.

Even if you’ve never commanded one of the blinkenlight behemoths that inspired the Digirule2, this is an excellent way to get some hands-on experience with early computer technology. Available for about the cost of a large pizza on Tindie, it represents one of the easiest and most cost-effective ways to tell your friends that as a matter of fact you have programmed a computer in binary.

The Digirule2 is powered by a Microchip PIC18F43K20, and is programmed by punching binary in one byte at a time with a bank of eight tactile switches. To make things a little easier, programs can be saved to the internal EEPROM and loaded back up just as easily thanks to the handy buttons next to the power switch. Now all you’ve got to do is figure out what all those blinking LEDs mean, and you’ll be in business.

The original Digirule was a logic gate simulator that we first covered back in 2015. We’re always happy to see projects grow and evolve over time, and think this new retro-computer themed variant is going to be quite popular with those who still love toggle switches and blinking lights.

Continue reading “Programmable Ruler Keeps 1970’s Computing Alive”

An Epic Mech Cockpit Build For Steel Battalion

Steel Battalion was released for the Xbox in 2002, and remains one of the most hardcore mech simulators of all time. It became legendary for its huge twin-stick controller covered in buttons, and for deleting your save game if you failed to eject in time. It took giant robot gaming to a new level, but fundamentally, you were still playing in front of a TV at home. Things really got serious in 2015, with the completion of the Big Steel Battalion Box – the battlemech cockpit of your dreams.

Coaching the player is a key part of BSBB gameplay, with a manual created specifically for this purpose.

If you’re thinking this is just a television in a dark room with some stickers, you’d be very wrong. The Imgur thread covers the build process, and it’s one heck of a ride. Things started with a custom cabinet being built, intentionally sized to induce claustrophobia. There’s a swivelling seat with a 4-point harness, and a hatch to seal the player inside. During initial testing of the box to determine how dark it was, one of the makers was trapped inside and had to call for help. That should highlight how serious the build really is.

The controller was modified and hooked up to custom electronics to add realistic effects. Get hit? Feel the seat rumble thanks to motors and a subwoofer in the base. Mech terminally damaged? The entire cockpit is bathed in flashing red light. There’s even smoke effects rigged up to make things even more stressful during battle.

The entire setup is connected to the outside world, where a coach can view the action inside through a video feed from the Xbox and several internal cameras. A basic manual is provided to help the coach keep the player alive during their first moments of combat. This is courtesy of a custom intercom setup, built using surplus Chinese aviation headsets. There’s even a red telephone to give that authentic military feel.

It’s a build that covers just about every detail you could think of. If you’re keen to try it out, it’s on permanent loan to The Museum of Art And Digital Entertainment in Oakland, California. It recalls memories of a similar build created to play Artemis. Video after the break.

Continue reading “An Epic Mech Cockpit Build For Steel Battalion”

The 8-Bit Guy Builds A 16-Bit Computer

One of the better retro historians out there on YouTube is the 8-Bit Guy, and after years of wanting to do something like this, it’s finally happening. The 8-Bit Guy is building his dream computer, heavily inspired by the Commodore 64.

Before we go into what this computer will do and what capabilities it will have, it’s important to note the 8-Bit Guy is actually doing a bit of market and user research before dedicating a year or more to this project. He’s asked other famous retrocomputing YouTubers for their input on what their ‘dream’ retrocomputer should do, and they’ve come up with a basic list of requirements. The Dream Computer will be like working on a 1957 Chevy, in that all the registers are immediately available for peeking and poking. The computer will be completely comprehensible, in so far that one person can completely understand everything, from the individual logic gates inside the CPU to the architecture of the kernel. It’ll run BASIC.

In the age of the Raspberry Pi, one might ask, ‘why not go with a Raspberry Pi?’. To the 8-Bit Guy, the Pi is just a Linux computer. Other retrocomputing projects of a similar scope to this dream computer also fail: The Mega65, a project to resurrect the Commodore 65, will be too expensive. The BASIC Engine fails because it only does composite out, and it runs on an ESP anyway, so you’re shielded from the real hardware. The same problem exists with the Maximite in that the hardware is one layer of abstraction away from the interface. The C256 Foenix is probably the closest to meeting the design goals, but it’s far too expensive, and even without the MIDI ports, SID chips, and other interesting hardware, it would still be above the desired price point.

The ‘requirement’ for this dream computer is to use only modern parts, have VGA or HDMI video out, a real CPU, preferably a 6502, use no FPGA or microcontrollers, and can run Commodore Basic. Also, this computer would cost about $50, with $100 as the absolute, maximum limit (implying a BOM cost of around $15-$25). This is absolutely, completely, astonishingly impossible. I would be deceiving you if I did not mention the impossibility of this project happening with the stated goals. This project will not meet the goal of selling for less than one hundred dollars.

That said, there’s no harm in trying, so The 8-Bit Guy is currently working with a few dev boards, specifically one designed around the 65816 CPU. The 65816 is an interesting chip, in that it is a 6502 until you flip a bit in a register. It has a larger address space than the 6502, and everything from the World of Commodore should be (relatively) easily ported to the 65816. Why was this CPU never used in Commodore hardware? Because a Western Design Center sales guy told a Commodore engineer that Apple was using it in their next computer (the Apple IIgs). The option of Commodore ever using the ‘816 died then and there.

If you’d like to help out on this computer, there is a Facebook group for organizing the build. This Facebook group is a closed group, meaning you need a Facebook account to login. Unfortunate, but we’re looking forward to a year of updates around this dream computer. Building a computer that meets the specs is impossible, but we’re more than eager to see the community try.

Continue reading “The 8-Bit Guy Builds A 16-Bit Computer”

WiFi Makes The Heart Glow Fonder

It’s more than a little too late for Valentine’s Day this year, but if you start now, you’re sure to be looking good next February. Print something that truly conveys how you feel, through the magic of wireless communication and RGB LEDs (Youtube, French).

Yes, [Heliox] has built a Valentine’s day project, and the presentation is top notch as always. A heart is 3D printed in white filament, with two chambers separated by a thick wall. Each chamber features five NeoPixel LEDs, controlled by an ESP8266 in the base.  The color of each chamber can be controlled through the Blynk smartphone app, allowing you to choose the exact colors that best represent your relationship.

The 3D printed heart does a good job of diffusing the LEDs, with the device showing a rich and consistent glow without any unattractive hotspots. It’s a fun holiday build, and if you’re quick, you might just have time to print one yourself if you start right away.

[Heliox] has good form when it comes to LED projects – her infinity cube is particularly impressive. Video after the break.

Continue reading “WiFi Makes The Heart Glow Fonder”

Live Hacking And A MIDI Keytar

We can’t think of where you’d buy a new, cheap, MIDI keytar that’s just a keyboard and a handle with some pitch and mod wheels or ribbon controllers. This is a format that died in the 90s or thereabouts. Yes, the Rock Band controller exists, but my point stands. In fact, the closest you can get to a cheap, simple MIDI keytar is the Alesis Vortex Wireless 2 Keytar, but the buttons on the handle don’t make any sense. [marcan] of Wii and Kinect hacking fame took note. (YouTube, embedded below.)

Reverse engineering is a research project, and all research projects begin with looking at the docs. When it comes to consumer electronics, the best resource is the documents a company is required to submit to the FCC (shout out to FCC.io), which gave [marcan] the user manual, and photos of the guts of the keytar. The ‘system update download’ files are living on the Alesis servers, and that’s really all you need to reverse engineer a keytar.

The first step is extracting the actual device firmware from whatever software package appears on the desktop when you download the software update. This is a simple job for 7zip, and after looking at a binary dump of the firmware, [marcan] discovered this was for an STM chip. With the datasheet of the chip, [marcan] got the entry point for the firmware, some values, and the real hardware hacking began. All of this was done with IDA.

This is a five-hour hacking session of cross-referencing the MIDI spec and a microcontroller built thirty years after this spec was developed. It’s an amazing bit of work just to find the bit of code than handled the buttons on the keytar grip, and it gets even better when the patched firmware is uploaded. If you want to ‘learn hacking’, as so many submitters on our tip line want to do, this is what you need to watch. Thanks [hmn] for the tip.

Continue reading “Live Hacking And A MIDI Keytar”

Balena Introduces DIN-Capable Pi Compute Module Carrier Board

Although you don’t hear about it very much over the clamor of emulating old video game systems, one of the biggest uses of the Raspberry Pi outside its educational roots is in industry. The Pi makes for a great industrial control system, and if you mount it to a DIN rail, you’re golden. This is the biggest reason the Pi foundation is still making the Pi 1, and it’s one of the big motivations behind the Pi Compute Module.

Now that the Pi Compute Module 3 and 3+ have been out for a while, it’s only fitting that these modules get a great carrier board. The balenaFin 1.1 is out now, and it’s the perfect carrier board for the Pi compute module.

Balena (formerly resin.io) is a software stack designed for managing fleets of Linux devices, and there’s no better example of that than a factory filled with Pis fiddling relays and such. Balena has found its way from tracking sea turtles to monitoring oil rigs, and with that comes a need for a developer kit. The Pi compute module is supposed to have a very long support life, so the obvious solution is to make a great carrier board for this fantastic module.

Features of note include two camera connectors, PoE (with a Hat), USB headers, an RGB indicator LED, an industrial temperature range, and a case designed for a DIN rail. So far, so goo, but there’s also a microcontroller with a Bluetooth radio that can operate without the compute module being turned on, and an RTC for time-based operation. There’s a mini PCI express slot designed for cellular modems, and a SIM card slot just for fun.

While most Pi builds we see could make use of these features, they are assuredly one-off builds. You’re not going to be deploying hundreds of Pis if you need to 3D print an enclosure for each one. That’s when actual engineers need to get involved, and if you’re doing that, you might as well go with the Raspberry Pi compute module. If you’re looking for a fleet of Pis, you could do worse than to look at this very nice compute module carrier board.