An IoT Christmas Tree You’re Invited To Control

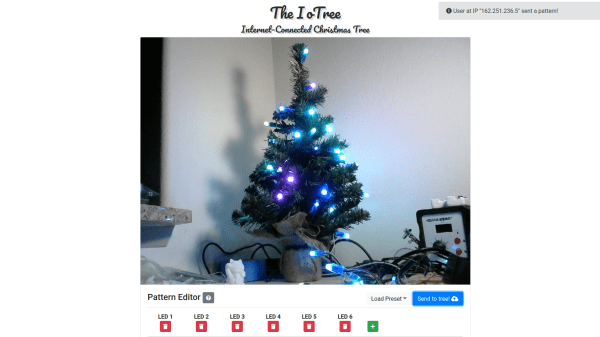
We love IoT gadgets, but are occasionally concerned that they might allow access to the wrong kind of hacker. In this case, [Kevin] has created an IoT tree that allows anyone to control the pattern of lights, and he’s invited you to do so!

We played with the tree a bit, and the web interface is fairly powerful. For each LED, you can select either a random color or a keyframe-defined pattern. For the keyframe LEDs, you can create a number of “keyframes”, each of which is defined by a color and a transition, which can be either linear, quarter sine wave, or instantaneous (“wall”). Additional keyframes can be added for each LED, and if don’t specify a pattern for all the LEDs, the system repeats those you have defined to fill the entire string. There are also a few preset patterns you can choose if you prefer. If you, too, want to play with the tree, don’t delay: it’s only available through the first week of 2019!

Behind the scenes, an aging Raspberry Pi provides the local brains driving the LED controller and streaming the video, while a cloud server running a Redis instance allows communication with the web. The interface to the string of WS2811 LEDs uses [Kevin]’s Kinetis LK26 breakout board, which he managed to get working despite the state of tools and documentation for the Kinetis ARM family. You can read a good discussion of the system on his blog; there are a surprisingly large number of pieces that need to work together. As usual, he provides all the source code for this project on GitHub.

We’ve seen [Kevin]’s work before, including his 73-LED wristwatch, and adventures developing on an STM32 from scratch.

But, if it’s IoT Christmas trees that have got you thinking, you can check out this one from last year.

Oh The Lessons You’ll Learn By Building A Robot Familiar

A familiar spirit, or just a familiar, is a creature rumored to help people in the practice of magic. The moniker is perfect for Archimedes, the robot owl built by Alex Glow, which wields the Amazon Google AIY kit to react when it detects faces. A series of very interesting design choices a what really gives the creature life. Not all of those choices were on purpose, which is the core of her talk at the 2018 Hackaday Superconference.

You can watch the video of her talk, along with an interview with Alex after the break.

Continue reading “Oh The Lessons You’ll Learn By Building A Robot Familiar”

Ambitious Homebrew X-Ray Machine Reveals What Lies Within

We’re not quite sure what to say about this DIY X-ray machine. On the one hand, it’s a really impressive build, with incredible planning and a lot of attention to detail. On the other hand, it’s a device capable of emitting dangerous doses of ionizing radiation.

In the end, we’ll leave judgment on the pros and cons of [Fran Piernas]’ creation to others. But let’s just say it’s probably a good thing that a detailed build log for this project was not provided. Still, the build video below gives us the gist of what must have taken an awfully long time and a fair amount of cash to pull off. The business end is a dental X-ray tube of the fixed anode variety. We’ve covered the anatomy and physiology of these tubes previously if you need a primer, but basically, they use a high voltage to accelerate electrons into a tungsten target to produce X-rays. The driver for the high voltage supply, which is the subject of another project, is connected to a custom-wound transformer to get up to 150V, and then to a voltage multiplier for the final boost to 65 kV. The tube and the voltage multiplier are sealed in a separate, oil-filled enclosure for cooling, wisely lined with lead.

The entire machine is controlled over a USB port. An intensifying screen converts the X-rays to light, and the images of various objects are quite clear. We’re especially impressed by the fluoroscopic images of a laptop while its hard drive is seeking, but less so with the image of a hand, presumably [Fran]’s; similar images were something that [Wilhelm Röntgen] himself would come to regret.

Safety considerations aside, this is an incredibly ambitious build that nobody else should try. Not that it hasn’t been done before, but it still requires a lot of care to do this safely.

Continue reading “Ambitious Homebrew X-Ray Machine Reveals What Lies Within”

Vintage Toys Live On Through 3D Printing

We all have fond memories of a toy from our younger days. Most of which are still easy enough to get your hands on thanks to eBay or modern reproductions, but what if your childhood fancies weren’t quite as mainstream? What if some of your fondest memories involved playing with 1960’s educational games which are now so rare that they command hundreds of dollars on the second-hand market?

Inside the Think-a-Dot replica

That’s the situation [Mike Gardi] found himself in recently. Seeing that the educational games which helped put him on a long and rewarding career in software development are now nearly unobtainable, he decided to try his hand at recreating them on his 3D printer. With his keen eye for detail and personal love of these incredible toys, he’s preserved them in digital form for future generations to enjoy.

His replica of The Amazing Dr. Nim” needed to get scaled-down a bit in order to fit on your average desktop 3D printer bed, but otherwise is a faithful reproduction of the original injection molded plastic computer. The biggest difference is that his smaller version uses 10 mm (3/8 inch) steel ball bearings instead of marbles to actuate the three flip-flops and play the ancient game of Nim.

[Mike] has also created a replica of “Think-a-Dot”, another game which makes use of mechanical flip-flops to change the color of eight dots on the front panel. By dropping marbles in the three holes along the top of the game, the player is able to change the color of the dots to create various patterns. The aim of the game is to find the fewest number of marbles required to recreate specific patterns as detailed in the manual.

Speaking of which, [Mike] has included scans of the manuals for both games, and says he personally took them to a local shop to have them professionally printed and bound as they would have been when the games were originally sold. As such, the experience of owning one of these classic “computer” games has now been fully digitized and is ready to be called into corporeal form on demand.

This is really a fascinating way of preserving physical objects, and we’re interested to see if it catches on with other toys and games which otherwise might be lost to time. As storage capacities get higher and our ability to digitize the world around us improve, we suspect more and more of our physical world will get “backed up” onto the Internet.

IPv6 Christmas Display Uses 75 Internet’s Worth Of Addresses

We’ve seen internet-enabled holiday displays before, and we know IPv6 offers much more space than the older IPv4 addressing scheme that most of us still use today, but the two have never been more spectacularly demonstrated than at jinglepings.com. The live video stream shows an Internet-connected Christmas tree and an LED display wall that you can control by sending IPv6 ICMP echo request messages, more commonly known as pings.

Reading the page, you quickly parse the fact that there are three ways to control the tree. First, you can type a message in the box and press send – this message gets displayed on the crawl at the bottom of the LED screen.  Second, you can light up the tree by sending a ping to the IPv6 address 2001:4c08:2028:2019::RR:GG:BB, where RR, GG, and BB are 8-bit hex values for red, green, and blue. This is a neat abuse of the IPv6 address space, in that the tree has 224 (around 16.8 million) IPv6 addresses, one for each color you can set. We were impressed by this brute-force use of address space, at least until we read on a little further.

You can also make your own drawings on the LED wall, again by sending pings. In this case, the address to set a pixel to a particular color is: 2001:4c08:2028:X:Y:RR:GG:BB, where X and Y are the pixel coordinates. This seems easy enough: to set pixel (10, 11) to magenta, the RGB value (0xFF, 0x00, 0xFF), you’d simply ping the IPv6 address 2001:4c08:2028:10:11:FF:00:FF. Having  an array of addressable LEDs is commonplace in hacker circles today, although each of them having their own live IPv6 address on the Internet seems a little excessive at first. Then it hits you – each LED has an IPv6 address for every possible color, just like the tree: 16.8 million addresses for each LED. The LED display is 160×120 pixels in size, so the total number of IPv6 addresses used is 160x120x224, which is 75 times larger than all possible IPv4 addresses!  This is a hack of monstrous proportions, and we love it.

In case you’re not running IPv6 yet, we’ve got you covered. To send individual pings using your browser, you can use a site like Ipv6now. If you want to send pixels to the display wall, you’re better off using a 6in4 tunnel that lets you access IPv6 sites using your current IPv4 connectivity.  Hurricane Electric offers a free 6in4 tunnel service that we’ve found useful. Then it’s just a matter of writing some code to send pixel values as pings.  The python scapy module is perfect for this sort of thing. But, first you’ll have to fill out the form on jinglepings.com and wait to get your IPv6 address whitelisted before you can draw on the display; evidently the usual bad actors have found the site and started drawing inappropriate things.

If you think this use of addresses seems wasteful, you needn’t worry. There are around 3.4×1038 IPv6 addresses, enough for 1027 such displays. We’re going to go out on a limb here and say it: nobody will ever need more than 2128 IP addresses.

If you’re looking to build an LED holiday display on a smaller budget, check out this one that re-purposes normal LED strings.

Thanks to [Ward] for the tip!

LEDs And Pi Let You Virtually Decorate This Online Christmas Tree

Anyone who has decorated a Christmas tree knows that the lights are what really make the look. But no matter how many strings you wrap around it, there never seems to be enough. Plus the standard sets either sit there and do nothing, or just blink on and off at regular intervals. Yawn.

But hackers aim higher, and [leo.currie]’s interactive “paintable” Christmas tree takes the lighting game a step beyond. The standard light strings are replaced with strings of WS2811 RGB LEDs which are wired to an ESP8266. A camera connected to a Raspberry Pi is setup up to stream images of the tree to all and sundry on the Interwebz, but with a special twist: it also creates a map of every light on the tree. That allows the lights to be controlled individually in response to user inputs on a web page hosted on the Pi. The upshot is that you can paint the tree with any color you like in real time, or upload various animated GIFs to display on the tree. You can play with the tree directly, or watch a replay on the video below when that Pi inevitably gets hugged to death.

Imagine the possibilities with this. Why not hang a lot of LED strings vertically from the eaves of your house and make a huge, low-resolution display? We’ve featured plenty of large, interactive LED Christmas displays before, and we’d love to see what you come up with.

Continue reading “LEDs And Pi Let You Virtually Decorate This Online Christmas Tree”

Lighting Up A Very Wiry Candle

Entries into the Circuit Sculpture Contest tend to be pretty minimalist by nature, and this LED candle by [Amal Mathew] is a perfect example. The idea here was to recreate the slim and uncomplicated nature of a real candle but with a digital twist, and we think he’s pulled it off nicely with a bare minimum part count and exaggerated wire length that gives it the look of a thin pillar candle.

To give the LED a fading effect, [Amal] uses a ATtiny85 programmed with the Arduino IDE. His code uses the analogWrite() in a loop to gradually increase and then decrease the PWM frequency. With the LED connected directly to one of the pins on the ATtiny85, the simple program achieves the fading effect without needing any additional components.

On the opposite side of the candle, connected by long copper wires, is the single CR2032 which provides power for the circuit. In a nice touch, [Amal] has turned the battery 90 degrees relative to the rest of the circuit, so it can serve as a weighted base. We imagine getting it to stand up might be a little fiddly from the looks of it, but once it’s up and merrily fading in and out, it really helps sell the candle idea.

The finished product might look fairly straight-forward, but in his write-up on Hackaday.io, [Amal] gives detailed instructions on how to build your own version if you’re not a bare microcontroller wizard. This includes direction on how to program the ATtiny85 using an Arduino Uno; a neat trick to know even if you aren’t planning on making any candles in the near future. The next logical step is making it so you can “blow out” the LED, which should only take the addition of a resistor and some updated code.

There’s still plenty of time to enter your own functional piece of art in the Circuit Sculpture Contest. Just write it up on Hackaday.io and submit it before the January 8th, 2019 deadline.

Continue reading “Lighting Up A Very Wiry Candle”