
How Power Over Ethernet (PoE) Works

A remote Ethernet device needs two things: power and Ethernet. You might think that this also means two cables, a beefy one to carry the current needed to run the thing, and thin little twisted pairs for the data. But no!

Power over Ethernet (PoE) allows you to transmit power and data over to network devices. It does this through a twisted pair Ethernet cabling, which allows a single cable to drive the two connections. The main advantage of using PoE as opposed to having separate lines for power and data is to simplify the process of installation – there’s fewer cables to keep track of and purchase. For smaller offices, the hassle of having to wire new circuits or a transformer for converted AC to DC can be annoying.

PoE can also be an advantage in cases where power is not easily accessible or where additional wiring simply is not an option. Ethernet cables are often run in the ceiling, while power runs near the floor. Furthermore, PoE is protected from overload, short circuiting, and delivers power safely. No additional power supplies are necessary since the power is supplied centrally, and scaling the power delivery becomes a lot easier.

Devices Using PoE
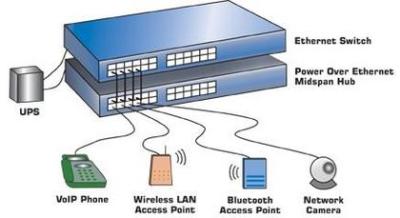
[via PowerOverEthernet.com]
VoIP phones are becoming increasingly prevalent as offices are opting to provide power for phones from a central supply rather than hosting smaller power supplies to supply separate phones. Smart cameras – or IP cameras – already use Ethernet to deliver video data, so using PoE simplifies the installation process. Wireless access points can be easily connected to Ethernet through a main router, which is more convenient than seeking out separate power supplies.


Other devices that use PoE include RFID readers, IPTV decoders, access control systems, and occasionally even wall clocks. If it already uses Ethernet, and it doesn’t draw too much power, it’s a good candidate for PoE.

On the supply side, given that the majority of devices that use PoE are in some form networking devices, it makes sense that the main device to provide power to a PoE system would be the Ethernet switch. Another option is to use a PoE injector, which works with non-PoE switches to ensure that the device is able to receive power from another source than the switch.

How it Works

Historically, PoE was implemented by simply hooking extra lines up to a DC power supply. Early power injectors did not provide any intelligent protocol, simply injecting power into a system. The most common method was to power a pair of wires not utilized by 100Base-TX Ethernet. This could easily destroy devices not designed to accept power, however. The IEEE 802.3 working group started their first official PoE project in 1999, titled the IEE 802.3af.
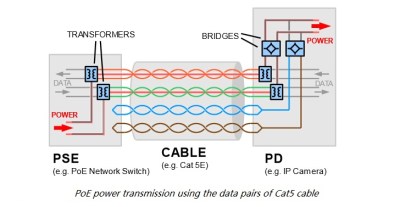
[via Fiber Optic Communication]
This standard delivered up to 13 W to a powered device, utilizing two of the four twisted pairs in Ethernet cabling. This was adequate power for VoIP phones, IP cameras, door access control units, and other devices. In 2009, the IEEE 802.3 working group released the second PoE standard, IEEE 802.3at. This added a power class that could deliver up to 25.5 W, allowing for pan and tilt cameras to use the technology.


While further standards haven’t been released, proprietary technologies have used the PoE term to describe their methods of power delivery. A new project from the IEEE 802.3 working group was the 2018 released IEEE 802.3bt standard that utilizes all four twisted pairs to deliver up to 71 W to a powered device.

But this power comes at a cost: Ethernet cables simply don’t have the conductive cross-section that power cables do, and resistive losses are higher. Because power loss in a cable is proportional to the squared current, PoE systems minimize the current by using higher voltages, from 40 V to 60 V, which is then converted down in the receiving device. Even so, PoE specs allow for 15% power loss in the cable itself. For instance, your 12 W remote device might draw 14 W at the wall, with the remaining 2 W heating up your crawlspace. The proposed 70 W IEEE 802.3bt standard can put as much as 30 W of heat into the wires.

The bigger problem is typically insufficient power. The 802.4af PoE standard maximum power output is below 15.4 W (13 W delivered), which is enough to provide power for most networking devices. For higher power consumption devices, such as network PTZ cameras, this isn’t the case.

Although maximum power supply is specified in the standards, having a supply that supplied more power is necessary will not affect the performance of the device. The device will draw as much current as necessary to operate, so there is no risk of overload, just hot wires.

So PoE isn’t without its tradeoffs. Nevertheless, there’s certainly a lot of advantages to accepting PoE for devices, and of course we welcome a world with fewer wires. It’s fantastic for routers, phones, and their friends. But when your power-hungry devices are keeping you warm at night, it’s probably time to plug them into the wall.
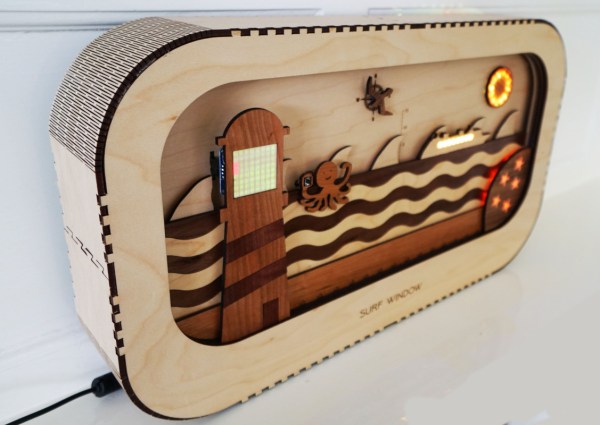

 

Hang Ten With Help From The Surf Window

Unless you live in a special, unique place like Hawaii or Costa Rica it’s unlikely you’ll be able to surf every day. It’s not easy to plan surf sessions or even surf trips to most locations because the weather conditions will need to be just right. Not only the wave height (swell) but also the wind speed and direction, tide, water and air temperature, and even amount and type of marine life present can all impact your surf session. You’ll want something which can easily tell you right away if conditions are good.

This project from [luke] is called the Surf Window shows the surf conditions at the local beach with just one glance. Made out of various pieces of wood, each part represents one of the weather conditions at the beach. A rotating seagull gives the wind direction, for example, and the wave height is represented by 3D, moving waves. All of the parts are connected with various motors and linkages to an Arduino Mega +WiFi R3 which grabs all of its information from Magicseaweed, a surf forecasting site.

The Surf Window can show the current conditions at virtually any surfable beach in the world, so if you really want to know how Jaws, Mavericks, or even Reef Road is breaking right now, you could use this to give you a more nuanced look. Don’t forget to take the correct board for the conditions!

Continue reading “Hang Ten With Help From The Surf Window”

The Blessings And Destruction Wrought By Lead Over Millennia

Everyone one of us is likely aware of what lead — as in the metal — is. Having a somewhat dull, metallic gray appearance, it occupies atomic number 82 in the periodic table and is among the most dense materials known to humankind. Lead’s low melting point and malleability even when at room temperature has made it a popular metal since humans first began to melt it out of ore in the Near East at around 7,000 BC in the Neolithic period.

Although lead’s toxicity to humans has been known since at least the 2nd century BC and was acknowledged as a public health hazard in the late 19th century, the use of lead skyrocketed in the first half of the 20th century. Lead saw use as a gasoline additive beginning in the 1920s, and the US didn’t abolish lead-based paint until 1978, nearly 70 years after France, Belgium and Austria banned it.

With the rise of consumer electronics, the use of lead-based solder became ever more a part of daily life during the second part of the 20th century, until an increase in regulations aimed at reducing lead in the environment. This came along with the World Health Organization’s fairly recent acknowledgment that there is truly no safe limit for lead in the human body.

In this article I’ll examine the question of why we are still using lead, and if we truly must, then how we can use this metal in the safest way possible.

Continue reading “The Blessings And Destruction Wrought By Lead Over Millennia”

Student-Built Rocket Engine Packs A Punch

A group of students at Boston University recently made a successful test of a powerful rocket engine intended for 100km suborbital flights. Known as the Iron Lotus (although made out of mild steel rather than iron), this test allowed them to perfect the timing and perfect their engine design (also posted to Reddit) which they hope will eventually make them the first collegiate group to send a rocket to space.

Unlike solid rocket fuel designs, this engine is powered by liquid fuel which comes with a ton of challenges to overcome. It is a pressure-fed engine design which involves a pressurized unreactive gas forcing the propellants, in this case isopropanol and N2O, into the combustion chamber. The team used this design to produce 2,553 lb*ft of thrust during this test, which seems to be enough to make this a class P rocket motor. For scale, the highest class in use by amateurs is class S. Their test used mild steel rather than stainless to keep the costs down, but they plan to use a more durable material in the final product.

The Boston University Rocket Propulsion Group is an interesting student organization to keep an eye on. By any stretch of the imagination they are well on their way to getting their rocket design to fly into space. Be sure to check out their other projects as well, and if you’re into amateur rocketry in general there are a lot of interesting things you can do even with class A motors.

Continue reading “Student-Built Rocket Engine Packs A Punch”

Retro Hardware Plots Again Thanks To Grbl And ESP32

When it comes to building a new CNC machine, you’ve got a wide world of controller boards to choose from. Whether you’re building a 3D-printer or a CNC plasma cutter, chances are good you’ll find a controller that fits your needs and your budget. Not so much, though, when you want to add CNC to a pen plotter from the early days of the PC revolution.

[Barton Dring] just posted the last installment of a five-part series in which he documented putting an Atari 1020 plotter under CNC control. The plotter was a peripheral for the Atari line of 6502 machines from the late 1970s; the guts of the little roll-fed, ballpoint-pen plotter appeared in Commodore, Tandy, and TI versions as well. [Bart]’s goal was to not add or modify anything to the mechanically simple device apart from the controller. That was easier said than done, given the unipolar stepper motors controlling the pen position and paper roll, and the fact that the pen lift mechanism uses a solenoid. Support for those had to be added to his Grbl_ESP32 firmware, as did dealing with the lack of homing switches in the plotter, and adapting the Grbl tool change command to the pen color change mechanism, which rotates the pen holder by bumping it into the right-hand carriage stop. The stock controller was replaced by a custom PCB that fits perfectly within the case, with plenty of room to spare. The video below shows it plotting out a vexillogically relevant sample.

From custom coasters to wooden nickels to complex string art, [Bart] has really put Grbl through the wringer. We really like this retro-redo, though, and fully support his stated desire to convert more old hardware to Grbl_ESP32.

Continue reading “Retro Hardware Plots Again Thanks To Grbl And ESP32”

LED Skirt Is Stealth By Day, Party By Night

Versatility is always a boon in any outfit. [Mikaela Holmes] wanted to create a skirt that could be unassuming by day, but be the life of the party when the lights go down. Her Day-To-Night Light Skirt achieves just that!

The build is one that should be achievable by anyone with basic dressmaking skills. White and lavender tutus are combined to form the base of the skirt, with a lace outer layer sewn on to create an attractive silhouette for the lights. A USB battery pack is hidden in a pocket in the back to power the show. A WS2812B LED strip is then attached to the skirt, and hidden behind an additional layer of white faux-fur to help diffuse the light.


A pre-programmed LED controller from Cool Neon is used to run the strip, meaning no microcontroller code is required. It also allows the skirt’s lighting effects to be controlled by remote. Such controllers can make getting a glowable project up and running more quickly, particularly for those with less experience in the microcontroller space. Plus, the project can always be upgraded with a fancier controller later. For the most part, the vast majority of glowable projects use similar flashing and fading animations anyway; there’s really no need to reinvent the wheel every time.

[Mikaela] does a great job of showing the necessary steps to produce a skirt that is both attractive and functional. We’ve seen other great projects in this space before, too – like this awesome fibre optic piece. If you’re sewing up your own impressive glowable fashions, be sure to let us know! Video after the break.

Continue reading “LED Skirt Is Stealth By Day, Party By Night”

Top Off A Dry Electrolytic

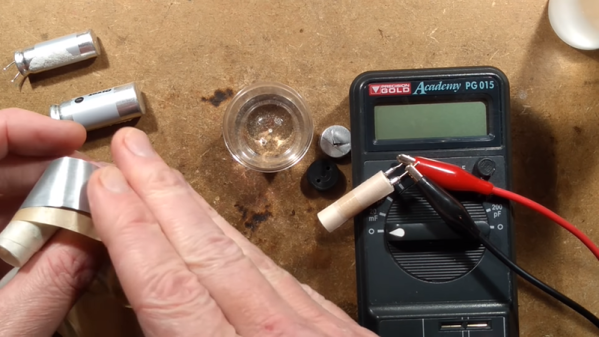
Making a capacitor is pretty easy. Just get two conductors close together. The bigger area you can get and the closer you can get them, the bigger the capacitor you can make. [BigClive] found some fake capacitors that were supposed to be very high value, but weren’t. Taking them apart revealed the capacitors didn’t have the electrolyte inside that gives these units both their name and their high values. What did he do? Mixed up some electrolyte and filled them back up to see what would happen. You can see the video below.

Electrolytic capacitors have a secret weapon to get the two electrodes as close as possible to each other. The electrolyte forms a very thin insulating layer on one electrode and the capacitance is between the conductive fluid and that electrode — not between the two electrodes. This allows for a very narrow gap between the conductors and explains why a small electrolytic can have a much greater capacitance than most other technologies in similar form factors.

Continue reading “Top Off A Dry Electrolytic”