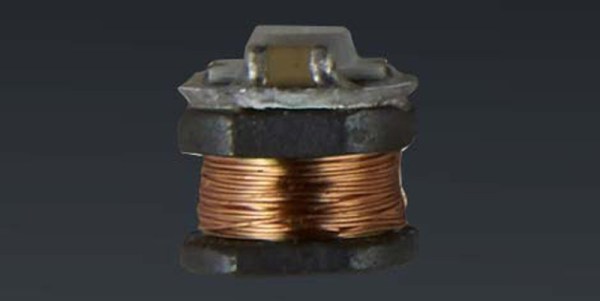
[Scotty] found these wireless LEDs in a display stand for model makers and gunpla. Because you don’t want to run wires, drill holes, and deal with fiber optics when illuminating plastic models, model companies have come up with wireless LEDs. Just glue them on, and they’ll blink. It requires a base station, but these are wireless LEDs.
After buying a few of these LEDs and sourcing a base station, [Scotty] found the LEDs were three components carefully soldered together: an inductor, two caps, and the LED itself. The base station is simply two coils and are effectively a wireless phone charger. Oh, some experimentation revealed that if you put one of these wireless LEDs on a wireless phone charger it’ll light up.
The next step is of course replication, so [Scotty] headed out to Akihabara and grabbed some wire, resistors, and LEDs. The wire was wrapped into a coil, a LED soldered on, and everything worked. This is by no means the first DIY wireless LED, as with so many technologies this too hit fashion first and you could buy press-on nails with embedded wireless LEDs for years now. Check out the video below.
Stop what you’re doing and get your ticket to the Hackaday Superconference. This is the ultimate hardware conference, November 15th, 16th, and 17th in Pasadena, California. It will sell out, especially the early bird tickets which are certain to be snapped up before the end of this day. (Edit: Early Bird tickets are already sold out, but you can still get the Early Bird price by submitting a talk).
Supercon is all about hardware creation. From prototypes and manufacturable designs, to one-off hardware art and products that have sold thousands, this is where you meet the people and hear the stories behind new and interesting feats of engineering. It’s a weekend filled with fascinating talks and mind-expanding workshops, but Supercon is so much more.
This is a Hacker Village where the greenest beginner and the grayest veteran sit shoulder to shoulder to solder, to code, to dream of the future, and to share stories of the past. We want you here, and you need to make it happen. Whether it’s professional development (yes! ask your boss to make this a business outing) or your hard-earned vacation, Supercon will recharge your batteries and top off your inspiration for the year to come.
Yes, I’m talking to you. Core to the mission of the Hackaday Superconference is to encourage more people to speak publicly about everything that goes into designing and manufacturing hardware. This means we want first time speakers just as much as we want seasoned presenters. You will be celebrated at Supercon; the ethos of this community is warm, welcoming, and thankful that you took the time to help everyone learn something interesting.
Don’t stop to ask yourself if you should… yes, we want to read your talk proposal. No topic is too big or too small for consideration. This is your chance to give back as a thank-you to so many people who have helped you gather your own skills over the years. We stand on the shoulders of giants, it’s your turn to be giant.
True Believer Tickets
We like to think of our Early Bird tickets as a nod to the true believers out there. We haven’t published the speakers, the workshops, or really anything else. That info will be public as everything comes together, but by then it may be too late to get a ticket. Right now all we can tell you for certain is that there will be a big celebration to name the grand prize winner of the 2019 Hackaday Prize, there will be a ton of badge hacking on a mind-blowing hardware badge being designed by Sprite_TM (Jeroen Domburg), you will have way too much fun and get far too little sleep, and tickets will sell out. In other words, this will be awesome.
Competitive soldering
Hackaday Prize winners
Opening ceremonies were packed tight!
Workshops in full swing
Badge hacking throughout the weekend
Standing room only as Ben Krasnow gives the last talk of the conference on Sunday
Need more convincing? You can watch the recap video from 2018, or dive into the weekend overview, badge-hacking, and competitive soldering roundups. I’ve never met anyone from the first four years of Supercon who regretted buying early bird tickets. I’ve met plenty of people who regretted missing out. Don’t miss out on year five of the movement. This is your community, there is truly something for everyone, and Pasadena is a beautiful place to be in the middle of November. See you at Supercon!
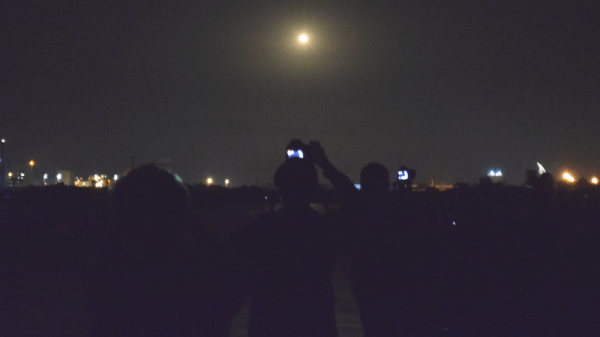
It’s true that I’m not known for keeping particularly regular hours, but even I had my doubts about this plan. We’d go to sleep around midnight, wake up at 3 AM, drive up the coast aimlessly, then turn around and attend a full-day event where we’d have to maintain at least some semblance of professionalism. It was a bad idea, terrible even. But there I was at 11:30 PM sitting in a Waffle House with Thomas, the Supplyframe videographer, getting dangerously close to signing off on it.
Officially we were there to cover the Cornell Cup Finals being held at Kennedy Space Center, but as it so happens, our arrival in Florida perfectly coincided with the launch of CRS-17, SpaceX’s latest International Space Station resupply mission. Technically this was not part of our assignment. But really, what choice did we have?
Even if our respective bosses didn’t see it as a wasted opportunity, we had to consider the locals. In the few hours we’d been here, it seemed the launch was all anyone wanted to talk about. Everyone from the airport shuttle driver to the waitress who brought us our hash browns reminded us a rocket would be lifting off soon. If we didn’t go, then come Friday afternoon we’d be the only people in Cape Canaveral who didn’t have a personal account of the event. By all indications, an unforgivable cultural faux pas in central Florida.
Of course, the truth of the matter is that we didn’t actually need any convincing to go on this adventure. We had the supreme good fortune of finding ourselves in the vicinity of Kennedy Space Center a few hours before they were going to send a rocket thundering off into the black, and there was no way we could just sleep through it. No, there was never any choice in the matter. We were going.
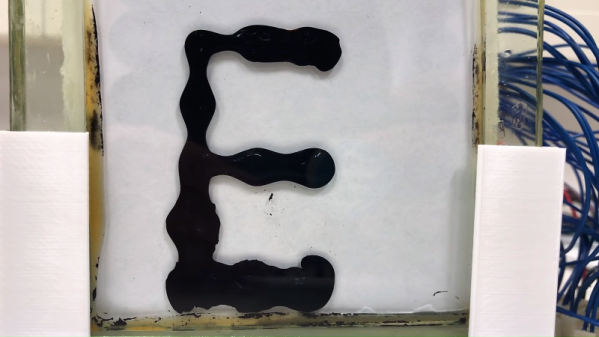
When deadlines loom and your future is on the line, do what top college students through the ages have always done: procrastinate! [Simen] and [Amund] did that in grand style by starting a YouTube channel, delightfully and aptly named “Applied Procrastination”, wherein they plan to avoid their responsibilities as long as possible in favor of making a large-scale ferrofluidic display panel. (Video, embedded below.)
We suppose we should encourage them to hit the books, but honestly they look like they’re having much more fun and learning more than they would in class. The idea isn’t new; we’ve seen ferrofluid clocks before, after all. [Amund] and [Simen] have grander plans for their display, but they’re wisely starting small with basic experiments. They had an early great idea to use a double-pane window as a tank for their display, but coatings on the inside of the glass and the aluminum frame conspired to cloud the display. They also did some tests to make sure they can control 252 electromagnets safely. They did manage to get a small test display working, but really the bulk of the video is just them playing with magnets and ferrofluid. And again, we’re OK with that.
It looks like this is going to be an interesting project, with hopefully regular updates to the channel now that summer break is upon us. Unless they find something else to do, of course.
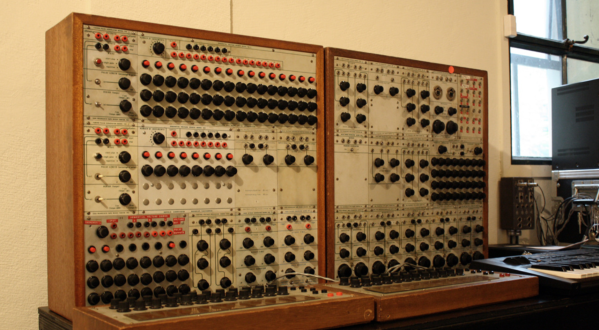
[Eliot Curtis] found himself a little too close to 1960’s counterculture while restoring a vintage modular synthesizer — he began tripping out on acid. The instrument in question is a Buchla Model 100. The Buchla is a modular synth. Instead of a keyboard, it used capacitance-sensitive touch plates. This particular model 100 was purchased by California State University East Bay Campus. The synth was popular for a while, but eventually fell into disuse, and was stored in a classroom closet.
Modular synths are experiencing a renaissance, as can be seen right here on Hackaday. The Buchla was pulled out of storage and given a proper restoration. [Eliot Curtis] is the Broadcast Operations Manager at KPIX 5, the San Francisco CBS TV station. He also is the hacker who volunteered to restore the Buchla.
During the restoration, [Curtis] found residue and crystals stuck under one of the knobs of the Control Voltage Processing Module. Was it flux, conformal coating, or something else? [Eliot] hit the board with contact cleaner and wiped it down. Within 45 minutes, he was feeling a strange tingling. It was the beginning of a nine-hour LSD trip. Three independent tests on the module came back positive for LSD.
Lysergic acid diethylamide (LSD for short) can be readily absorbed through the skin, which is exactly what happened to [Eliot]. Synth designer [Don Buchla] was friends with [Owsley Stanley], who worked for the Grateful Dead and allegedly cooked up some very potent LSD. Some of Buchla’s modules even found their way into Ken Keesey’s hands, where they wound up on his famous bus “further”. As it turns out there were rumors that modules had been dipped in LSD back in the ’60s. Why someone would do that to an electronic module, we’re not sure — they must have been on drugs. [Eliot] recovered from his brush with the ’60s and continued with the restoration with gloves on.
If there is a moral here, it should be to take precautions when working on equipment which might contain dangerous substances. We’ve learned this lesson ourselves cracking open broken laptops. You might find anything from coffee to soda, to pet urine or worse. A box of nitrile gloves definitely should be standard equipment in any hacker’s lab.
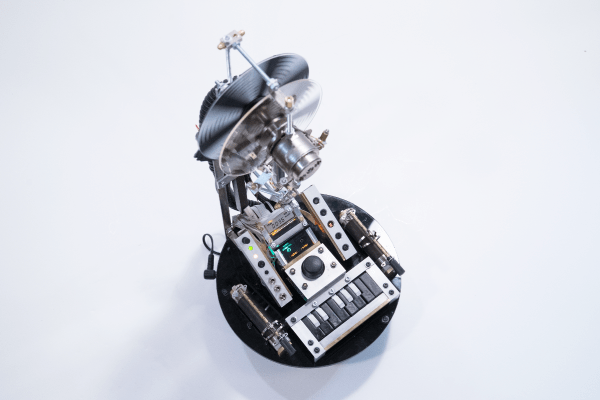
CDs were a great advancement in audio quality when they were first put on the market. There’s no vinyl-style degradation of the medium if it’s played over and over, and there’s no risk of turning them into a giant pile of ribbon while rewinding like a cassette tape. The one downside was that if you were to take them on the move you needed special hardware and software to prevent the inevitable skipping. If you look at the skipping not as a downside, though, but as a way to produce interesting music, you might end up with a pretty unique piece of hardware.
[Dmitry] is known for his interesting art installations, and the latest one uses parts from three 1988 Sony D2 CD players that have been reassembled in order to take advantage of a skipping and glitching CD. The modified equipment is able to play during pause or rewind thanks to a processor modification, and can also change the rotational speed of the disc. There are other pieces of hardware included for more fine control of glitching and skipping of the audio being read off of the CD.
The new device functions as a working musical instrument, although [Dmitry] says that it is more useful for deconstructing the information stored on the disc, and exploring the medium itself. Of course if you have enough motivation, you can find sounds from almost anywhere on (or in) the planet too.
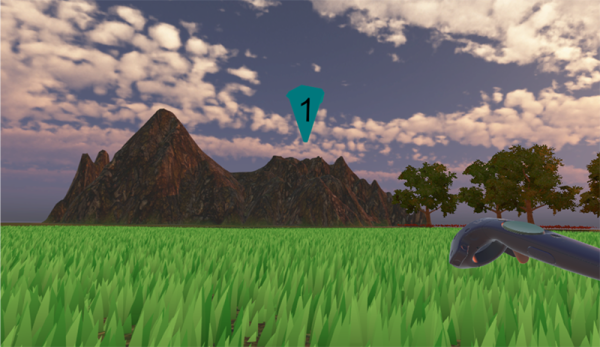
You may think of Alzheimer’s as a disease of the elderly, but the truth is people who suffer from it have had it for years — sometimes decades — before they notice. Early detection can help doctors minimize the impact the condition has on your brain, so there’s starting to be an emphasis on testing middle-aged adults for the earliest signs of the illness. It turns out that one of the first noticeable symptoms is a decline in your ability to navigate. [Dennis Chan] at Cambridge Biomedical Research Centre and his team are now using virtual reality to determine how well people can navigate as a way to assess Alzheimer’s earlier than is possible with other techniques.
Current tests mostly measure your ability to remember things, but by the time that’s a problem, things have often progressed. The test has the subject walk to different cones and remember their locations, and has already proven more effective than the standard test.