What Are Those Hieroglyphics On Your Laptop Charger?

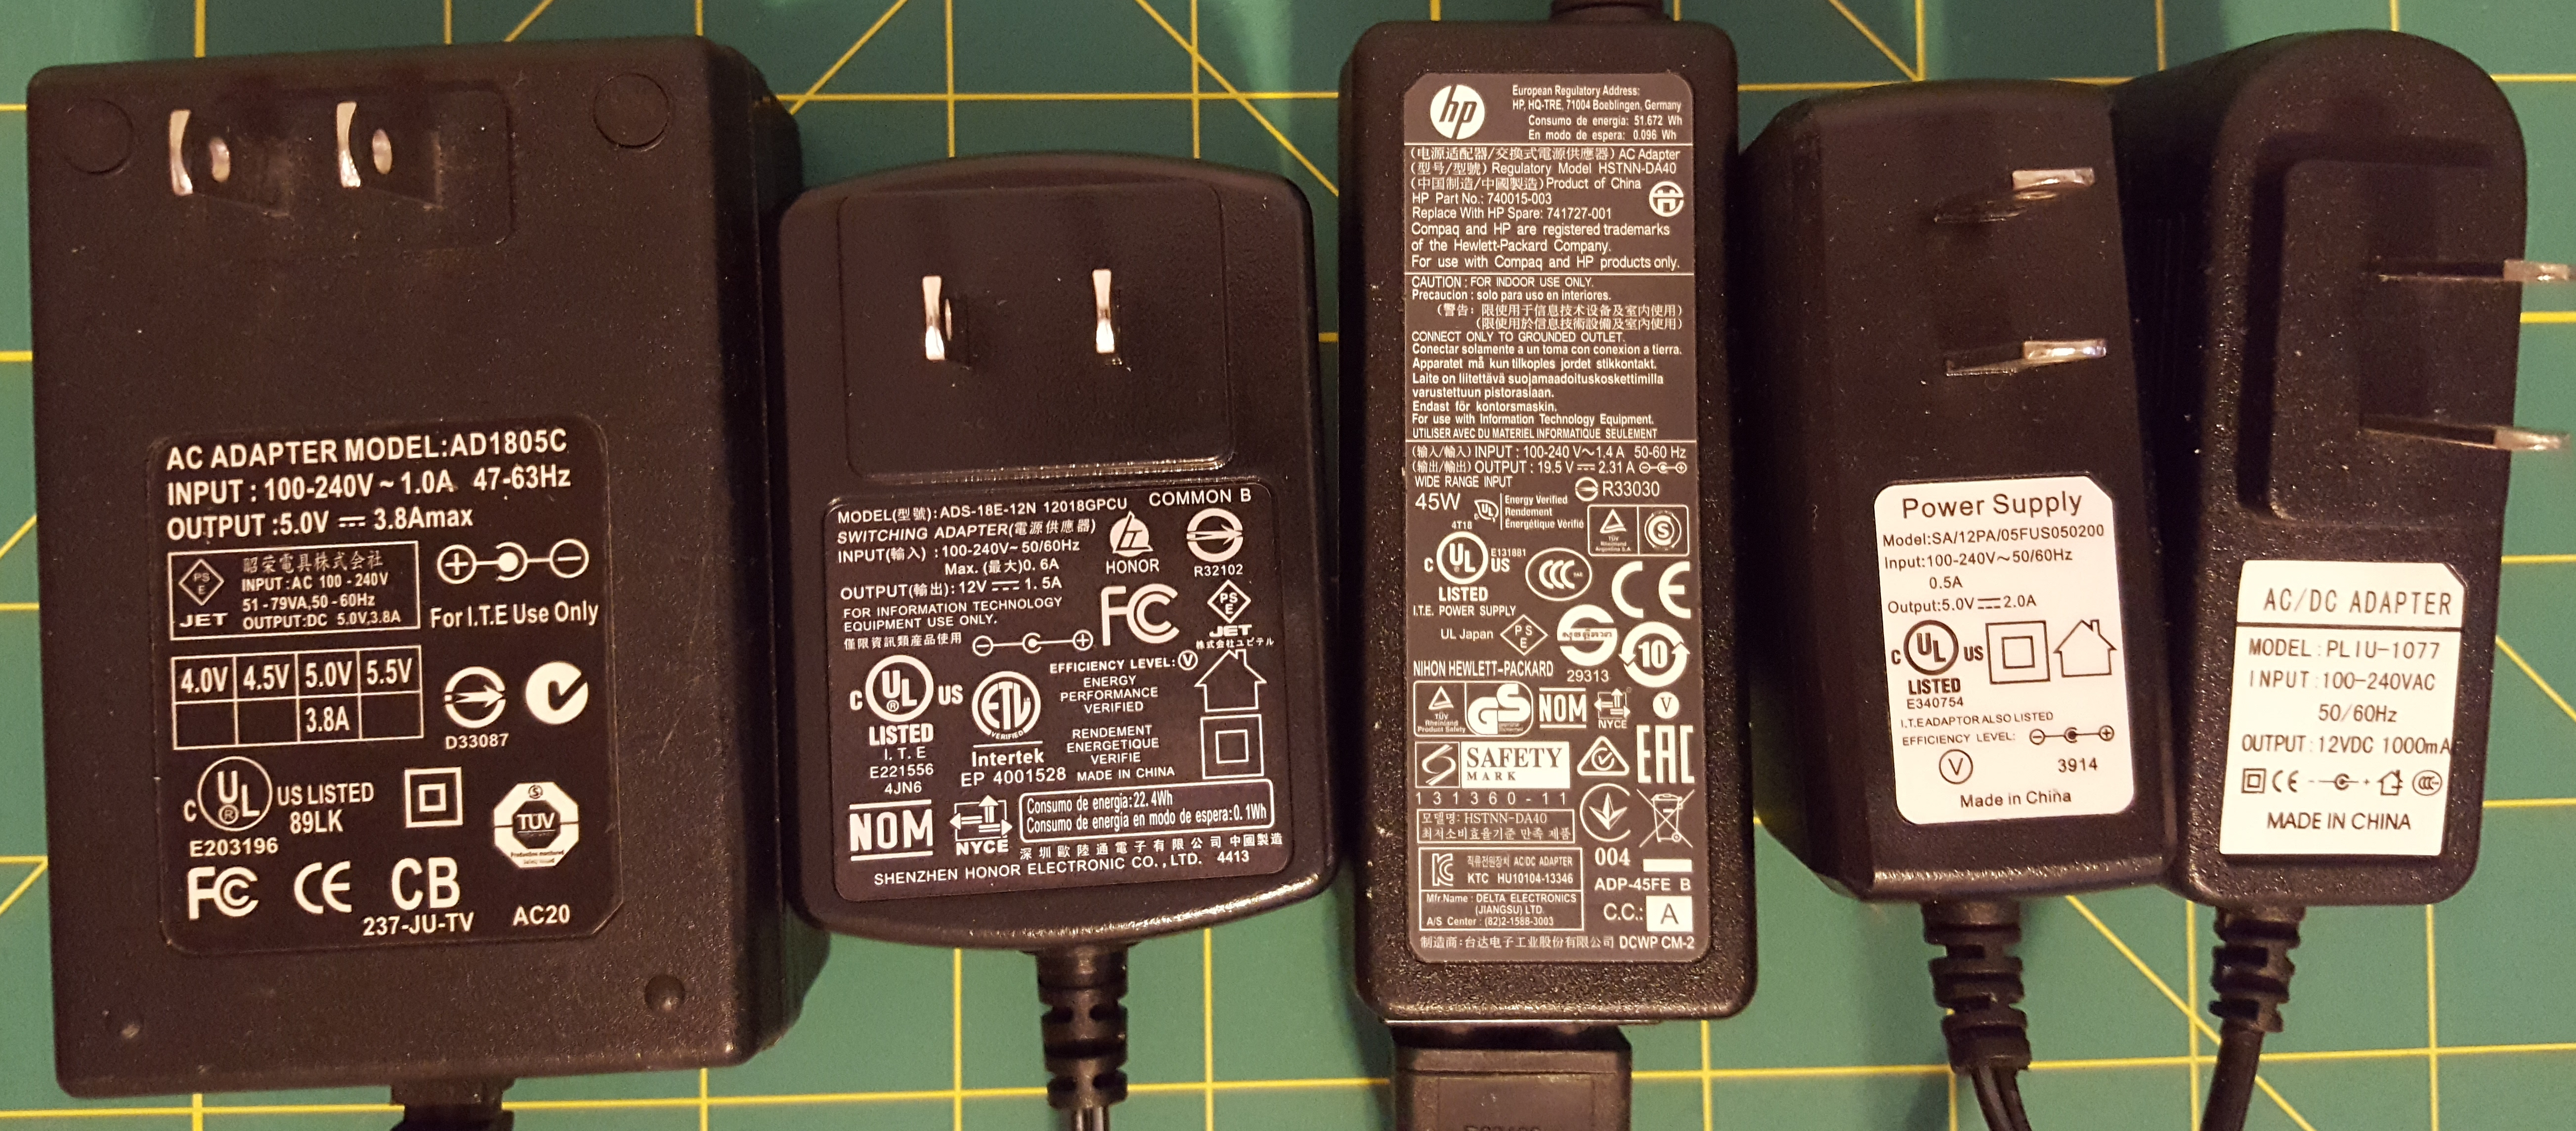
Look on the back of your laptop charger and you’ll find a mess of symbols and numbers. We’d bet you’ve looked at them before and gleaned little or no understanding from what they’re telling you.

These symbols are as complicated as the label on the tag of your shirt that have never taught you anything about doing laundry. They’re the marks of standardization and bureaucracy, and dozens of countries basking in the glow of money made from issuing certificates.

The switching power supply is the foundation of many household electronics — obviously not just laptops — and thus they’re a necessity worldwide. If you can make a power supply that’s certified in most countries, your market is enormous and you only have to make a single device, possibly with an interchangeable AC cord for different plug types. And of course, symbols that have meaning in just about any jurisdiction.

In short, these symbols tell you everything important about your power supply. Here’s what they mean.

Continue reading “What Are Those Hieroglyphics On Your Laptop Charger?”

Flexiphone Rises From The Ashes Of Broken Instruments

The mechanics of an old Rhodes Piano, and a set of chromatic saucer bells rescued from a reed organ. What do these two things have to do with each other? If you’re [Measured Workshop], they are the makings of a new instrument. The Flexiphone is a transposable instrument with a piano keyboard and interchangeable sound source.

The Rhodes is a great stage instrument. Unlike a piano with strings, it uses tines mounted above the key mechanism. It is also relatively compact for an analog instrument. This made it perfect as a donor for the Flexiphone’s keyboard. [Measured Workshop] cut they mechanism down to 30 keys, just under 2 octaves. The key mechanism was also cleaned up and restored with new felt.

The sounding portion of the Flexiphone is a set of chromatic saucer bells. The bells are mounted on a felt covered threaded rod, which itself sits in a wood frame. The bell frame sits on top of the base in one of three slots. Each slot is a halftone transposed from the last. Simply moving the bells allows the player to transpose the entire instrument. The bells and their rod frame can also be completely removed and replaced with any other sound source.

The Flexiphone sounds great — sometimes. As [Measured Workshop] says, bells contain many harmonics. playing single or double notes sounds rather sweet, but chords can sometimes become a shrill assault on the ears. Still, it’s an awesome hack with plenty of potential for future mods.

Continue reading “Flexiphone Rises From The Ashes Of Broken Instruments”

Keeping Magnetized Marbles From Stopping The Music

Take a couple of thousand steel balls, add a large wooden gear with neodymium magnets embedded in it, and what do you get? Either the beginnings of a wonderful kinetic music machine, or a mess of balls all stuck together and clogging up the works.

The latter was the case for [Martin], and he needed to find a way to demagnetize steel balls in a continuous process if his “Marble Machine X” were to see the light of day. You may recall [Martin] as a member of the band Wintergatan and the inventor of the original Marble Machine, a remarkable one-man band that makes music by dropping steel balls on various instruments. As fabulous a contraption as the original Marble Machine was, it was strictly a studio instrument, too fragile for touring.

Marble Machine X is a complete reimagining of the original, intended to be robust enough to go on a world tour. [Martin] completely redesigned the lift mechanism, using magnets to grip the balls from the return bin and feed them up to a complicated divider. But during the lift, the balls became magnetized enough to stick together and no longer roll into the divider. The video below shows [Martin]’s solution: a degausser using magnets of alternating polarity spinning slowly under the sticky marbles. As a side note, it’s interesting and entertaining to watch a musician procrastinate while debugging a mechanical problem.

We can’t wait to see Marble Machine X in action, but until it’s done we’ll just settle for [Martin]’s other musical hacks, like his paper-tape programmed music box or this mashup of a synthesizer and a violin.

Continue reading “Keeping Magnetized Marbles From Stopping The Music”

A Grandfather Clock BarBot

As the saying goes, it’s five o’clock somewhere; when the clock finally strikes the hour, that same clock can pour you a drink thanks to redditor [Diggedypomme].

This bar-clock can dispense beverages with up to four different spirits and four mixers, and takes orders over voice, keyboard, or web-controls. A belt-driven drink loading platform pushes out through a spring-loaded door and once the vessel is in place and the order received, peristaltic pumps dispense the spirits while servos open taps for the mixers — a far easier method to administer the often carbonated liquids. A Raspberry Pi acts as this old-timer’s brain, an Arduino controls the lights, and a HAT to controls the servos. Here’s a more in-depth tour of what’s going on behind the bar, but check out the video after the break for a full run through of a few drink orders!

Continue reading “A Grandfather Clock BarBot”

Three Wires = One Motor

Here’s a quick build to show off fundamentals of electric current to new makers — or a cool party trick that might earn you a buck. [Jay] from the [Plasma Channel] shows off how you can make a simple motor with only three pieces of enameled wire in under five minutes.

Start with a roll of 26-guage — or thicker — magnet wire, and a pair of scissors or knife. For the base, wrap fifteen to twenty turns of wire around any spherical object about one and a half inches in diameter, leaving a few inches extra on both ends. Wrap those ends around your coil a few tines to secure it and straighten out the excess length — one will act as a support and the other will connect to your power source. Another piece of wire — similarly wrapped around the base coil — acts as the other support and the other terminal. Scrape off the wire coating from one side on both support wires and curl them into small loops. Halfway done!

Continue reading “Three Wires = One Motor”

HandHolo: A Homebrew ARG

Taking a dive into VR or augmented reality — once, dreamed-of science fiction — is not only possible for the average consumer, but crafting those experiences is as well! Hackaday.io user [kvtoet]’s HandHolo is a homebrew method to cut your teeth on peeking into a virtual world.

This project requires a smartphone running Android Oreo as its backbone, a Bluetooth mouse, a piece of cardboard and a small mirror or highly reflective surface. The phone is slotted into the cardboard housing — prototype with what you have! — above the mouse, and the mirror angled opposite the screen reflects the image back to the user as they explore the virtual scene.

Within Unity, [kvtoet]’s used a few scripts that access phone functions — namely the gyroscope, which is synchronised to the mouse’s movements. That movement is translated into exploration of the virtual space built in Unity and projected onto the portal-like mirror. Check it out!

Continue reading “HandHolo: A Homebrew ARG”

Repairs You Can Print: Fixing A Chewed Up Remote

What is it about remote controls? They’re like some vortex of household chaos, burrowing into couch cushions while accusations fly about who used it last. Or they land in just the right spot on the floor to be stepped on during a trip to the bathroom. And don’t get us started about the fragility of their battery case covers; it’s a rare remote in a house with kids whose batteries aren’t held in by strips of packing tape.

But [Alex Rich]’s Bose radio remote discovered another failure mode: imitating a dog chew toy. Rather than fork out $90 for a replacement, [Alex] undertook a 3D-printed case to repair the chewed remote. He put an impressive amount of reverse engineering into the replacement case, probably expending much more than $90 worth of effort. But it’s the principle of the thing, plus he wanted to support some special modifications to the stock remote. One was a hardware power switch to disconnect the batteries entirely, hidden in the bottom shell of the case. The second was the addition of a link to his thermostat to adjust the volume automatically when the AC comes on. That required a Trinket inside the remote and a few mods to make room for it.

Yes, this project dates from a few years back, but [Alex] only just brought it to our attention for the Repairs You Can Print contest. Got some special unobtanium part that you were able to print to get out of a jam? Enter and win prizes to add to the glory of fixing something yourself.