There’s nothing like a true hack, where something useful is concocted from bits of scrap and bargain store finds. Builds like these are much more than the sum of their parts, especially when they result in a useful tool, like this DIY vacuum chamber that’s good for all sorts of jobs.
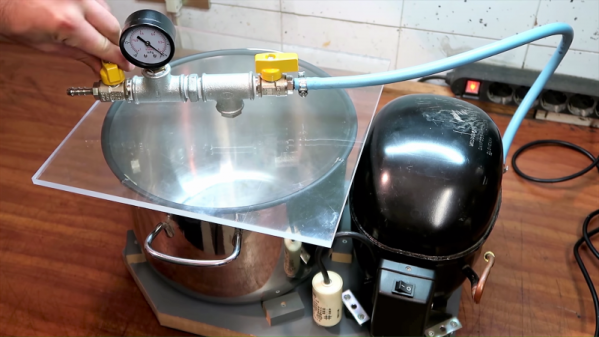
Everything [Black Beard Projects] used to accomplish this build is readily available almost everywhere in the world, although we have to note that appliance recycling efforts and refrigerant recovery programs have made it somewhat harder to lay hands on things like the old fridge compressor used here. The big steel cooking pot is an easy thrift store find, though, and while [Black Beard] used high-quality stainless fittings and valves to plumb the chamber, pretty much any cheap fittings will do.
The one sketchy area of the build is the plexiglass sheet used for the chamber top, which seems a little on the thin side to us. You can see it flexing in the video below as vacuum is pulled; it survived, but we can see it failing catastrophically at some point. We stand ready to be reassured in the comments. Still, it’s a tidy build with a few nice details, like wiring a switch into the old start capacitor box and using car door edge protector as a gasket on the chamber.
Fridge compressor hacks are standard fare, of course, being used to make everything from air compressors to two-stroke engines. Sometimes they’re even used to keep things cool too.
Continue reading “Hacked Vacuum Chamber Won’t Suck A Hole In Your Budget” →