Winners Of The Take Flight With Feather Contest

It’s hard to beat the fidelity and durability of printed text on paper. But the e-paper display gets pretty close, and if you couple it will great design and dependable features, you might just prefer an e-reader over a bookshelf full of paperbacks. What if the deal is sweetened by making it Open Hardware? The Open Book Project rises to that challenge and has just been named the winner of the Take Flight with Feather contest.

This e-reader will now find its way into the wild, with a small manufacturing run to be put into stock by Digi-Key who sponsored this contest. Let’s take a closer look at the Open Book, as well as the five other top entries.

Continue reading “Winners Of The Take Flight With Feather Contest”

Parallel Pis For Production Programming; Cutting Minutes And Dollars Off Of Assembly

Assembly lines for electronics products are complicated beasts, often composed of many custom tools and fixtures. Typically a microcontroller must be programmed with firmware, and the circuit board tested before assembly into the enclosure, followed by functional testing afterwards before putting it in a box. These test platforms can be very expensive, easily into the tens of thousands of dollars. Instead, this project uses a set of 12 Raspberry Pi Zero Ws in parallel to program, test, and configure up to 12 units at once before moving on to the next stage in assembly.

Continue reading “Parallel Pis For Production Programming; Cutting Minutes And Dollars Off Of Assembly”

“The Thing”: A Homemade FPGA Board

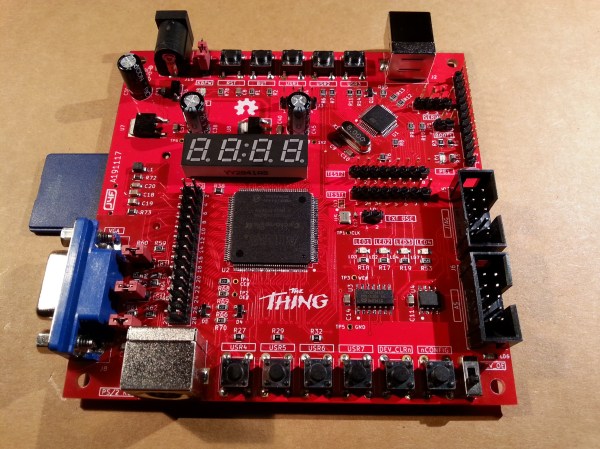
The Thing is an unassuming name for an ambitious project to build an FPGA board from easy to find components.

The project stems from an earlier build submitted to the 2018 Hackaday Prize by [Just4Fun] where two dev boards – an STM32-based Arduino and an Altera MAX II CPLD board – were combined with the Arduino used as a stimulus generator for the CPLD. This way, the Arduino IDE, interfaced through USB, can be used for programming the CPLD.

The Thing similarly uses the STM32 Arduino as a companion processor for the FPGA, with a 512KB SRAM and common I/O for GPIOs and a PS/2 keyboard for running HDL SOCs. It can also run Multicomp VHDL SOCs, a modular design that was made to run some older 8-bit CPUs made by [Grant Searle].

The FPGA (EP2C5T144C8N) uses the Quartus II IDE for configuration with a USB Blaster dongle through the JTAG or AS connector. The FPGA side controls a 4 digit seven segment LED display, four push buttons, 3 LEDs, a push button to clear all internal FFs (sampling rates), a push button to force a reboot (configuration reload), and a switch to force all pins to Hi-Z mode. Both an onboard 50MHz oscillator and connector for an external oscillator are also present on the FPGA side.

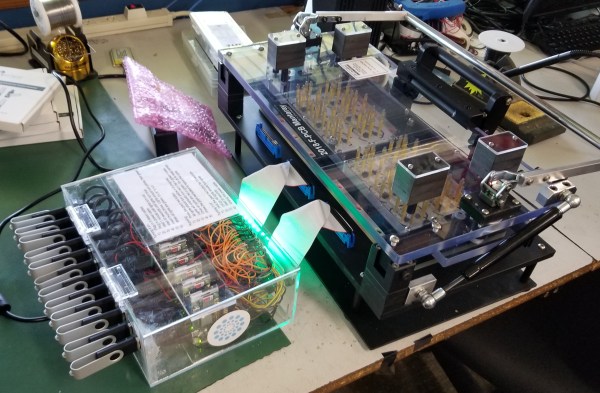
In one demo of the MP/M system capability of the board, The Thing was made to handle four concurrent users with one serial port connector to a PC and terminal emulator and the other serial ports connected to terminal emulators on VT100 boards routed through a dual-channel RS232 adapter board.

Both the Arduino and FPGA sides can also be used as standalone boards, but why use one when you can harness both boards together?

Continue reading ““The Thing”: A Homemade FPGA Board”

X-Ray Vision For FPGAs: Using Verifla

Last time I talked about how I took the open source Verifla logic analyzer and modified it to have some extra features. As promised, this time I want to show it in action, so you can incorporate it into your own designs. The original code didn’t actually capture your data. Instead, it created a Verilog simulation that would produce identical outputs to your FPGA. If you were trying to do some black box simulation, that probably makes sense. I just wanted to view data, so I created a simple C program that generates a VCD file you can read with common tools like gtkwave. It is all on GitHub along with the original files, even though some of those are not updated to match the new code (notably, the PDF document and the examples).

If you have enough pins, of course, you can use an external logic analyzer. If you have enough free space on the FPGA, you could put something like SUMP or SUMP2 in your design which would be very flexible. However, since these analyzers are made to be configurable from the host computer, they probably have a lot of circuitry that will compete with yours for FPGA space. You configure Verifla at compile time which is not as convenient but lets it have a smaller footprint.

Continue reading “X-Ray Vision For FPGAs: Using Verifla”

Easy GUI Front Ends For Arduino, Rasberry Pi, And More With MyOpenLab

If you want to integrate a nice graphical interface with a microcontroller or single-board computer for a useful piece of custom equipment, how will you go about it? MyOpenLab is a platform that makes it easy to design virtual interfaces your electronic builds. If you want controls and readouts for Arduino, Raspberry Pi, Android, or anything with a serial port, this is worth a try.

MyOpenLab reminds me of LabView. Not so much modern LabView with all of its add-ons and extras, but LabView back when it did just a few things but did them really well. The open source MyOpenLab project has been around for a while. The website and documentation are not in English, which may have kept some people from giving it a try, but the software itself is available in German, English, and Spanish. I took the plunge and found the language barrier didn’t cause me trouble.

As an example of what you can do, image you want to build a custom bench tool. You build virtual device (they call it a “VirtualMachine”) that uses your computer as the control panel and readout, and your electronic project as the physical interface. In myOpenLab your device will consist of two parts: a diagram and a front panel. Some things only live on the diagram, like a timer or a connection to an Arduino. But some things live on both like switches, LEDs, graphs, and so on. You can connect all the little boxes together to build up applications. They can stand alone, but the power comes in being able to connect to an Arduino or Raspberry Pi (or a few other options) for I/O.

Continue reading “Easy GUI Front Ends For Arduino, Rasberry Pi, And More With MyOpenLab”

Linux Adds CH341 GPIO

There was a time when USB to serial hardware meant one company: FTDI. But today there are quite a few to choose from and one of the most common ones is the WCH CH341. There’s been support for these chips in Linux for a while, but only for use as a communication port. The device actually has RS232, I2C, SPI, and 8 general purpose I/O (GPIO) pins. [ZooBaB] took an out-of-tree driver that exposes the GPIO, and got it working with some frightening-looking CH341 boards.

He had to make a slight mod to the driver to get six GPIOs in /sys/class/gpio. Once there though, it is easy to manipulate the pins using a shell script or anything that can write to the virtual files corresponding to the GPIO pins.

Continue reading “Linux Adds CH341 GPIO”

A Converter You Won’t Have: PS/2 Mouse To Serial Mouse

When did you last buy a mouse? Did it have a little adapter in the box? There was a time when if you bought a USB mouse, in the box was also an adapter to allow it to be used with the older PS/2 interface. And if you were to go back a few more years into the past, you’d have found when you bought a mouse with a PS/2 connector fitted, it may well have come with an adapter for a 9-pin RS232 serial port. Those mice from a decade or more ago would have contained the software to recognise the interface into which they were plugged, and emulate it accordingly. It is unlikely then that you could take a modern USB-only device and an unholy chain of USB-to-PS/2-to-serial adapters, and have it work as a serial mouse. Want to run Windows 3.1 on a 386DX? You need a serial mouse.

Happily, [matze525] has come along with a solution for those of you with a need to drive an ancient PC with a serial mouse. He’s created a PS/2 to RS232 mouse converter, and it takes the form of a little PCB with an AT90S2313P microcontroller to do the translation and an RS232 level converter chip.

It might sound like a rather unexpected device to produce, but we can see it fills an important niche. In the early 1990s mice were not the reliable optical devices we have today, instead they had nasty mechanical connections inside, or if you were extremely lucky, optical encoder wheels. The supply of still-reliable RS232 mice must therefore be dwindling, and if you have a Windows 3.1 PC to keep alive then we can see the ability to use a more modern pointing device has a lot going for it.

If you have one of those machines from that era that came with proprietary interfaces, maybe you can make use of a USB to quadrature converter.