Retrotechtacular: Office Equipment From The 1940s

If you can’t imagine writing a letter on a typewriter and putting it in a mailbox, then you take computers for granted. But that’s just the tip of the iceberg. More niche applications begat niche machines, and a number of them are on display in this film that the Computer History Archives Project released last month. Aside from the File-o-matic Desk, the Addressograph, or the Sound Scriber, there a number of other devices that give us a peek into a bygone era.

One machine that’s still around, although in a much computerized form, is the stenograph. Not so popular these days is the convenient stenograph carrier, allowing a patient’s statement to be recorded bedside in the hospital immediately after a car accident. Wire recorders were all the rage in 1947, as were floppy disks (for audio, not data). Both media were used to time-shift dictation. Typing champions like Stella Pajunas could transcribe your letters and memos at 140 WPM using an electric typewriter, outpacing dot matrix printers but a snail’s pace compared to a laser jet.

Continue reading “Retrotechtacular: Office Equipment From The 1940s”

wifi scanner

Visualizing WiFi With A Converted 3D Printer

We all know we live in a soup of electromagnetic radiation, everything from AM radio broadcasts to cosmic rays. Some of it is useful, some is a nuisance, but all of it is invisible. We know it’s there, but we have no idea what the fields look like. Unless you put something like this 3D WiFi field strength visualizer to work, of course.

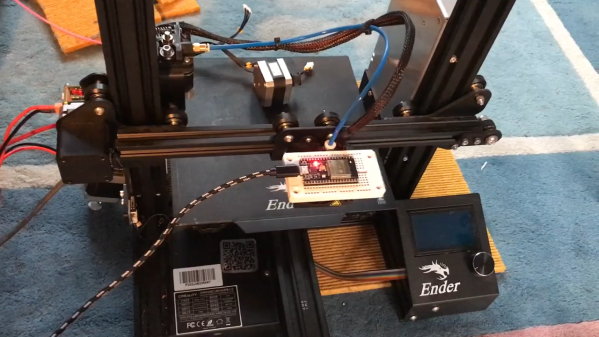
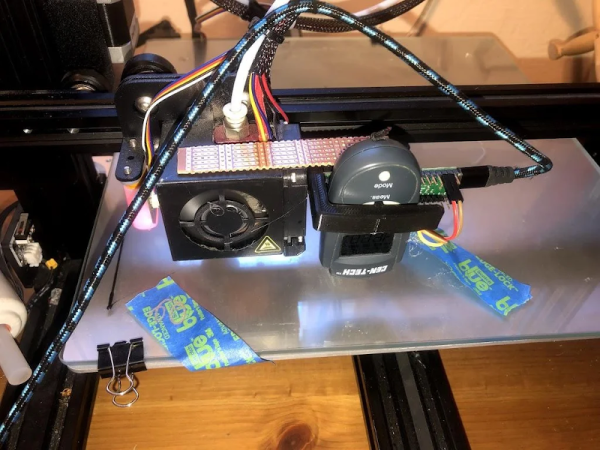
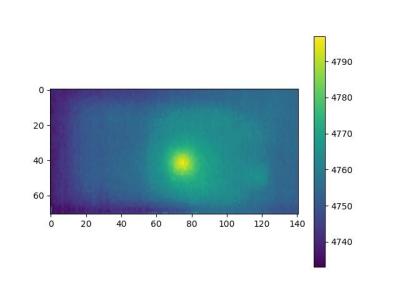
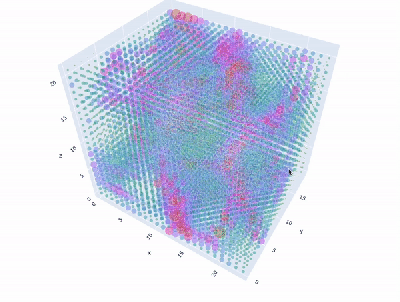
Granted, based as it is on the gantry of an old 3D printer, [Neumi]’s WiFi scanner has a somewhat limited work envelope. A NodeMCU ESP32 module rides where the printer’s extruder normally resides, and scans through a series of points one centimeter apart. A received signal strength indicator (RSSI) reading is taken from the NodeMCU’s WiFi at each point, and the position and RSSI data for each point are saved to a CSV file. A couple of Python programs then digest the raw data to produce both 2D and 3D scans. The 3D scans are the most revealing — you can actually see a 12.5-cm spacing of signal strength, which corresponds to the wavelength of 2.4-GHz WiFi. The video below shows the data capture process and some of the visualizations.

While it’s still pretty cool at this scale, we’d love to see this scaled up. [Neumi] has already done a large-scale 3D visualization project, using ultrasound rather than radio waves, so he’s had some experience in this area. But perhaps a cable bot or something similar would work for a room-sized experiment. A nice touch would be using an SDR dongle to collect signal strength data, too — it would allow you to look at different parts of the spectrum.

Continue reading “Visualizing WiFi With A Converted 3D Printer”

This beaded QR code tells a story when scanned.

Beaded QR Code Bracelets Weave A Storytelling Interface

For centuries, people have been using patterns to communicate information in an eye-catching way. QR codes are no different, although they require a barcode scanner to decode rather than a knowledge of Navajo Native American history.

November is National Native American Heritage Month, and as part of their celebration, [ngaskins] and their students are making seed bead bracelets with QR codes. When scanned, each QR triggers a story written by the student in the form of an audio file, a video clip, or an animation. [ngaskins] says that this project was inspired by eyeDazzler, a beadwork tapestry made with software that generates Navajo weaving patterns.

The students started by designing their bracelets on graph paper, software, or a virtual loom before getting the seed beads and the tweezers out, and decided whether they would use a static or dynamic QR code. Aside from the aesthetics of beadwork, the bead loom is good for teaching math and computational ideas because the beads are laid out in rows and columns. It’s also a good tool for teaching lines of symmetry.

QR codes can hold quite a bit of information. In fact, there’s enough room in a version 40 QR for an executable version of Snake.

Building A Bicycle Dash Cam With Advanced Capabilites

Riding a bicycle is a wonderful and healthy way to get around. However, just like with any other vehicle on the road, it can be useful to have a camera to record what goes on in traffic. [Richard Audette] built just such a rig.

The original setup relies on a Raspberry Pi 3, which takes a photo every 10 seconds using the attached Pi Camera. It then processes these photos using OpenALPR, which is a piece of software for reading licence plates. Licence plates detected while cycling can be stored on the Raspberry Pi for later, something which could be useful in the event of an accident.

However, [Richard] has developed the concept further since then. The revised dashcam adds blind spot detection for added safety, and uses a Luxonis OAK-D camera which provides stereo depth data and has AI acceleration onboard. It’s paired with a laptop carried in a backpack instead of a Raspberry Pi, and can stream video to a smartphone sitting on the handlebars as a sort of rear-view mirror.

Anyone who has commuted on a bicycle will instantly see the value in work like [Richard]’s. Just avoiding one accident from a car coming from behind would be of huge value, and we’re almost surprised we don’t see more bicycle rear view kits in the wild.

Alternatively, if you just want to scan your surroundings as you ride, consider building a landscape scanner instead. Video after the break.

Continue reading “Building A Bicycle Dash Cam With Advanced Capabilites”

3D Printed Adapter Puts Slides In Their Best Light

If you’ve got old family photos on slides there’s an excellent chance you’ve considered digitizing them at one point or another, but perhaps didn’t know the best way of going about it. In that case, this 3D printed adapter designed by [Rostislav Persion] that lets you photograph slides with a standard DSLR may be exactly what you were waiting for.

The idea is simple enough, you place the slide inside the adapter, get your focus right, and snap a picture. But of course, you’ve also got to provide some illumination. In this case, the camera is mounted on a tripod and pointed at an appropriate light source. Once you’ve experimented a bit and got the image backlit the way you want it, you can lock everything in place and easily power through a stack of vintage family memories in no time.

For such a straightforward concept, we really appreciate the little details in the execution. For example, rather than just sliding a 3D printed cylinder over the DSLR’s lens, [Rostislav] came up with a foam-padded “shim” that’s strong enough to hold the adapter on without marring anything. The two-part slide spacer that features a bit of springiness to hold everything tight is also a very nice touch.

An approach like this should work nicely for the amount of slides most families are likely to have, but if you’re in a position where you need to digitize thousands of images, some automation would certainly help things along.

World’s Cheapest And Possibly Worst IR Camera

Don’t blame us for the title. [CCrome] admits it may well be the cheapest and worst IR camera available. The concept is surprisingly simple. Mount a cheap Harbor Freight non-contact thermometer on a 3D printer carriage and use it to scan the target. The design files are available on GitHub.

There is, of course, an Arduino to grab the data and send it to the PC. Some Python code takes care of converting it into an image.

Perhaps you don’t need a camera, but having a way to communicate with an $11 IR temperature sensor might come in handy someday. You do have to mash the measurement button down, so [CCrome] used the 3D printer to make a clamp for the button that also holds the POGO pins to the PCB. We would have been tempted to solder across the switch and also solder the wires to the pad. But, then again, you need a 3D printer for the project anyway.

Don’t expect the results you would get from a real thermal sensor. If you want that, you may have to build it yourself or open your wallet wide. If you need some inspiration for a use case, look at the thermal camera contest from a few years back.

Hackaday Podcast 138: Breakin’ Bluetooth, Doritos Rockets, Wireless Robots, And Autonomous Trolling

Hackaday editors Elliot Williams and Mike Szczys peruse the great hardware hacks of the past week. There’s a robot walker platform that wirelessly offloads motor control planning to a computer. We take a look at automating your fishing boat with a trolling motor upgrade, building the Hoover dam in your back yard, and playing Holst’s Planets on an army of Arduini. Make sure you stick around until the end as we stroll through distant memories of Gopher, and peek inside the parking garages of the sea.

Take a look at the links below if you want to follow along, and as always, tell us what you think about this episode in the comments!

Direct download (60 MB or so.)

Continue reading “Hackaday Podcast 138: Breakin’ Bluetooth, Doritos Rockets, Wireless Robots, And Autonomous Trolling”