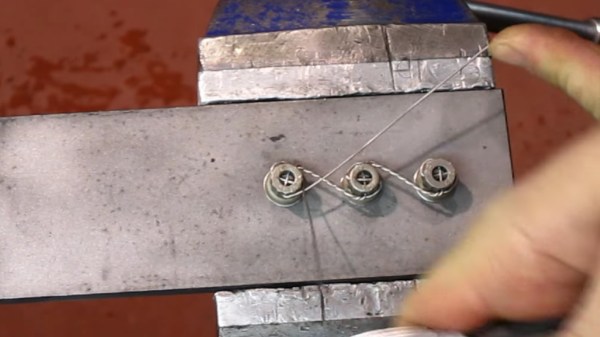
Hackaday Links Column Banner

Hackaday Links: February 5, 2017

A lot of people around here got their start in electronics with guitar pedals. This means soldering crappy old transistors to crappy old diodes and fawning over your tonez, d00d.  Prototyping guitar pedals isn’t easy, though, and now there’s a CrowdSupply project to make it easier The FX Development Board is just that — a few 1/4″ jacks, knobs, pots, power supply, and a gigantic footswitch to make prototyping guitar pedals and other musical paraphernalia easy. Think of it as a much more feature-packed Beavis Board that’s still significantly cheaper.

How do Communicators in Star Trek work? Nobody knows. Why don’t the crew always have to tap their badge before using it? Nobody knows. How can the com badge hear, ‘Geordi to Worf’, and have Worf instantly respond? Oh, we’ve argued about this on IRC for years now. Over on Hackaday.io, [Joe] is building a Star Trek com badge. The electronics are certainly possible with modern microcontrollers, but for the enclosure, we’ll have to review a few scenes from Time’s Arrow and The Enemy.

[Alois] was working with an Intel Edison on a breadboard. He was generating a signal, and sending it through a little tiny breadboard wire to an oscilloscope. The expected waveform should have been a nice square wave at 440MHz. What he got out of this wire was a mess. You shouldn’t use long wires when probing circuits. That little breadboard wire was a perfect radiator for 440MHz, and the entire setup turned into an antenna.

[Douglas] is running a Kenwood TM-D710A as his amateur radio rig. This radio does APRS stuff, but it requires an external GPS and power source to do it right. GPS receivers are now very small and very cheap, so [Douglas] just stuffed a GPS module inside his radio. The module itself is a GP-20U7, a tiny GPS module the size of a postage stamp, and wired it up to a few pads on the radio PCB.

Here’s an upcoming Kickstarter that’s going straight to the front page of Boing Boing. It’s Pong, in coffee table format which we first saw last Spring. Instead of racing the beam, this version of Pong is mechanical. The ball is a cube, the paddles are slightly longer cubes, and the entire game is a highly refined CNC machine. Here’s something from seven years ago that’s also Pong in coffee table format. Pongmechanik is electromechanical Pong, built entirely out of switches, relays, and a few motors.

Sync Your Pocket Synth With Ableton

The Teenage Engineering Pocket Operators are highly popular devices — pocket-sized synthesizers packed full of exciting sounds and rhythmic options. They’re also remarkably affordable. However, this comes at a cost — they don’t feature MIDI connectivity, so it can be difficult to integrate them into a bigger digital music setup. Never fear, little-scale’s got your back. This Max patch allows you to synchronize an Ableton Link network to your Pocket Operators.

little-scale’s trademark is creating useful software and hardware devices using cheap, off-the-shelf hardware wherever possible. The trick here is a simple Max patch combined with a $2 USB soundcard or Bluetooth audio adapter. It’s all very simple: the Pocket Operators have a variety of sync modes that sync on audio pulses, essentially a click track. They use stereo 3.5mm jacks on board, generally using one channel for the synth’s audio and one channel for receiving sync pulses. It’s a simple job to synthesize suitable sync pulses in Ableton, and then pump them out to the Pocket Operators through the Bluetooth or USB audio output.

The Pocket Operators sync at a rate of 2 PPQN — that’s pulses per quarter note. little-scale says that KORG volcas & monotrons should also work with this patch, as they run at the same rate, but it’s currently untested. If you happen to try this for yourself, let us know if it works for you. Video below the break.

We’ve seen pocket synths on Hackaday before, with this attractive mixer designed for use with KORG Volcas.

Continue reading “Sync Your Pocket Synth With Ableton”

Olimex Announces Their Open Source Laptop

A few months ago at the Hackaday | Belgrade conference, [Tsvetan Usunov], the brains behind Olimex, gave a talk on a project he’s been working on. He’s creating an Open Source Hacker’s Laptop. The impetus for this project came to [Tsvetan] after looking at how many laptops he’s thrown away over the years. Battery capacity degrades, keyboards have a fight with coffee, and manufacturers seem to purposely make laptops hard to repair.

Now, this do it yourself, Open Source Hardware and hacker-friendly laptop is complete. The Olimex TERES I laptop has been built, plastic has been injected into molds, and all the mechanical and electronic CAD files are up on GitHub. This Open Source laptop is done, but you can’t buy it quite yet; for that, we’ll have to wait until Olimex comes back from FOSDEM.

The design of this laptop is completely Open Source. Usually when we hear this phrase, the Open Source part only means the electronics and firmware. Yes, there are exceptions, but the STL files for the PiTop, the ‘3D printable Raspberry Pi laptop’ are not available, rendering the ‘3D printable’ part of PiTop’s marketing splurge incongruent with reality. If you want to build a case for the Open Source laptop to date, [Bunnie]’s Novena, random GitHub repos are the best source. The Olimex TERES I is completely different; not only can you simply buy all the parts for the laptop, the hardware files are going up too. To be fair, this laptop is built with injection molded parts and will probably be extremely difficult to print on a standard desktop filament printer. The effort is there, though, and this laptop can truly be built from source.

As far as specs go, this should be a fairly capable laptop. The core PCB is built around an Allwinner ARM Cortex-A53, sporting 1GB of DDR3L RAM, 4GB of eMMC Flash, WiFi, Bluetooth, a camera, and an 11.6″ 1366×768 display. Compared to an off-the-shelf, bargain-basement consumer craptop, those aren’t great specs, but at least the price is consummate with performance: The TERES I will sell for only €225, or about $250 USD. That’s almost impulse buy territory, and we can’t wait to get our hands on one.

Building A Wavetable Synth

Every semester at one of [Bruce Land]’s electronics labs at Cornell, students team up, and pitch a few ideas on what they’d like to build for the final project. Invariably, the students will pick what they think is cool. The only thing we know about [Ian], [Joval] and [Balazs] is that one of them is a synth head. How do we know this? They built a programmable, sequenced, wavetable synthesizer for their final project in ECE4760.

First things first — what’s a wavetable synthesizer? It’s not adding, subtracting, and modulating sine, triangle, and square waves. That, we assume, is the domain of the analog senior lab. A wavetable synth isn’t a deep application of a weird reverse FFT — that’s FM synthesis. Wavetable synthesis is simply playing a single waveform — one arbitrary wave — at different speeds. It was popular in the 80s and 90s, so it makes for a great application of modern microcontrollers.

The difficult part of the build was, of course, getting waveforms out of a microcontroller, mixing them, and modulating them. This is a lab course, so a few of the techniques learned earlier in the semester when playing with DTMF tones came in very useful. The microcontroller used in the project is a PIC32, and does all the arithmetic in 32-bit fixed point. Even though the final audio output is at 12-bit resolution, the difference between doing the math at 16-bit and 32-bit was obvious.

A synthesizer isn’t useful unless it has a user interface of some kind, and for this the guys turned to a small TFT display, a few pots, and a couple of buttons. This is a complete GUI to set all the parameters, waveforms, tempo, and notes played by the sequencer. From the video of the project (below), this thing sounds pretty good for a machine that generates bleeps and bloops.

Continue reading “Building A Wavetable Synth”

DIY Wire Spooler With Clever Auto-Tensioning System

[Solarbotics] have shared a video of their DIY wire spooler that uses OpenBeam hardware plus some 3D printed parts to flawlessly spool wire regardless of spool size mismatches. Getting wire from one spool to another can be trickier than it sounds, especially when one spool is physically larger than the other. This is because consistently moving wire between different sizes of spools requires that they turn at different rates. On top of that, the ideal rate changes as one spool is emptying and the other gets larger. The wire must be kept taut when moving from one spool to the next; any slack is asking for winding problems. At the same time, the wire shouldn’t be so taut as to put unnecessary stress on it or the motor on the other end.

There aren’t any build details but the video embedded below gives a good overview and understanding of the whole system. In the center is a tension bar with pulleys on both ends though which the wire feeds. This bar pivots at the center and takes up slack while its position is encoded by turning a pot via a 3D printed gear. Both spools are motor driven and the speed of the source spool is controlled by the position of the tension bar. As a result, the bar automatically takes up any slack while dynamically slowing or speeding the feed rate to match whatever is needed.

Continue reading “DIY Wire Spooler With Clever Auto-Tensioning System”

Grant Anyone Temporary Permissions To Your Computer With SSH

This is a super cute hack for you Linux users out there. If you have played around with SSH, you know it’s the most amazing thing since sliced bread. For tunneling in, tunneling out, or even just to open up a shell safely, it’s the bees knees. If you work on multiple computers, do you know about ssh-copy-id? We had been using SSH for years before stumbling on that winner.

Anyway, [Felipe Lavratti]’s ssh-allow-friend script is simplicity itself, but the feature it adds is easily worth the cost of admission. All it does is look up your friend’s public key (at the moment only from GitHub) and add it temporarily to your authorized_keys file. When you hit ctrl-C to quit the script, it removes the keys. As long as your friend has the secret key that corresponds to the public key, he or she will be able to log in as your user account.

Continue reading “Grant Anyone Temporary Permissions To Your Computer With SSH”

Two Guitars, Two Amps, And Three Pole Dual Throw

[Alexbergsland] plays electric guitar. More accurately, he plays two electric guitars, through two amps. Not wanting to plug and unplug guitars from amps and amps from guitars, he designed an AB/XY pedal to select between two different guitars or two different amps with the press of a button.

The usual way of sending a guitar signal to one amp or another is with an A/B pedal that takes one input and switches the output to one jack or another. Similarly, to switch between two inputs, a guitarist would use an A/B pedal. For [Alex]’ application, that’s two pedals that usually sell for $50, and would consequently take up far too much room on a pedalboard. This problem can be solved with a pair of 3PDT footswitches that sell for about $4 each. Add in a few jacks, LEDs, and a nice aluminum enclosure, and [Alex] has something very cool on his hands.

The circuit for this switcher is fairly simple, so long as you can wrap your head around how these footswitches are wired internally. The only other special addition to this build are a trio of LEDs to indicate which output is selected and if both inputs are on. These LEDs are powered by a 9V adapter embedded in the pedalboard, but they’re not really necessary for complete operation of this input and output switcher. The LEDs in this project can be omitted, making this a completely passive pedal to direct signals around guitars and amps.