Protected Mode On A Z80! (Almost)

The microprocessor feature which probably most enables the computing experience we take for granted today is protected mode. A chip with the required hardware can run individual software processes in their own environments, enabling multitasking and isolation between processes. Older CPUs lacked this feature, meaning that all the resources were available to all software. [Andy Hu] has done the seemingly impossible with a Zilog Z80, enabling a protected mode on the chip for the first time in over four decades. Has he found an elusive undocumented piece of silicon missed by every other researcher? Not quite, but it is a clever hack.

The Z80 has two address spaces, one for memory and the other for I/O. He’s taken the I/O request line and fed it through a flip-flop and some logic to call a hardware interrupt the first time an I/O call is made or when a RST instruction is executed. Coupled with a small piece of memory for register contents, and he’s made a Z80 with a fully-functional protected mode, for the cost of a few logic chips. It’s explained in the video below the break, and we hope you agree that it’s rather elegant given the resources in hand. It’s too late for the commercial 8-bit machines of the past, but it would be interesting to see what today’s retrocomputer designers make of it.


Continue reading “Protected Mode On A Z80! (Almost)”

DIY Heat-Set Insert Press Says Complicated = Comfort

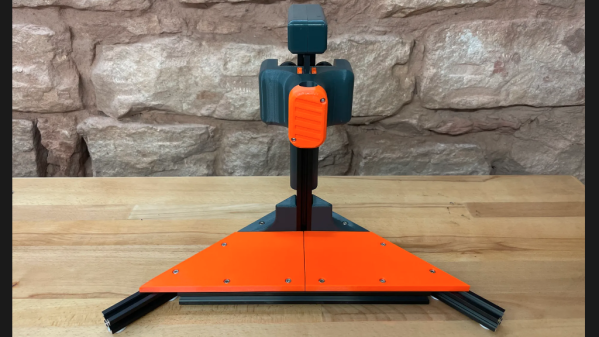
Heat-set inserts are a great way to embed mechanically-strong, threaded parts into a 3D print. For installation, all that is required is an economical soldering iron; something most of us already have.

The carriage and counterweight use a v-wheel gantry, GT2 belt, and other common hardware.

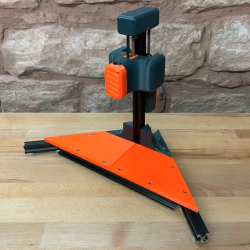
That’s fine for a handful of occasional inserts, but when a large number need to be inserted reliably and cleanly, something a little more refined is called for. That’s where [virchow]’s threaded insert press design comes in. It adds 3D-printed parts to an aluminum extrusion frame to create a press that smoothly lowers a soldering iron directly up and down, with minimal effort by the user.

The holder for the soldering iron is mounted to a small v-wheel gantry that rides along the vertical extrusion. The gantry features a counterweight to take care of resetting the position of the iron. [Virchow] admits that the design could be considered unnecessarily complicated (hence the “UC” in the name) but on the other hand, there’s nothing like doing a hundred or so inserts to make one appreciate every bit of comfort and stability.

Heat-set inserts aren’t difficult to use, but a little technique goes a long way. Spend a few minutes reading Joshua Vasquez’s guide on the optimal way to use them in 3D-printed parts to make sure yours not only go in straight but end up looking great as well.

When [Elon] Says No, Just Reverse Engineer The Starlink Signal

We all know that it’s sometimes better to beg forgiveness than ask permission to do something, and we’ll venture a guess that more than a few of us have taken that advice to heart on occasion. But [Todd Humphreys] got the order of operations a bit mixed up with his attempt to leverage the Starlink network as a backup to the Global Positioning System, and ended up doing some interesting reverse engineering work as a result.

The story goes that [Todd] and his team at the University of Texas Austin’s Radionavigation Lab, on behalf of their sponsors in the US Army, approached Starlink about cooperating on a project to make their low-Earth orbit constellation provide position, navigation, and timing capabilities. Although initially interested in the project, Starlink honcho [Elon Musk] put the brakes on things, leaving [Todd]’s team high and dry. Not to be dissuaded, they bought a Starlink user terminal, built what amounts to a small radiotelescope — although we’ve seen something similar done with just an RTL-SDR — and proceeded to reverse-engineer the structure of Starlink’s Ku-band downlink signal. The paper (PDF link) on their findings is densely packed with details, such as the fact that Starlink uses an orthogonal frequency-division multiplexing (OFDM) scheme.

It’s important to note that their goal was not to break encryption or sniff in on user data; rather, they wanted access to the synchronization and timing signals embedded in the Starlink data structures. By using this data along with the publically available ephemera for each satellite, it’s possible to quickly calculate the exact distance to multiple satellites and determine the receiver’s location to within 30 meters. It’s not as good as some GPS-Starlink hacks we’ve seen, but it’s still pretty good in a pinch. Besides, the reverse engineering work here is well worth a read.

Thanks to [Adrian] for the tip!

Velomobile Gets Electric Assist

What do you get when you throw all accepted bicycle designs out the window and start fresh? Well, it might look a bit like [Saukki’s] velomobile.

Most bikes come in a fairly standard, instantly-recognizable shape which has been popular for over a century now. While it’s a vast improvement over its predecessor, the penny-farthing bicycle, there’s no reason that a bike needs to have this two-triangle frame shape other than that a pretentious bicycle racing standards group says they have to. If you want to throw their completely arbitrary rulebook out of the window, though, you can build much more efficient, faster bikes like recumbents or even full-fairing velomobiles. And if you want to go even faster than that, you can always add a standard ebike motor kit to one.

This is a lot harder than putting a motor on a normal bicycle. Bicycles tend to have standardized parts and sizes, and [Saukki]’s velomobile is far from the standard bike. First, he needed custom mounts for the display and also for the battery, which he needed to make extra wide so its weight wouldn’t rip through the carbon fiber body. The emergency brake lever motor cutoff needed to be dismantled to work with his control system too, and finally the mid-drive motor needed a custom mount as well. It’s a TSDZ2 motor that comes with torque-sensing pedal assist.

The changes didn’t stop there. The velomobile max speed is much higher than a standard bike. This called for some gear ratio changes, in the form of a monster 60-tooth chain ring.

This leads to the one major problem with this build which is that the velomobile can achieve such high speeds on its own that the electric assist cuts out for most of the ride. There is a legal requirement over much of Europe that e-bikes only have pedal assist (without a throttle) and that they stop assisting above a specific speed. But if you want to build an e-bike that pushes the boundary of the law instead of strictly adhering to it, take a look at this one which uses a motor from a washing machine.

Continue reading “Velomobile Gets Electric Assist”

Retrofitting Robots

Al Williams wrote up a neat thought piece on why we are so fascinated with robots that come in the shape of people, rather than robots that come in the shape of whatever it is that they’re supposed to be doing. Al is partly convinced that sci-fi is partly responsible, and that it shapes people’s expectations of what robots look like.

What sparked the whole thought train was the ROAR (robot-on-a-rail) style robot arms that have been popping up, at least in the press, as robot fry cooks. As the name suggests, it’s a robot arm on a rail that moves back and forth across a frying surface and uses CV algorithms to sense and flip burgers. Yes, a burger-flipping robot arm. Al asks why they didn’t just design the flipper into the stovetop, like you would expect with any other assembly line.

In this particular case, I think it’s a matter of economics. The burger chains already have an environment that’s designed around human operators flipping the burgers. A robot arm on a rail is simply the cheapest way of automating the task that fits in with the current ergonomics. The robot arm works like a human arm because it has to work in an environment designed for the human arm.

Could you redesign a new automatic burger-flipping system to be more space efficient or more reliable? Probably. If you did, would you end up with a humanoid arm? Not necessarily. But this is about patching robotics into a non-robotic flow, and that means they’re going to have to play by our rules. I’m not going to deny the cool factor of having a robot arm flip burgers, but my guess is that it’s actually the path of least resistance.

It feels kind of strange to think of a sci-fi timeline where the human-looking robots come first, and eventually get replaced by purpose-built intelligent machines that look nothing like us as the environments get entire overhauls, but that may be the way it’s going to play out. Life doesn’t always imitate art.

Lego Plays Electronic Drums

The ability to quickly try out an idea, and then expand and develop it, is what rapid prototyping is all about. Although we tend to think of 3D printing when rapid prototyping is mentioned, [Brick Technology] reminds us of the power of Lego, as he rapidly builds and improves an electromechanical drum machine.

Using Lego Technic pieces, he starts with a simple music box-style drum with moveable pins that pluck on spring-loaded levers, which in turn hit piezoelectric discs. The electronics side is simple, with the discs wired to a Roland sound module from an existing electronic drum kit. With the ability to instantly adjust, add and remove pieces, he quickly finds and fixes the problem of getting eleven hammer mechanisms together and working smoothly.

To get around the limited pin space on the drum and increase the length and variation potential of the rhythms, [Brick Technology] moved to a belt design that can accommodate significantly more pins. He also added an electric motor and various gearbox ratios for consistent and adjustable tempo. Together with his water vortex ball machine, he makes us think our workshops probably need a few hundred Lego Technic pieces.

Continue reading “Lego Plays Electronic Drums”

Build This Halloween-Themed TensEGGrity Sculpture

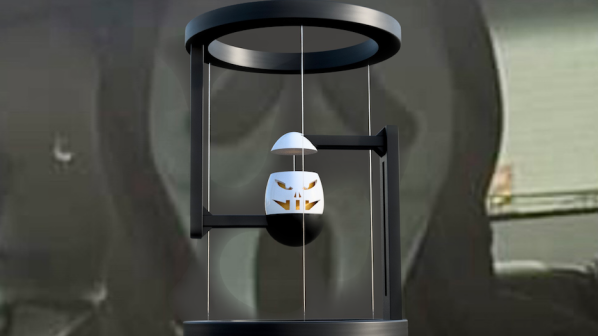
Tensegrity sculptures are fun things, and often sold as office desk toys or scientific novelties. You can build your own too, and [seabirdhh] has whipped up a fun holiday-themed version.

The first part to build is the egg-hat-stand. This consists of the base of the structure, with the “hat” of the egg character hanging in the center. The other half of the structure is built separately, with the rest of the “egg head” sitting in a cup in the bottom of the upper structure. A series of nylon threads are then tied between the components. These can then be tensioned to give the structure its shape, allowing the egg’s “hat” to hover above its “head”. [seabirdhh] passes the nylon threads through small pieces of rubber that allow the tension to be adjusted just right. Too little and the structure falls down, but too much, and it will bend over time. Tuning it carefully is key.

It’s a fun build, and a cheap way to experiment with tensegrity concepts at home. You can even use these same techniques to build a quadcopter, or apply them in the world of LEGO. Video after the break.

Continue reading “Build This Halloween-Themed TensEGGrity Sculpture”