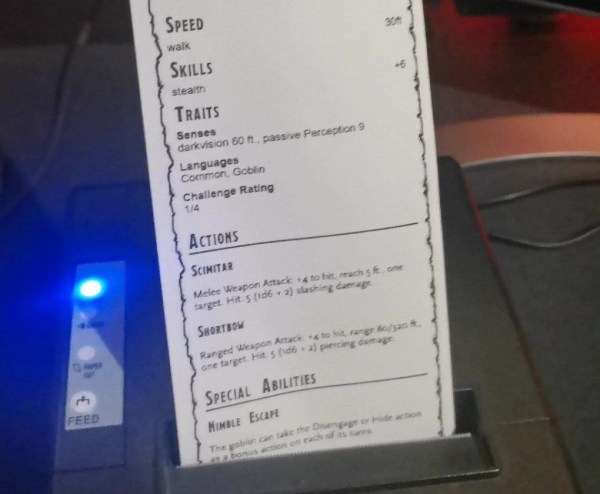
The thermal printer is ubiquitous in today’s world, mostly found whenever we have to get a receipt from somewhere. They’re cheap, fast, and easy to use. Not only that, though, but as [Daniel] found out, they’re also pretty straightforward to re-program and use for other things than a three-foot-long receipt from a drug store. He’s adapted them to serve as a key tool of the dungeon master in his D&D games.
While he has adapted the most common thermal printer standard, the Epson Standard Code, the real fun of this project is in the user interface. He’s made it possible to build templates and other D&D-oriented sheets quickly via HTML, so the dungeon master can print out character sheets, items from the game, maps, or anything else they might possibly need at the time. It’s all highly configurable to whatever needs arise, and the interface works on Mac, Windows, and Linux.
All of the project code is located on Daniel’s GitHub page for anyone looking to try this out. Most thermal printers use this standard too, so cheap ones can easily be found and put to use as long as a roll of thermal paper is available. If the feel of thermal paper is bringing up some childhood nostalgia, it could be because you had the Game Boy Printer as a youth and are looking for ways to recapture that thermal printer magic.
If you want a little mayhem on your Christmas tree, you can check out [Sprite_tm]’s tiny PC Christmas ornament. With 3D printing, that isn’t such a tall order, but [Sprite]’s does have a unique ability: it plays DOOM, as you can see in the video below.
The device uses an ESP32, and while [Sprite] had ported the iconic shooter to the microcontroller before, he decided to use a Game Boy port that is more lightweight instead. There were a few reasons for the choice, including the ability to do Bluetooth so you could connect controllers so you can play the game. The only catch was he had to pull off the flash memory and replace it with a larger one (see the second video below).
Granted, the screen is tiny, so it is sort of a novelty. But if you want to have a go, the files are all there. As you might expect, there is a tiny battery and the circuitry required to recharge it, as well. We’d probably make an adapter to let it charge from the Christmas lights, but that can wait for version 2.
The input device handling is a bit strange. Bluetooth BLE devices will automatically grab an input device that is in pairing mode. There is no provision for connecting using the “normal” Bluetooth mechanism. A fun project and you could use the case for some other tiny projects, too. A larger flash on an ESP32 has lots of possibilities, as well.
If you need a primer on the ESP32, we got it. If you want to play DOOM on something truly strange, try seven-segment displays.
We aren’t sure what made him think of it, but [Proper Printing] decided to make an FDM printer lay down resin instead of filament. Why? We still aren’t sure, but we admire the effort nonetheless. In principle, extruding resin shouldn’t be much different than other liquid things you print like icing or concrete. Then you’d need to UV-cure the viscous liquid quickly. In fact, they wound up making up a paste-like resin using several chemicals and a filler.
Armed with the paste, it would seem like the big obstacles would be over. Instead of part cooling fans, the printer now has two laser heads focused on the print area. Printing in vase mode avoids some problems, but the first few attempts were not very successful.
With a bit of perseverance, the setup did work — for a while. More fine tuning got acceptable results. However, he eventually changed the filler material and got a passable Benchy to print. Nothing to be proud of, but recognizable. Honestly, we were surprised that the laser’s didn’t cure the material still inside the nozzle and cause terrible clogs.
Why put this much effort into doing this? We have no idea. Should you try it? Probably not. Of course, being able to print a paste has its own value. Perhaps delivering glue or solder paste, for example. But you generally won’t need to make tall prints with that kind of material. Then again, we’ve never been opposed to doing something “just because.”
Emulating old computers or video game systems isn’t always about recreating childhood nostalgia or playing classics on hardware that doesn’t exist anymore. A lot of the time it can be an excellent way to learn about the mechanics of programming a video game. Plenty of older titles have available source code that anyone can pour over and modify, and one of those is Pokémon Emerald. This was the first Pokémon game that [Inkbox] played, and he added a few modern features to it with this custom ROM file.
The first thing to add to this game was the ability to have one’s Pokémon follow their character around in the overworld map. This is common in later games, but wasn’t yet a feature when Emerald and Ruby first came out. [Inkbox] needed to import sprites from later games into the Emerald game file, convert their color palettes to match the game’s palette, and then get to work on the mechanics. After everything was finished, the Pokémon not only follow the player around the map but are animated, enter and exit their Pokéballs, and even jump off ledges in a believable, 32-bit way.
One of the great things about older games like these is that they’ve been around long enough to have source code or decompiled code available, they often have plenty of documentation, and the platforms they operate on are well-known by now as well. Pokémon Emerald is not alone in this regard; in fact, there is a huge Game Boy Advance homebrew scene that is not too difficult to get involved in.
The Playdate is an interesting gaming system. It’s a handheld, has a black and white screen, and superficially reminds us a little bit of the original Game Boy, right down to the button layout. But the fact that it has a second controller that pops out of the side, that this controller is a crank, and that the whole system was made by the same people that made Untitled Goose Game, makes us quite intrigued. Apparently it has made an impact on others, too, because this project turns the gaming system into a typewriter.
The Playdate doesn’t have native support for USB accessories unless it’s plugged into this custom 3D printed dock. Inside of the dock is a Teensy 4.1 which handles some translation between the keyboard and the console. Once the dock is taken care of the text editor needs to be side-loaded to the device as well. The word processor has the ability to move the cursor around, insert and delete text, and the project’s creator, [t0mg], plans to add more features in future versions like support for multiple files, changing the font, and a few other things as well.
For anyone interested in recreating this project, all of the printable files, the text editor, and the schematics are all available in the GitHub repo. It’s an impressive project for a less well-known console that we haven’t seen many other hacks for, unless you count this one-off Arduboy project which took some major inspiration from the Playdate’s crank controller.
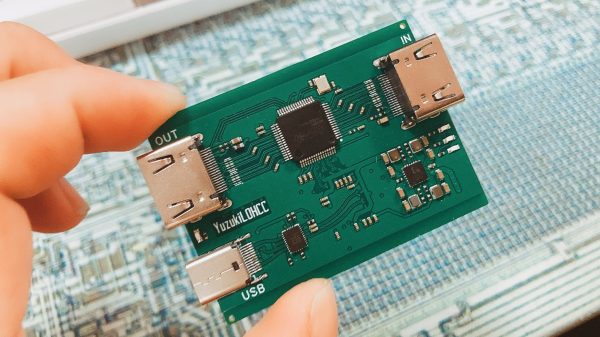
[YuzukiHD] has provided files for anyone that wishes to build their own HDMI capture card at home. The design is known as the Yuzuki Loop Out HDMI Capture Card PRO, or YuzukiLOHCC PRO for short.
The build is based on the MS2130, a HD video and audio capture chip that’s compatible with USB 3.2 Gen 1. We’re pretty sure that’s now called USB 3.2 Gen 1×1, and that standard is capable of transfers at up to 5 Gbps. Thus, the chip can support HDMI at up to 4K resolution at 60 Hz depending on the exact signals being passed down the line. It’s compatible with YUV422 & MJPEG modes and can be used with software like OBS Studio and FFmpeg. The board itself is relatively simple. It features an HDMI In port, an HDMI Out port, and a USB-C port for hooking up to a computer for capture.
HDMI capture cards can be expensive and fussy things, so you may find it pays to roll your own. Plus, being open sourced under the CERN Open Hardware License V2 means that you can make changes to suit your own use case if you so desire.
In a perfect world, all of our electronic devices would come with complete documentation, and there’d be open source libraries available for interfacing them with whatever we wanted. There’d never be arbitrary lockouts preventing us from using a piece of hardware in a way the manufacturer didn’t approve of, and the “cloud” wouldn’t be a black-box server in some data center on the other side of the planet, but a transparent and flexible infrastructure for securely storing and sharing information.
Unfortunately, that’s not the world we live in. What’s worse, rather than moving towards that electronic utopia, the industry appears to be heading in the opposite direction. It seems like every month we hear about another service shutting down and leaving viable hardware to twist in the wind. Just yesterday Google announced they’d be retiring their Stadia game streaming service early next year — leaving users with unique Internet-connected controllers that will no longer have a back-end to communicate with.
Matthew Alt
Luckily for us, there’s folks like Matthew [wrongbaud] Alt out there. This prolific hacker specializes in reverse engineering, and has a knack not just for figuring out how things work, but in communicating those findings with others. His conquests have graced these pages many times, and we were fortunate enough to have him helm the Introduction to Reverse Engineering with Ghidra class for HackadayU back in 2020. This week, he stopped by the Hack Chat to talk about the past, present, and future of reverse engineering.
Matthew got his start in reverse engineering during college, when he was working in a shop that specialized in tuning engine control units (ECUs). He was responsible for figuring out how the ECUs functioned, which ultimately would allow them to be modified to improve engine performance beyond the vehicle’s stock configuration. Sometimes that involved uploading modified calibration data, or disabling functions that were detrimental to engine performance. These software changes could potentially increase engine output by as much as 50 HP, though he says that sometimes the goal was to simply increase throttle response so the vehicle would feel more aggressive on the road.
Moving on to the tools of the trade, Matthew explained why he prefers using Ghidra for embedded targets over classic reverse engineering tools like IDA Pro. As an example he points to a recent project where he used Ghidra’s API and intermediary language PCode to crack passwords in Game Boy Advance games. Though he does mention that IDA still has its place if you’re looking to peek into some Windows C++ software.
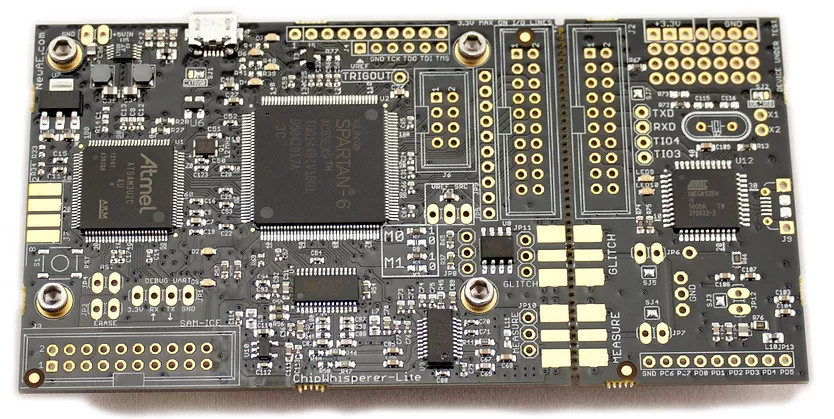
Matthew also pointed to new techniques and tools for working with fault injection which have opened up a lot of exciting possibilities over the last few years. In fact, he says tools like ChipWhisperer will become invaluable as newer devices adopt advanced security features. When gadgets are using secure boot and encrypted firmware, gaining access is going to take a bit more than just finding an unleaded serial port on the board. Glitching attacks will become more commonplace, so you might as well get up to speed now.
Colin O’Flynn’s ChipWhisperer makes side-channel power analysis and glitching attacks far more accessible.
We’d like to thank Matthew Alt for not just stopping by the Hack Chat, but for being such a good friend to the Hackaday community. His work has been inspirational for all of us here, and it’s always exciting when he’s penned a new blog post detailing another challenge bested. The next time your favorite MegaCorp releases some anti-consumer gadget, you can take some comfort in knowing he’s still out there bending hardware to his will.
The Hack Chat is a weekly online chat session hosted by leading experts from all corners of the hardware hacking universe. It’s a great way for hackers connect in a fun and informal way, but if you can’t make it live, these overview posts as well as the transcripts posted to Hackaday.io make sure you don’t miss out.