Today, we take office software suites for granted. But in the 1970s, you were lucky to have a typewriter and access to a photocopier. But in the early 1980s, IBM rolled out PROFS — the Professional Office System — to try to revolutionize the office. It was an offshoot of an earlier internal system. The system would hardly qualify as an office suite today, but for the time it was very advanced.
The key component was an editor you could use to input notes and e-mail messages. PROFS also kept your calendar and could provide databases like phonebooks. There were several key features of PROFS that would make it hard to recognize as productivity software today. For one thing, IBM terminals were screen-oriented. The central computer would load a form into your terminal, which you could fill out. Then you’d press send to transmit it back to the mainframe. That makes text editing, for example, a very different proposition since you work on a screen of data at any one time. In addition, while you could coordinate calendars and send e-mail, you could only do that with certain people.
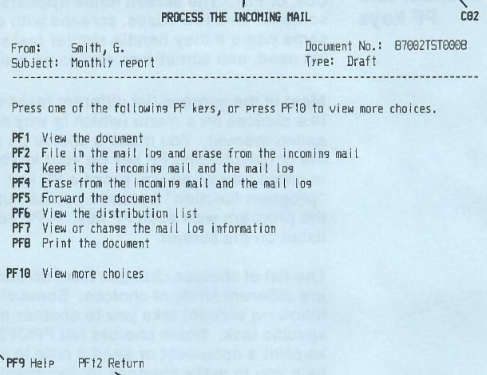
In general, PROFS connected everyone using your mainframe or, perhaps, a group of mainframes. In some cases, there might be gateways to other systems, but it wasn’t universal. However, it did have most of the major functions you’d expect from an e-mail system that was text-only, as you can see in the screenshot from a 1986 manual. PF keys, by the way, are what we would now call function keys.
The calendar was good, too. You could grant different users different access to your calendar. It was possible to just let people see when you were busy or mark events as confidential or personal.
You could actually operate PROFS using a command-line interface, and the PF keys were simply shorthand. That was a good thing, too. If you wanted to erase a file named Hackaday, for example, you had to type: ERASE Hackaday AUT$PROF.
Styles
PROFS messages were short and were essentially ephemeral chat messages. Of course, because of the block-mode terminals, you could only get messages after you sent something to the mainframe, or you were idle in a menu. A note was different. Notes were what we could call e-mail. They went into your inbox, and you could file them in “logs”, which were similar to folders.