Science today seems to be dominated by big budgets and exotics supplies and materials, the likes of which the home gamer has trouble procuring. But back in the day, science was once done very much by the seats of the pants, using whatever was available for the job. And as it turns out, some of the materials the old-timers used are actually still pretty useful.
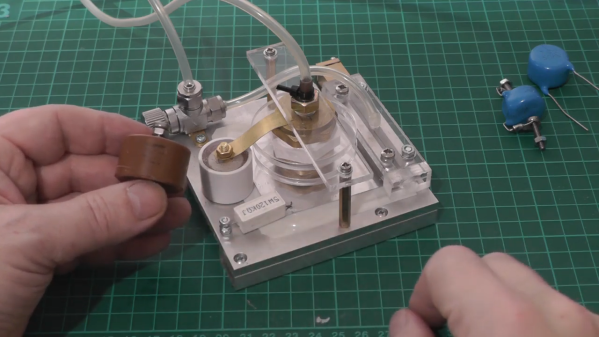
An example of this is a homemade version of “Faraday Wax”, which [ChristofferB] is using for his high vacuum experiments. As you can imagine, getting a tight seal on fittings is critical to maintaining a vacuum, a job that’s usually left to expensive synthetic epoxy compounds. Realizing that a lot of scientific progress was made well before these compounds were commercially available, [ChristofferB] trolled through old scientific literature to find out how it used to be done.
This led to a recipe for “Faraday Wax”, first described by the great scientist himself in 1827. The ingredients seem a little archaic, but are actually pretty easy to source. Beeswax is easy to come by; the primary ingredient, “colophony”, is really just rosin, pretty much the same kind used as solder flux; and “Venetian red” is a natural pigment made from clay and iron oxide that can be had from art suppliers. Melted and blended together, [ChristofferB] poured it out onto wax paper to make thin strips that are easily melted onto joints in vacuum systems, and reports are that the stuff works well, even down to 10-7 mbar.
We love this one — it’s the perfect example of the hacker credo, which has been driving progress for centuries. It also reminds us of some of the work by [Simplifier], who looks for similar old-time recipes to push his work in DIY semiconductors and backyard inductors forward.
[David Gustafik] dropped us the tip on this one. Thanks!
Like so many consumer products these days, baby toys seem to get progressively more complex with each passing year. Despite the fact that the average toddler will more often than not be completely engrossed by a simple cardboard box, toy companies are apparently hell-bent on producing battery powered contraptions that need to be licensed with the FCC.
As a perfect example, we have Fisher-Price’s Linkimals. These friendly creatures can operate independently by singing songs and flashing their integrated RGB LEDs in response to button presses, but get a few of them in the room together, and their 2.4 GHz radios kick in to create an impromptu mesh network of fun.
They’ll soon be back, and in greater numbers.
Once connected to each other, the digital critters synchronize their LEDs and sing in unison. Will your two year old pay attention long enough to notice? I know mine certainly wouldn’t. But it does make for a compelling commercial, and when you’re selling kid’s toys, that’s really the most important thing.
On the suggestion of one of our beloved readers, I picked up a second-hand Linkimals Musical Moose to take a closer look at how this cuddly pal operates. Though in hindsight, I didn’t really need to; a quick browse on Amazon shows that despite their high-tech internals, these little fellows are surprisingly cheap. In fact, I’m somewhat embarrassed to admit that given its current retail price of just under $10 USD, I actually paid more for my used moose.
But you didn’t come here to read about my fiscal irresponsibility, you want to see an anthropomorphic woodland creature get dissected. So let’s pull this smug Moose apart and see what’s inside.
It’ll be Pi Day when this article goes live, at least for approximately half the globe west of the prime meridian. We always enjoy Pi Day, not least for the excuse to enjoy pie and other disc-shaped foods. It’s also cool to ponder the mysteries of a transcendental number, which usually get a good treatment by the math YouTube community. This year was no disappointment in this regard, as we found two good pi-related videos, both by Matt Parker over at Standup Maths. The first one deals with raising pi to the pi to the pi to the pi and how that may or may not result in an integer that’s tens of trillions of digits long. The second and more entertaining video is a collaboration with Steve Mould which aims to estimate the value of pi by measuring the volume of a molecular monolayer of oleic acid floating on water. The process was really interesting and the results were surprisingly accurate; this might make a good exercise to do with kids to show them what pi is all about.
Remember basic physics and first being exposed to the formula for universal gravitation? We sure do, and we remember thinking that it should be possible to calculate the force between us and our classmates. It is, of course, but actually measuring the attractive force would be another thing entirely. But researchers have done just that, using objects substantially smaller than the average high school student: two 2-mm gold balls. The apparatus the Austrian researchers built used 90-milligram gold balls, one stationary and one on a suspended arm. The acceleration between the two moves the suspended ball, which pivots a mirror attached to the arm to deflect a laser beam. That they were able to tease a signal from the background noise of electrostatic, seismic, and hydrodynamic forces is quite a technical feat.
We noticed a lot of interest in the Antikythera mechanism this week, which was apparently caused by the announcement of the first-ever complete computational model of the ancient device’s inner workings. The team from University College London used all the available data gleaned from the 82 known fragments of the mechanism to produce a working model of the mechanism in software. This in turn was used to create some wonderful CGI animations of the mechanism at work — this video is well worth the half-hour it takes to watch. The UCL team says they’re now at work building a replica of the mechanism using modern techniques. One of the team says he has some doubts that ancient construction methods could have resulted in some of the finer pieces of the mechanism, like the concentric axles needed for some parts. We think our friend Clickspring might have something to say about that, as he seems to be doing pretty well building his replica using nothing but tools and methods that were available to the original maker. And by doing so, he managed to discern a previously unknown feature of the mechanism.
We got a tip recently that JOGL, or Just One Giant Lab, is offering microgrants for open-source science projects aimed at tackling the problems of COVID-19. The grants are for 4,000€ and require a minimal application and reporting process. The window for application is closing, though — March 21 is the deadline. If you’ve got an open-source COVID-19 project that could benefit from a cash infusion to bring to fruition, this might be your chance.
And finally, we stumbled across a video highlighting some of the darker aspects of amateur radio, particularly those who go through tremendous expense and effort just to be a pain in the ass. The story centers around the Mt. Diablo repeater, an amateur radio repeater located in California. Apparently someone took offense at the topics of conversation on the machine, and deployed what they called the “Annoy-o-Tron” to express their displeasure. The device consisted of a Baofeng transceiver, a cheap MP3 player loaded with obnoxious content, and a battery. Encased in epoxy resin and concrete inside a plastic ammo can, the jammer lugged the beast up a hill 20 miles (32 km) from the repeater, trained a simple Yagi antenna toward the site, and walked away. It lasted for three days and while the amateurs complained about the misuse of their repeater, they apparently didn’t do a thing about it. The jammer was retrieved six weeks after the fact and hasn’t been heard from since.
Mouser and Digi-Key are great for servicing most needs, and the range of parts they offer is frankly bewildering. But given the breadth of the hardware hacking community’s interests, few companies could afford to be the answer to everyone’s needs.
That’s especially true for the esoteric parts needed when one’s hobby involves high voltages and homemade lasers, like [Les Wright]. He recently came up with a DIY doorknob capacitor design that makes the hard-to-source high-voltage caps much easier to obtain. We’ve seen [Les] use these caps in his transversely excited atmospheric (TEA) lasers, a simple design that uses high-voltage discharge across a long, narrow channel filled with either room air or nitrogen. The big ceramic caps are needed for the HV supply, and while [Les] has a bunch, they’re hard to come by online. He tried a follow-up using plain radial-lead ceramic capacitors, and while the laser worked, he did get some flashover between the capacitor leads.
[Les]’s solution was to dunk the chunky caps in acetone for a week or so to remove their epoxy covering. Once denuded, the leads were bent into a more axial configuration and soldered to brass machine screws. The dielectric slug is then put in a small section of plastic tubing and potted in epoxy resin with the bolts protruding from each end. The result is hard to distinguish from a genuine doorknob cap; the video below shows the build process as well as some testing.
Hats off to [Les] for taking pity on those of us who want to replicate his work but find ourselves without these essentials. It’s nice to know there’s a way to make unobtanium parts when you need them.
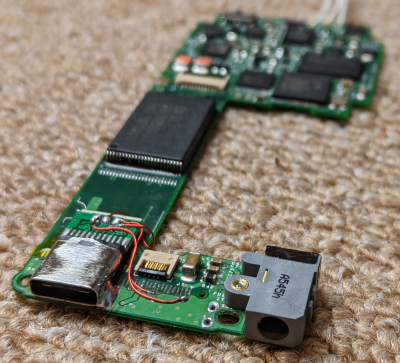
[David] bought the iPod with a dead battery, so when he opened the iPod to get the old battery out, he noticed there was enough space to fit a USB-C connector. The original Apple 30 pin connector runs USB 2.0 through four of the pins, so [David] used the original USB cable and identified the appropriate pins and traces with a continuity tester. The connector was destructively removed with side cutters, ripping off all but one of the pads in the process. A hot air station might have made things easier, but we assume he did not have one on hand. The USB-C connector was scavenged from a cheap USC-C to USB Micro adaptor and mounted by soldering the housing directly to the PCB’s ground plane. The three remaining terminals were soldered to the traces with enamel wire.
With the new battery installed, [David] confirmed that both charging and data transfer worked. The IC that handles the button and scroll pad interfered slightly with the new connector, so he filed away some of the IC’s excess. Any open pads close to the new connector was covered with Kapton tape to avoid shorts. The large hole in the enclosure for the 30 pin connection was partly filled in with five-minute epoxy. The final assembled product looks almost factory produced and works as it’s supposed to, so we call this a win.
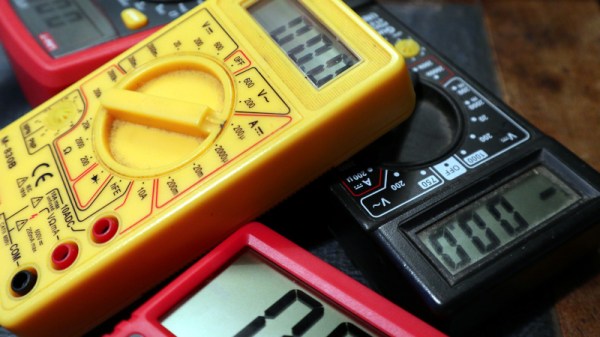
If we had to make a guess at the single piece of electronic bench equipment owned by the highest proportion of Hackaday readers, it would not be a budget oscilloscope from Rigol, nor would it be a popular portable soldering iron like the TS100. Instead we’re guessing that it’s a multimeter, and not even the most accomplished one.
The DT830 is a genericised Chinese-manufactured 3.5 digit digital multimeter that can be had for an astonishingly low price. Less than a decent hamburger gets you an instantly recognisable plastic case with a chunky rotary range selector switch, and maybe a socket for some kind of transistor or component tester. Make sure that there is a 9 volt battery installed, plug in the pair of test leads, and you’re in business for almost any day-to-day electrical or electronic measurement. They’ve been available in one form or another for decades and have been the subject of innumerable give-aways and loss-leader offers, so it’s a reasonsble guess that you’ll have one somewhere. I have three as far as I know, they make great on-the-go instruments and have proved themselves surprisingly reliable for what they are. Continue reading “In Praise Of The DT830, The Phenomenal Instrument You Probably Don’t Recognise For What It Is”→
Anti-static ESD straps are de rigueur in lab settings for those working with sensitive electronics. They’re a simple protective device, and one that generally doesn’t warrant a second thought. However, [Daniel Bogdanoff] figured they could stand to be a little more fashionable, and set to work on a fancier design.
The first step was to take a look at a regular ESD strap. Typically, they consist of a band that fastens around the wearer’s wrist, with a metal stud for connecting to the earthing lead. The earthing lead contains a high resistance to limit the discharge current to avoid ugly high-energy shorts when wearing the strap.
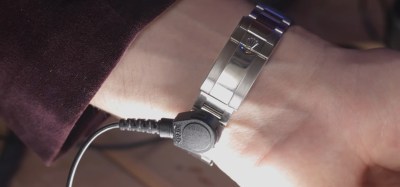
The metal stud is attached to a replacement link on the ROLEX’s strap, making the modification neat, tidy, and reversible.
With a good understanding of the basics, [Daniel] set about modifying a CASIO calculator watch for practice. After soldering a metal stud to the watch case failed, a second attempt with conductive epoxy worked great. The watch could be connected to the earthing strap, and an ESD tester confirmed the device was doing its job.
But unfortunately, permanently modifying the borrowed ROLEX wasn’t an option. Instead, [Daniel] limited his work to a single replacement link which could be inserted into the watch band. Hooked up to an earthing strap, the luxury watch also passed a basic ESD test successfully.
[Daniel] notes that while this is a fun experiment, using properly rated safety equipment is best. Additionally, he points out that the ROLEX is likely to do worse than the CASIO for the simple fact that a metal-banded watch is more likely to cause shorts when working on electronics. Of course, if a watch isn’t your thing, consider a ring instead. Video after the break.