Patience Beats Rage-Quit In Shattered Xbox Controller Repair

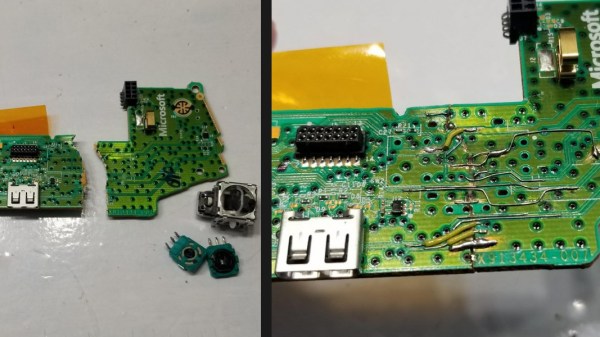
There are negative-one hacks to this project. Someone lost at their game, lost their temper, then raged at their Xbox controller with some horsepower. The result is that [Taylor Burley] gets a free controller with a non-responsive joystick out of the deal, and since he had nothing to lose, he decided to heat up the iron and bring the controller back to life.

The majority of the project is told in pictures and through the narration in the video below. In removing the joystick, [Taylor] opts for the technique of doping the connections with fresh solder (we assume containing lead for easier melting) before reaching for the desoldering wick. The diagnosis stage is brief because when the joystick lifts away, the PCB falls apart into two separate pieces! The next step was to glue the two halves together with cyanoacrylate to get into the nooks and crannies, then epoxy to provide structure. Solder bridges were not going to jump that gap, so he used 30ga wire and attached it wherever he could scrape away some solder mask. Best of all, it worked when he reattached the joystick. Job well done.

Xbox controllers are not a scarce commodity, so people do not spend their idle hours fixing them, but not many people can claim experience. Maybe someday the stakes will be higher and he will have the courage to repair vintage electronics. We won’t rant on how things aren’t built to last, and how we don’t train people to fix things. Today, we want to focus on someone who used their time to repair and learn.

Continue reading “Patience Beats Rage-Quit In Shattered Xbox Controller Repair”

Digging Deep Into SD Card Secrets

To some, an SD card is simply an SD card, notable only for the amount of storage it provides as printed on the label. However, just like poets, SD cards contain multitudes. [Jason Gin] was interested as to what made SanDisk’s High Endurance line of microSDXC cards tick, so he set out to investigate.

Naturally, customer service was of no help. Instead, [Jason] started by scraping away the epoxy covering which hides the card’s test points. Some delicate soldering was required to hook up the test points to a breakout board, while also connecting the SD interface to a computer to do its thing. A DS Logic Plus signal analyzer was used to pick apart the signals going to the chip to figure out what was going on inside.

After probing around, [Jason] was able to pull out the NAND Flash ID, which, when compared to a Toshiba datasheet, indicates the card uses BiCS3 3D TLC NAND Flash. 3D NAND Flash has several benefits over traditional planar Flash technology, and SanDisk might have saved [Jason] a lot of time investigating if they’d simply placed this in their promotional material.

We’ve seen other similar hacks before, like this data recovery performed via test points. If you’ve been working away on SD cards in your own workshop, be sure to let us know!

Teardown: Generation NEX

Today if you wanted a little gadget to sit on your shelf and let you play classic games from the early console era, you’d likely reach for the Raspberry Pi. With slick emulator front-ends like RetroPie and DIY kits available on Amazon, you don’t even need to be a technical wizard or veteran penguin wrangler to set it up. If you can follow an online tutorial, you can easily cram the last few decades of gaming into a cheap and convenient package.

But things were a bit different back in 2005. There weren’t a lot of options for playing old games on the big screen, and what was out there tended to be less than ideal. You could hack an original Xbox or gut an old laptop to make an emulation box that could comfortably blend in with your DVD player, but that wasn’t exactly in everyone’s wheelhouse. Besides, what if you had the original cartridges and just wanted to play them on a slightly more modern system?

I’m willing to bet whoever wrote this owns a katana.

Enter Messiah, and their Generation NEX console. As you might have gathered from their ever-so-humble name, Messiah claimed their re-imagined version of the Nintendo Entertainment System would “Bring Gaming Back to Life” by playing the original cartridges with enhanced audio and visual clarity. It also featured integrated support for wireless controllers, which at the time was only just becoming the standard on contemporary consoles. According to the manufacturer, the Generation NEX used custom hardware based on the “NES algorithm” that offered nearly 100% game compatibility.

Unfortunately, the system was a complete bomb. Despite Messiah’s claims, the Generation NEX ended up being yet another “NES-on-a-chip” (NOAC) clone, and a pretty poor one at that. Reviewers at the time reported compatibility issues with many popular titles, despite the fact that they were listed as working on Messiah’s website. The touted audio and video improvements were nowhere to be found, and in fact many users claimed the original NES looked and sounded better in side-by-side comparisons.

It didn’t matter how slick the console looked or how convenient the wireless controllers were; if the games themselves didn’t play well, the system was doomed. Predictably the company folded not long after, leaving owners stuck with the over-priced and under-performing consoles. Realistically, most of them ended up in landfills. Today we’ll take a look inside a relatively rare survivor and see just what nostalgic gamers got for their money in 2005.

Continue reading “Teardown: Generation NEX”

Teardown: Cobra XRS 9740 Radar Detector

Drivers with a lead foot more often than not have Waze open on their phone so they can see if other drivers have spotted cops up ahead. But avoiding a speeding ticket used to involve a lot more hardware than software. Back before the smartphone revolution, that same driver would have had a radar detector on their dashboard. That’s not to say the gadgets are completely unused today, but between their relatively high cost (one of the top rated models on Amazon as of this writing costs over $300) and the inevitable false positives from so many vehicles on the road having their own radar and LIDAR systems, they’ve certainly become a less common sight over the years

The subject of today’s teardown is a perfect example of “Peak Radar Detector”. Manufactured back in 2007, the Cobra XRS 9740 would have been a fairly mid-range entry offering the sort of features that would have been desirable at the time. Over a decade ago, having an alphanumeric display, voice alerts, and a digital compass were all things worth shouting about on the box the thing was sold in. Though looking like some kind of Cardassian warship was apparently just an added bonus.

As the name implies these devices are primarily for detecting radar activity, but by this point they’d also been expanded to pick up infrared lasers and the strobe beacons on emergency vehicles. But false positives were always a problem, so the device allows the user to select which signals it should be on the lookout for. If you were getting some kind of interference that convinced the detector it was being bombarded with IR lasers, you could just turn that function off without having to pull the plug entirely.

But it’s important to remember that this device was built back when people were still unironically carrying around flip phones. Detecting laser and multi-band radars might sound like something pulled from the spec sheet of a stealth fighter jet, but this is still a piece of consumer electronics from more than a decade in the past. So let’s crack it open and take a look at what goes on inside a radar detector that’s only a few years away from being old enough to get its own driver’s license.

Continue reading “Teardown: Cobra XRS 9740 Radar Detector”

Cheap Stereo Microscope Helps With SMD

Soldering is best done under magnification. Parts become ever smaller and eyes get weaker, so even if you don’t need magnification now, you will. [Makzumi] didn’t want to shell out $400 or more for a good microscope so he hacked one from some cheap binoculars from the toy section on Amazon.

A lot of magnifiers aren’t really good for soldering because the distance between the work and the lens isn’t very large. The hacked ‘scope has about 4 inches of working distance, which is plenty of room to stick some solder and a hot iron under there. The resulting magnification is about 12 or 15X and he claims that the cell phone pictures he’s included aren’t as good as really looking through the eyepieces yourself.

Continue reading “Cheap Stereo Microscope Helps With SMD”

A Stylish Low Part Count Non-Contact Thermometer

A non-contact thermometer is a pretty common tool these days, and one that most of us probably have kicking around the lab. You can grab them online for as little as $10 USD, and while they’re nowhere near as capable as a thermal camera, they certainly have their uses. But even with their increased availability, there are at least two safe assumptions we can make about owners of said gadgets: they didn’t make it themselves, and they are probably pretty ambivalent about its aesthetics.

Which makes this project by [Ijon Tichy] particularly interesting. Not only is this a non-contact infrared thermometer that’s extremely easy to build should you be so inclined, but it’s actually quite attractive. In fact, if it wasn’t for the video of it in operation after the break, we would have assumed it was some kind of faux-retro cosplay prop. Even if you don’t have any use for an IR thermometer, you might just want to add one of these to your toolbox on principle.

The main components of the thermometer are a MLX90614 sensor, a gorgeous HP QDSP-6040 bubble display, and a ATtiny2313 microcontroller to tie it all together. The rest are passive components, with the exception of the TP4056 charging module that got tacked on to handle the 200 mAh lithium-ion battery. All of the components are arranged neatly in a line down the length of the thermometer, which is assembled on a piece of perfboard. Rather than go with a 3D printed enclosure that would cover it all up, [Ijon] decided to encapsulate everything in a clear epoxy resin. It looks fantastic, though you’re going to want to triple check all those solder joints before pouring on your “enclosure”.

[Ijon] has provided the diagrams and source code you need to build your own version of this artisanal thermometer, but we think with a custom PCB and perhaps a less liquid enclosure that still shows off the goods, this could be a very popular gadget for the discerning hacker. As we’ve seen, even the most basic of tools can benefit from a stylish makeover.

Continue reading “A Stylish Low Part Count Non-Contact Thermometer”

Stuck Designing Two-Layer PCBs? Give Four Layers A Try!

Many readers are certainly familiar with the process for home-etching of PCBs: it’s considered very straightforward, if a little involved, today. This was not the case in my youth, when I first acquired an interest in electronics. At that time, etching even single-sided boards was for “advanced” hobbyists. By the time I started etching my own PCBs, the advanced hobbyists were on to double-sided home-etched boards — the only type not pictured above, because I couldn’t find the one successful example I ever created. I later saw the rise of “bare bones” fabricated PCBs: professionally made fixed size boards with plated-through holes, but no soldermask or silkscreen. Eventually, this gave way to the aggregating PCB services we have now with full two-layer boards, complete with soldermask and silkscreen.

Today, the “advanced” hobbyist may be using four-layer boards, although the four-layer adoption rate is still relatively low – OSH Park produces around 90% two-layer and 10% four-layer, for instance. I think this will inevitably increase, as has been the case with all the previous technologies: the advanced eventually becomes the mainstream. Each of the previous shifts has brought easier design and construction as well as improved performance, and the same will be true as four layers becomes more commonplace.

So, let’s take a look at designing four-layer PCBs. If you’ve never considered one for any of your designs, you may be pleasantly surprised at what little extra cost is involved for all the benefits you gain. Continue reading “Stuck Designing Two-Layer PCBs? Give Four Layers A Try!”