Toothbrush Timer

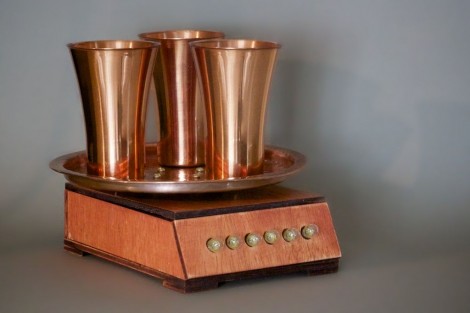
This toothbrush holder will make sure you’re brushing your pearly whites for an appropriate length of time. The three cups serves as tootbrush storage, and detect when one has been removed. Once you start brushing your teeth the lights on the front and bell in the back count down the process automatically.

The counting sequence starts when a weight sensor in the base detects a change caused by picking up a toothbrush. The ATmega328 — which is programmed with Arduino-style code — then turns on all of the incandescent lamps mounted on the front portion of the base. Each of these are switched with a 2N3904 transistor in order to sink enough current for the bulb. As a two-minute timer decrements, the bulbs are extinguished one by one. But there is also an auditory feedback mechanism. On the back of the base is a small bell. A hammer on a servo strikes the bell every 30 seconds to let you know how you’re doing. The entire thing is driven by an internal Li-ion battery which lasts about three weeks between charges. Don’t miss the demo video found after the break.
Continue reading “Toothbrush Timer”

Donation Meter Raises Alarm When Not Plugged With Coins

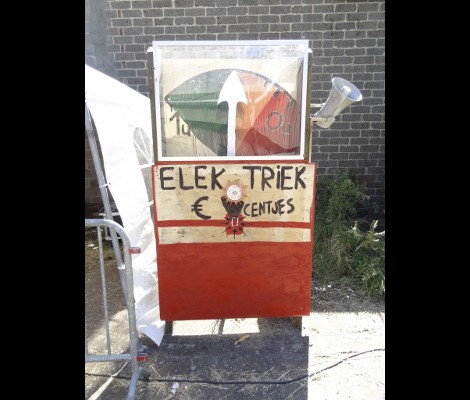
This is something of a mandatory donation meter. If you don’t feed it with coins it sounds a very loud alarm continuously.

[Piet De Vaere] built the device for a free festival in Ghent, Belgium. The intent is to help raise awareness that although free of an admission price, the success of the event depends on donations. It works much like a parking meter. When you feed it coins time is added to the meter. When it runs all the way down that large loudspeaker on the right side of the case sounds the alarm.

In the video after the break [Piet] walks us through a demonstration, followed by a tour of the hardware. The pointer on the meter is a piece of cardboard connected to a servo. An Arduino board controls the servo, adding time in two-minute intervals whenever a coin enters the chute and passes by an optical sensor. There is no distinction between types of coins.

The use of a pizza box as a prototyping board shows that you don’t have to be fancy to build something neat.

Continue reading “Donation Meter Raises Alarm When Not Plugged With Coins”

Watering System For Your Vegetable Garden

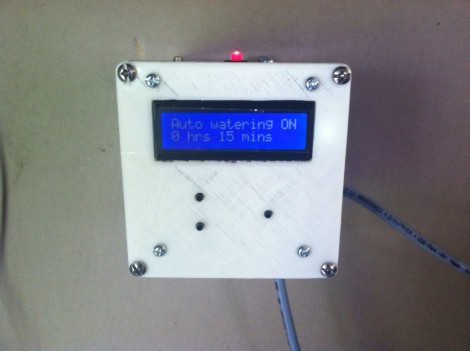
The vegetables will be alive when [Dillon Nichols] returns from vacation thanks to this automatic watering controller that he built. This is the second iteration of the project, and deals mainly with replacing the electronics and UI of the controller itself. He detailed the hardware used for watering in a previous post. He plumbed in a solenoid valve with a hose threading on the output end for the soaker hoses snaking through the garden beds. This is a normally open valve but we’d suggest using a normally closed valve as a power outage will let the hose run continuously.

[Dillon] prototyped the design on an Arduino board, then moved to a standalone ATmega328 chip on some protoboard for the final design. He used a 3D printer to make the custom face plate which allows access to the three control buttons and provides a place for the character LCD to be mounted. In addition to the timer settings there is a manual watering switch as well. He used a typical mains light switch, wiring it with a pull-down resistor to make it work well with the Arduino. His explanation of the timer system can be seen after the break.

Continue reading “Watering System For Your Vegetable Garden”

Birth Of An Arduino

Hey look, an Arduino without its clothes on. This one’s just started its journey to becoming the ubiquitous prototyping tool. The image is from [Bunnie’s] recent tour of the fab house where Arduino boards are made.

As it says on every true Arduino board, they’re made in Italy. [Bunnie’s] trip to the factory happened in Scarmagno, on the outskirts of Torino. The process starts with large sheets of FR4 copper clad material, usually about 1 by 1.5 meters in size. The first task is to send the sheets through a CNC drill. With all of the holes done it’s time for some etch resist; the image above is just after the resist has been applied. A robotic system takes over from here, running the panels through the chemicals which first etch away the copper, then remove the resist and plate the remaining traces. From there it’s off to another machine for solder mask and silk screen.

There are videos of each step available. But our favorite piece is the image at the end that shows a pallet with stacks of completed PCB panels which are headed off to be populated with components.

[via Reddit]

LEGO ROV Without A Tether

[Brane] built an underwater ROV from LEGO mindstorm parts. Look closely at this image and you should notice something missing. The tether that normally carries power and control lines from an ROV to the surface is missing. This is a wireless solution that lets him control the device using an Xbox controller.

The video after the break shows about five minutes of test drive footage. [Brane] has a big aquarium in which he can test the thing. Since he put it together as his senior engineering project at University it’s likely that this is a testing facility at the school. Here’s the little we know about the hardware: It’s using NXT Mindstorm parts to control the motors, with a sealed chamber for a battery. Connectivity is provided by an XBee module with an NXT adapter board called the NXTBee. A laptop with its own XBee module makes up the other end of communications. Right now [Brane] uses an Xbox controller connected to the laptop, but a standalone device would be easy to build by hacking the XBee and controller together directly.

Continue reading “LEGO ROV Without A Tether”

Building A Giant Game Of Life Spinner

We see a lot of projects related to Conway’s Game of Life, but this one is Hasbro’s Game of Life. The board game company recently commissioned a giant game spinner as part of a museum exhibit. Here’s the build log that shows how it was pulled off.

The first thing to note is that [Jzzsxm] does this for a living. His company was hired to build several exhibits related to board games for a children’s museum in Springfield, MA. But don’t let that stop you from offering to help at your own local museum. We know some hackers love doing that kind of work.

The scale of the project is what makes the build really interesting. It starts with a design which can be cut out with a CNC router. First the spinner frame and numbers are cut out of MDF to verify the code. From there the design is cut in two pieces out of HI-MACS, a durable solid-surface material. Pegs for spinning the dial are milled from more HI-MACS stock. The clicker mechanism uses a steel rod as a pivot point. On the underside of the table it has opposing springs to hold it in place no matter which way the thing is spun. [Jzzsxm] mentions that it sees a lot of abuse from the young patrons, but seems to be holding up just great!

[via Reddit]

Turning A Keyboard Into A Computer With A Raspberry Pi

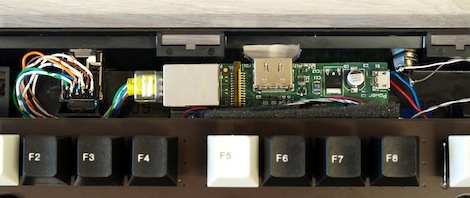
Only 80s kids will get this: remember when computers had built-in keyboards, like the Apple II line, or the Commodore 64? That’s a form factor duplicated by case modders many times over the years, but [preamp]’s project is the first time its been done using a Raspi (German, Google translation).

For his build, [preamp] used what he considers the best keyboard in the world, the Cherry G80-3000. Except for the HDMI port, just about every plug was moved to the back side of the keyboard with the help of an Ethernet jack, a USB hub, and RCA jack. Audio is missing, but for an extremely portable system [preamp]’s RaspCherry Pi is at the top of its class.

We were wondering when someone would shove a Raspi into a keyboard, and we couldn’t be happier that [preamp] chose a Cherry keyboard for his build; they’re wonderful input devices second only to the 8 pound behemeoth used to write this post.