In Defense Of Anthropomorphizing Technology

Last week I was sitting in a waiting room when the news came across my phone that Ingenuity, the helicopter that NASA put on Mars three years ago, would fly no more. The news hit me hard, and I moaned when I saw the headline; my wife, sitting next to me, thought for sure that my utterance meant someone had died. While she wasn’t quite right, she wasn’t wrong either, at least in my mind.

As soon as I got back to my desk I wrote up a short article on the end of Ingenuity‘s tenure as the only off-Earth flying machine — we like to have our readers hear news like this from Hackaday first if at all possible. To my surprise, a fair number of the comments that the article generated seemed to decry the anthropomorphization of technology in general and Ingenuity in particular, with undue harshness directed at what some deemed the overly emotional response by some of the NASA/JPL team members.

Granted, some of the goodbyes in that video are a little cringe, but still, as someone who seems to easily and eagerly form attachments to technology, the disdain for an emotional response to the loss of Ingenuity perplexed me. That got me thinking about what role anthropomorphization might play in our relationship with technology, and see if there’s maybe a reason — or at least a plausible excuse — for my emotional response to the demise of a machine.

Continue reading “In Defense Of Anthropomorphizing Technology”

Schematics, For A Modern Flagship Phone

The mobile phone is an expensive and often surprisingly fragile device, whose manufacturers are notorious for making them as difficult to repair as possible. Glued-together cases and unreplaceable batteries abound, and technical information is non-existent. But amongst all that there’s one manufacturer with a different approach — Fairphone. Case in point, they’ve released the full service guide including schematics for their flagship Fairphone 5.

Fairphone’s selling point is the repairability and internal accessibility of their products and of course they’ve made hay with this as a marketing opportunity. But aside from that, it’s a fascinating chance to look in-depth at a modern smartphone from the inside out. We see the next-level PCB layout and how everything is so neatly packed into the minimum space, all without resorting to a heat gun.

It’s great to have another hackable phone, and fair play to Fairphone for releasing all this stuff, but perhaps the most interesting part from where we’re sitting is how and where this phone is being sold. There have been hackable phones before, for many the Pinephone will spring to mind, but they have always been sold to an audience who buy to hack. Here in Europe where this is being written, the Fairphone is being sold as a consumer device. It won’t shake Apple or Samsung from their perches, but for a hackable device to be so generally available to those who wish to do things with it can never be a bad thing.

We took a quick look at Fairphone back in 2015, when they launched.

Harbor Freight And LEGO PCB Vise Is Cheap And Effective

It doesn’t take much chasing things around the bench with a soldering iron to appreciate the value of good work holding. And don’t get us started on those cheap “helping hands” alligator clip thingies; they’re somehow worse than no work holding. Isn’t there a better way?

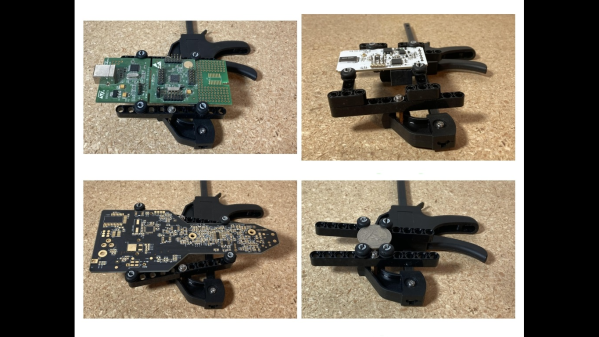
Maybe, judging by [Paul Bryson]’s idea for a dirt cheap PCB vise. It’s a pretty clever design that’ll have you heading to Harbor Freight, or whatever the moral equivalent is in your location, where you’ll pick up a small ratcheting bar clamp. [Paul] used a 4″ (10 cm) clamp; that which looks fine for a wide range of boards, but we suppose you could go bigger if you like. You could also stop there and just clamp your PCBs in the plastic jaws, but [Paul] adorned the jaws with swiveling arms made from LEGO Technic pieces, of all things. Rubber grommets slipped onto Technic pegs go into the holes on the beam to hold the PCB edges firmly, while the swiveling action adapts to odd-shaped boards.

To our mind, the biggest advantage to this design other than cost is how low it holds the PCB — a decided advantage while working under the microscope. Don’t have any Technics parts close to hand? No worries, 3D printed parts could easily stand in, and maybe even improve the design. [Paul] also shows off a substitute for the Technics beam rendered in PCB material, which would reduce the height of the workpiece over the bench even more.

We’ve seen a lot of PCB vises come and go, using everything from scrap wood to 3D printed compliant mechanisms. But we doubt you’ll find anything more cost-effective than [Paul]’s design.

Recreating The Quadrophonic Sound Of The 70s

For plenty of media center PCs, home theaters, and people with a simple TV and a decent audio system, the standard speaker setup now is 5.1 surround sound. Left and right speakers in the front and back, with a center speaker and a subwoofer. But the 5.1 setup wasn’t always the standard (and still isn’t the only standard); after stereo was adopted mid-century, audio engineers wanted more than just two channels and briefly attempted a four-channel system called quadrophonic sound. There’s still some media from the 70s that can be found that is built for this system, such as [Alan]’s collection of 8-track tapes. These tapes are getting along in years, so he built a quadrophonic 8-track replica to keep the experience alive.

The first thing needed for a replica system like this is digital quadrophonic audio files themselves. Since the format died in the late 70s, there’s not a lot available in modern times so [Alan] has a dedicated 8-track player connected to a four-channel audio-to-USB device to digitize his own collection of quadrophonic 8-track tapes. This process is destructive for the decades-old tapes so it is very much necessary.

With the audio files captured, he now needs something to play them back with. A Raspberry Pi is put to the task, but it needs a special sound card in order to play back the four channels simultaneously. To preserve the feel of an antique 8-track player he’s cannibalized parts from three broken players to keep the cassette loading mechanism and track indicator display along with four VU meters for each of the channels. A QR code reader inside the device reads a QR code on the replica 8-track cassettes when they are inserted which prompts the Pi to play the correct audio file, and a series of buttons along with a screen on the front can be used to fast forward, rewind and pause. A solenoid inside the device preserves the “clunk” sound typical of real 8-track players.

As a replica, this player goes to great lengths to preserve the essence of not only the 8-track era, but the brief quadrophonic frenzy of the early and mid 70s. There’s not a lot of activity around quadrophonic sound anymore, but 8-tracks are popular targets for builds and restorations, and a few that go beyond audio including this project that uses one for computer memory instead.

Continue reading “Recreating The Quadrophonic Sound Of The 70s”

Evidence For Graphite As A Room Temperature Superconductor

Magnetization M(H) hysteresis loops measured for the HOPG sample, before and after 800 K annealing to remove ferromagnetic influences. (Credit: Kopelevich et al., 2023)

Little has to be said about why superconducting materials are so tantalizing, or what the benefits of an ambient pressure, room temperature material with superconducting properties would be. The main problem here is not so much the ‘room temperature’ part, as metallic hydrogen is already capable of this feat, if at pressures far too high for reasonable use. Now a recent research article in Advanced Quantum Technologies by Yakov Kopelevich and colleagues provides evidence that superconducting properties can be found in cleaved highly oriented pyrolytic graphite (HOPG). The fact that this feat was reported as having been measured at ambient pressure and room temperature makes this quite noteworthy.

What is claimed is that the difference from plain HOPG is the presence of parallel linear defects that result from the cleaving process, a defect line in which the authors speculate that the strain gradient fluctuations result in the formation of superconducting islands, linked by the Josephson effect into Josephson junctions. In the article, resistance and magnetization measurements on the sample are described, which provide results that provide evidence for the presence of these junctions that would link superconducting islands on the cleaved HOPG sample together.

As with any such claim, it is of course essential that it is independently reproduced, which we are likely to see the results of before long. An interesting part of the claim made is that this type of superconductivity in linear defects of stacked materials could apply more universally, beyond just graphite. Assuming this research data is reproduced successfully, the next step would likely be to find ways to turn this effect into practical applications over the coming years and decades.

Beating Bitlocker In 43 Seconds

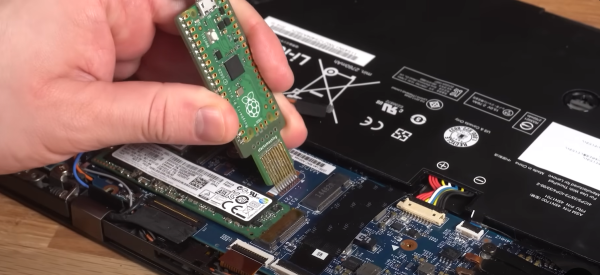
How long does it take to steal your Bitlocker keys? Try 43 seconds, using less than $10 in hardware. Encrypting your hard drive is good security. If you’re running Windows, the most popular system is BitLocker, which has come with Windows since Vista. We’ve known for some time that Bitlocker could be defeated with direct access to the hardware. Microsoft claims that the process requires an attacker with skill and lengthy access to the hardware. [Stacksmashing] wanted to define lengthy, so he gave it a try. The result is a shockingly fast attack.

Anyone who uses Windows has probably run into Bitlocker. Your hard drive is encrypted, and Bitlocker runs silently in the background, decrypting data on demand.  The problem is key storage. In a simplified sense, encryption keys are stored in the Trusted Platform Module (TPM). When your computer boots, it reads the key from the TPM over the LPC (low pin count) bus, which is one of the last remnants of the original ISA bus.

Continue reading “Beating Bitlocker In 43 Seconds”

IoT Air Purifier Makes A Great Case Study In Reverse Engineering

Here at Hackaday, about the only thing we like more than writing up tales of reverse engineering heroics is writing up tales of reverse engineering heroics that succeed in jailbreaking expensive widgets from their needless IoT dependency. It’s got a real “stick it to the man” vibe that’s hard to resist.

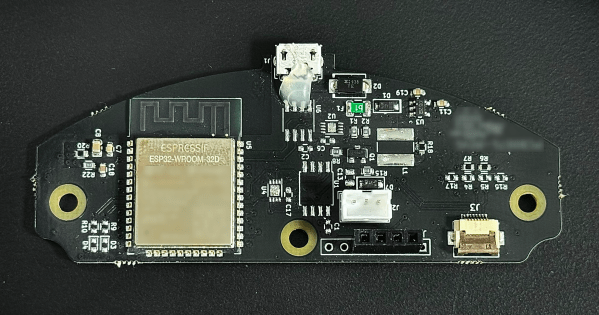
The thing is, we rarely see a reverse engineering write-up as thorough as the one [James Warner] did while integrating an IoT air purifier into Home Assistant, so we just had to make sure we called this one out. Buckle up; it’s a long, detailed post that really gets down into the weeds, but not unnecessarily so. [James] doesn’t cloud-shame the appliance manufacturer, so we can’t be sure who built this, but it’s someone who thought it’d be a swell idea to make the thing completely dependent on their servers for remote control via smartphone. The reverse engineering effort started with a quick look at the phone app, but when that didn’t pay off in any useful way, [James] started snooping on what the device was talking about using Wireshark.

One thing led to another, wires were soldered to the serial pins on the ESP32 on the purifier’s main board, and with the help of a FlipperZero as a UART bridge, the firmware was soon in hand. This gave [James] clues about the filesystem, which led to a whole Ghidra side quest into learning how to flash the firmware. [James] then dug into the meat of the problem: figuring out the packet structure used to talk to the server, and getting the private key used to encrypt the packets. This allowed a classic man-in-the-middle attack to figure out the contents of each packet and eventually, an MQTT bridge to let Home Assistant control the purifier.

If it sounds like we glossed over a lot, we know — this article is like a master class on reverse engineering. [James] pulled a lot of tools out of his kit for this, and the write-up is clear and concise. You may not have the same mystery fan to work with, but this would be a great place to start reverse engineering just about anything.

Thanks to [ThoriumBR] for the tip.