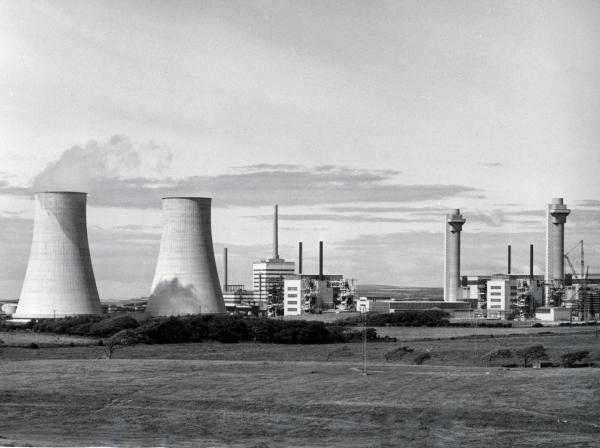
2024 Home Sweet Home Automation: The Winners Are In

Home automation is huge right now in consumer electronics, but despite the wide availability of products on the market, hackers and makers are still spinning up their own solutions. It could be because their situations are unique enough that commercial offerings wouldn’t cut it, or perhaps they know how cheaply many automation tasks can be implemented with today’s microcontrollers. Still others go the DIY route because they’re worried about the privacy implications of pushing such a system into the cloud.

Seeing how many of you were out there brewing bespoke automation setups gave us the idea for this year’s Home Sweet Home Automation contest, which just wrapped up last week. We received more than 80 entries for this one, and the competition was fierce. Judging these contests is always exceptionally difficult, as nearly every entry is a standout accomplishment in its own way.

But the judges forged ahead valiantly, and we now have the top three projects which will be receiving $150 in store credit from the folks at DigiKey.

Continue reading “2024 Home Sweet Home Automation: The Winners Are In”

Make 3D Scenes With A Holodeck-Like Voice Interface

The voice interface for the holodeck in Star Trek had users create objects by saying things like “create a table” and “now make it a metal table” and so forth, all with immediate feedback. This kind of interface may have been pure fantasy at the time of airing, but with the advent of AI and LLMs (large language models) this kind of natural language interface is coming together almost by itself.

A fun demonstration of that is [Dominic Pajak]’s demo project called VoxelAstra. This is a WebXR demo that works both in the Meta Quest 3 VR headset (just go to the demo page in the headset’s web browser) as well as on desktop.

The catch is that since the program uses OpenAI APIs on the back end, one must provide a working OpenAI API key. Otherwise, the demo won’t be able to do anything. Providing one’s API key to someone’s web page isn’t terribly good security practice, but there’s also the option of running the demo locally.

Either way, once the demo is up and running the user simply tells the system what to create. Just keep it simple. It’s a fun and educational demo more than anything and will try to do its work with primitive shapes like spheres, cubes, and cylinders. “Build a snowman” is suggested as a good starting point.

Intrigued by what you see and getting ideas of your own? WebXR can be a great way to give those ideas some life and looking at how someone else did something similar is a fine way to begin. Check out another of [Dominic]’s WebXR projects: a simulated BBC Micro, in VR.

A Smart Power Distribution Unit For Home Automation

Power distribution units, as the name implies, are indispensable tools to have available in a server rack. They can handle a huge amount of power for demands of intensive computing and do it in a way that the wiring is managed fairly well. Plenty of off-the-shelf solutions have remote control or automation capabilities as well, but finding none that fit [fmarzocca]’s needs or price range, he ended up building his own essentially from scratch that powers his home automation system.

Because it is the power supply for a home automation system, each of the twelve outlets in this unit needed to be individually controllable. For that, three four-channel relay boards were used, each driven by an output on an ESP32. The ESP32 is running the Tasmota firmware to keep from having to reinvent the wheel, while MQTT was chosen as a protocol for controlling these outlets to allow for easy integration with the existing Node-RED-based home automation system. Not only is control built in to each channel, but the system can monitor the power consumption of each outlet individually as well. The entire system is housed in a custom-built sheet metal enclosure and painted to blend in well with any server rack.

Adding a system like this to a home automation system can simplify a lot of the design, and the scalable nature means that a system like this could easily be made much smaller or much larger without much additional effort. If you’d prefer to keep your hands away from mains voltage, though, we’ve seen similar builds based on USB power instead, with this one able to push around 2 kW.

Mining And Refining: Uranium And Plutonium

When I was a kid we used to go to a place we just called “The Book Barn.” It was pretty descriptive, as it was just a barn filled with old books. It smelled pretty much like you’d expect a barn filled with old books to smell, and it was a fantastic place to browse — all of the charm of an old library with none of the organization. On one visit I found a stack of old magazines, including a couple of Popular Mechanics from the late 1940s. The cover art always looked like pulp science fiction, with a pipe-smoking father coming home from work to his suburban home in a flying car.

But the issue that caught my eye had a cover showing a couple of rugged men in a Jeep, bouncing around the desert with a Geiger counter. “Build your own uranium detector,” the caption implored, suggesting that the next gold rush was underway and that anyone could get in on the action. The world was a much more optimistic place back then, looking forward as it was to a nuclear-powered future with electricity “too cheap to meter.” The fact that sudden death in an expanding ball of radioactive plasma was potentially the other side of that coin never seemed to matter that much; one tends to abstract away realities that are too big to comprehend.

Things are more complicated now, but uranium remains important. Not only is it needed to build new nuclear weapons and maintain the existing stockpile, it’s also an important part of the mix of non-fossil-fuel electricity options we’re going to need going forward. And getting it out of the ground and turned into useful materials, including its radioactive offspring plutonium, is anything but easy.

Continue reading “Mining And Refining: Uranium And Plutonium”

Slicing And Dicing The Bits: CPU Design The Old Fashioned Way

Writing for Hackaday can be somewhat hazardous. Sure, we don’t often have to hide from angry spies or corporate thugs. But we do often write about something and then want to buy it. Expensive? Hard to find? Not needed? Doesn’t really matter. My latest experience with this effect was due to a recent article I wrote about the AM2900 bitslice family of chips. Many vintage computers and video games have them inside, and, as I explained before, they are like a building block you use to build a CPU with the capabilities you need. I had read about these back in the 1970s but never had a chance to work with them.

As I was writing, I wondered if there was anything left for sale with these chips. Turns out you can still get the chips — most of them — pretty readily. But I also found an eBay listing for an AM2900 “learning and evaluation kit.” How many people would want such a thing? Apparently enough that I had to bid a fair bit of coin to take possession of it, but I did. The board looked like it was probably never used. It had the warranty card and all the paperwork. It looked in pristine condition. Powering it up, it seemed to work well.

What Is It?

The board hardly looks at least 40  years old.

The board is a bit larger than a letter-sized sheet of paper. Along the top, there are three banks of four LEDs. The bottom edge has three banks of switches. One bank has three switches, and the other two each have four switches. Two more switches control the board’s operation, and two momentary pushbutton switches.

The heart of the device, though, is the AM2901, a 4-bit “slice.” It isn’t quite a CPU but more just the ALU for a CPU. There’s also an AM2909, which controls the microcode memory. In addition, there’s a small amount of memory spread out over several chips.

A real computer would probably have many slices that work together. It would also have a lot more microprogram memory and then more memory to store the actual program. Microcode is a very simple program that knows how to execute instructions for the CPU. Continue reading “Slicing And Dicing The Bits: CPU Design The Old Fashioned Way”

The Hunt For MH370 Goes On With Barnacles As A Lead

On March 8, 2014, Malaysia Airlines Flight 370 vanished. The crash site was never found, nor was the plane. It remains one of the most perplexing aviation mysteries in history. In the years since the crash, investigators have looked into everything from ocean currents to obscure radio phenomena to try and locate the plane. All have thus far failed to find the wreckage.

It was on July 2015 when a flaperon from the aircraft washed up on Réunion Island. It was the first piece of wreckage found, and it was hoped it could provide clues to the airliner’s final resting place. While it’s yet to reveal a final answer as to the aircraft’s fate, some of the ocean life living on it could help investigators need to find the plane. The picture is murky right now, but in an investigation where details are scarce, every little clue helps.

Continue reading “The Hunt For MH370 Goes On With Barnacles As A Lead”

A pair of hands holds a digital camera. "NUCA" is written in the hood above the lens and a black grip is on the right hand side of the device (left side of image). The camera body is off-white 3D printed plastic. The background is a pastel yellow.

AI Camera Only Takes Nudes

One of the cringier aspects of AI as we know it today has been the proliferation of deepfake technology to make nude photos of anyone you want. What if you took away the abstraction and put the faker and subject in the same space? That’s the question the NUCA camera was designed to explore. [via 404 Media]

[Mathias Vef] and [Benedikt Groß] designed the NUCA camera “with the intention of critiquing the current trajectory of AI image generation.” The camera itself is a fairly unassuming device, a 3D-printed digital camera (19.5 × 6 × 1.5 cm) with a 37 mm lens. When the camera shutter button is pressed, a nude image is generated of the subject.

The final image is generated using a mixture of the picture taken of the subject, pose data, and facial landmarks. The photo is run through a classifier which identifies features such as age, gender, body type, etc. and then uses those to generate a text prompt for Stable Diffusion. The original face of the subject is then stitched onto the nude image and aligned with the estimated pose. Many of the sample images on the project’s website show the bias toward certain beauty ideals from AI datasets.

Looking for more ways to use AI with cameras? How about this one that uses GPS to imagine a scene instead. Prefer to keep AI out of your endeavors to invade personal space? How about building your own TSA body scanner?