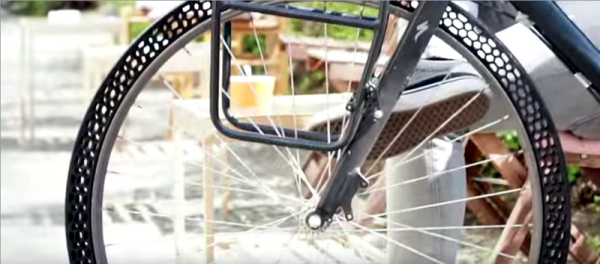
What’s the smallest controller you’ve ever used? [BitBuilt] forum user [Madmorda] picked up a cool little GameCube controller keychain with semi-working buttons at her local GameStop. As makers are wont to do, she figured she could turn it into a working controller and — well — the rest is history.
This miniaturized controller’s original buttons were essentially one piece of plastic and all the buttons would depress at once — same goes for the D-pad. Likewise, the original joystick and C-stick lacked springs and wouldn’t return to a neutral position after fidgeting with them. To get the ball rolling, [Madmorda] picked up a GC+ board — a custom GameCube controller board — just small enough to fit this project, eleven hard tact switches for the various buttons, and two squishy tact switches to replicate the original controller’s L and R button semi-analog, semi-digital functionality.
[Erich] is the middle of building a new competition sumo bot for 2018. He’s trying to make this one as open and low-cost as humanly possible. So far it’s going pretty well, and the quest to make DIY parts has presented fodder for how-to posts along the way.
The pre-fab encoder disks don’t have individual magnets—they’re just a puck of magnetic slurry that gets its polarity on the assembly line. [Erich] reverse-engineered a disk and found the polarity using magnets (natch). Then got to work designing a replacement with cavities to hold six 1mm x 1mm x 1mm neodymium magnets and printed it out. After that, he just had to glue them in place, matching the polarity of the original disk. We love the ingenuity of this project, especially the pair of tweezers he printed to pick and place the magnets.
Rotary encoders are pretty common in robotics applications to detect and measure wheel movement. Don’t quite recall how they work? We’ll help you get those wheels turning.
The greatest enemy of proprietary hardware and components is time. Eventually, that little adapter cable or oddball battery pack isn’t going to be available anymore, and you’re stuck with a device that you can’t use. That’s precisely what happened to [Larry G] when the now antiquated 7.2V NiCd batteries used by his cordless drill became too hard to track down. The drill was still in great shape and worked fine, but he couldn’t power the thing. Rather than toss a working tool, he decided to 3D print his own battery pack.
The 3D modeling on the battery pack is impeccable
He could have just swapped new cells into his old pack, but if you’re going to go through all that trouble, why not improve on things a little? Rather than the NiCd batteries used by the original pack, this new pack is designed around readily available AA NiMH batteries. For the light repairs and craft work he usually gets himself into, he figures these batteries should be fine. Plus he already had them on hand, and as we all know, that’s half the battle when putting a project together.
Interestingly, the original battery pack was wired in such a way that it provided two voltages. In older tools such as this one, this would be used for rudimentary speed control. Depending on which speed setting the drill is on, it would either connect to 4 or 6 cells in the original pack. [Larry] didn’t want to get involved with the extra wiring and never used the dual speeds anyway, so his pack only offers the maximum speed setting. Though he does mention that it may be possible to do PWM speed control in the battery itself via a 555 timer if he feels like revisiting the project.
[Larry] tells us the pack itself was rendered completely from scratch, using only the original battery pack and trial-and-error to get the fit perfect. He reused the side-mounted release buttons to save time, but otherwise everything is 3D printed in PETG for its strength and chemical resistance.
The twenty best projects will receive $100 in Tindie credit, and for the best projects by a Student or Organization, we’ve got two brand-new Prusa i3 MK3 printers. With a printer like that, you’ll be breaking stuff around the house just to have an excuse to make replacement parts.
Today, when we say “Jesus nut”, we’re not referring to the people who spend their days proselytizing down at the mall. The term, likely spawned in the Vietnam war, refers to the main nut holding the rotors on to the mast of a helicopter which is in the shape of the Christian cross. If the “Jesus nut” was to fail, the rotors would detach from the craft, and there would be little for crews to do except to pray.
[Marius] was presented with a failed Jesus nut, though thankfully from an R/C helicopter, meaning there was no loss of life. A friend needed the part replaced for their FQ777 copter, so it was time to bust out the 3D printer and get to work.
The first step was to reconstruct the broken piece so it could be measured and then modeled in CAD software with the help of calipers to determine the original dimensions. What followed will be familiar to many 3D printing enthusiasts — a case of educated trial and error, experimenting with different filaments and print settings until a usable part was produced. [Marius] notes on the part’s Thingiverse page that they achieved the best print with an 0.2mm layer height, and printing two parts at once to allow the layers more time to cool during each pass. It was then a simple matter of tidying up the part with sandpaper and a drill bit before installing it on the vehicle.
[Marius] reports that the part was successful, being both strong enough to withstand the forces involved as well as having a fit that was just right to suit the rotor pin which needs to be able to turn freely within the Jesus nut. While they’re not always the right tool for the job, 3D printed replacement parts can sometimes surprise you. These prints that are used in repair work often don’t attract the same interest as printing cosplay armor, kinetic art, and low-poly Pokemon. But they quickly prove how transformative having a 3D printer, and the skills to use it, are. That’s why we’re running the Repairs You Can Print contest… take a few minutes to show off the really useful repairs you’ve pulled off with your 3D printer!
[Sean Riley] is a violinist who had a problem. He wanted to play one particular piece, but he couldn’t. It wasn’t that he lacked the skill — he a doctoral student at the University of Texas and has two degrees in violin performance from The Julliard School. The problem was that “The Dharma at Big Sur” by [John Adams] is made for an instrument with six strings, while most violins only have four. So he did what any of us would do. He stopped by the local hackerspace and fabricated one. You can hear (and see) [Sean] performing with the instrument in the video, below.
The University of Texas operates “The Foundry” which is a hackerspace with all the usual items: laser cutters, 3D printers, and the like. It is open to all their students and staff. [Sean] needed some help with the engineering, and was lucky to find a mechanical engineering senior, [Daniel Goodwin], working at The Foundry.
If you’ve ever worked on a small PCB, you know how much of a hassle it can be to hold on to the thing. It’s almost as if they weren’t designed to be held in the grubby mitts of a human. As designs have become miniaturized over time, PCBs are often so fragile and festooned with components that tossing them into the alligator clips of the classic soldering “third hand” can damage them. The proper tool for this job is a dedicated PCB vise, which is like a normal bench vise except it doesn’t crank down very hard and usually has plastic pads on the jaws to protect the board.
Only problem with a PCB vise is, like many cool tools and gadgets out there, not everybody owns one. Unless you’re doing regular PCB fabrication, you might not take the plunge and buy one either. So what’s a hacker on a budget to do when they’ve got fiddly little PCBs that need attention?
Luckily for us, we live in a world where you can press a button and have a magical robot on your desktop build things for you. Online model repositories like Thingiverse and YouMagine are full of designs for printable PCB vises, all you have to do is pick one. After looking through a number of them I eventually decided on a model designed by [Delph27] on Thingiverse, which I think has a couple of compelling features and more than deserves the few meters of filament it will take to add to your bench.
Of course the best part of all of this is that you can customize and improve the designs you download, which is what I’m about to do with this PCB vise!
For all that we love 3D printers, sometimes the final print doesn’t turn out as durable as we might want it to be.
Aiming to mimic the properties of natural structures such as wood, bone, and shells, a research team lead by [Jennifer A. Lewis] at Harvard John A. Paulson School of Engineering and Applied Sciences’ Lewis Lab have developed a new combined filament and printing technique which they call rotational 3D printing.
Minuscule fibres are mixed in with the epoxy filament and their controlled orientation within the print can reinforce the overall structure or specific points that will undergo constant stresses. To do so the print head is fitted with a stepper motor, and its precisely programmed spin controls the weaving of the fibres into the print. The team suggests that they would be able to adapt this tech to many different 3D printing methods and materials, as well as use different materials and printed patterns to focus on thermal, electrical, or optical properties.